
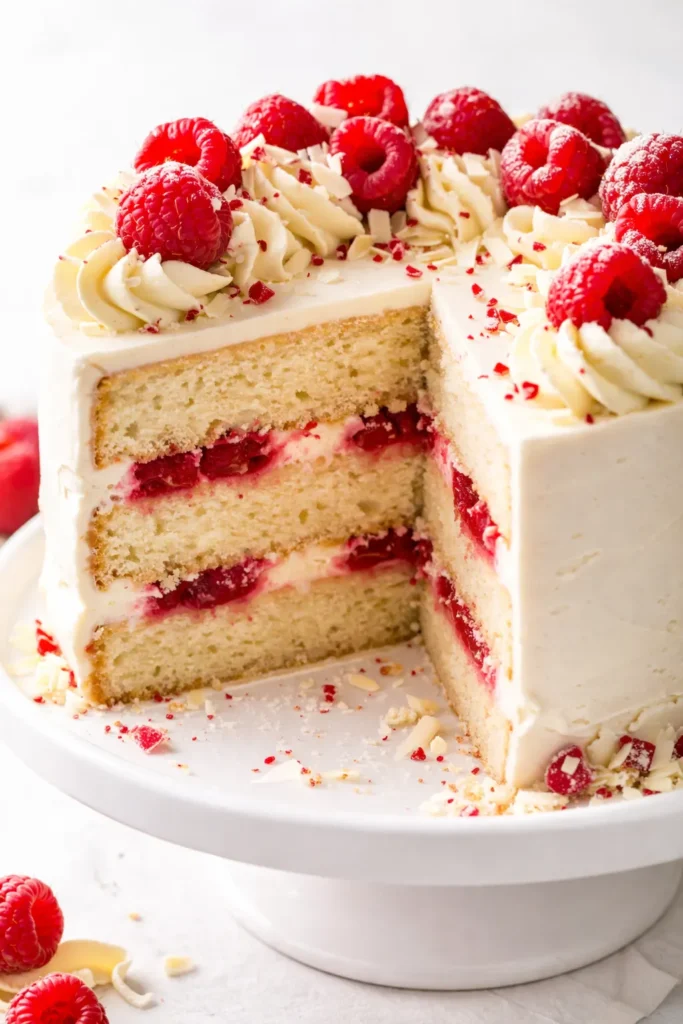
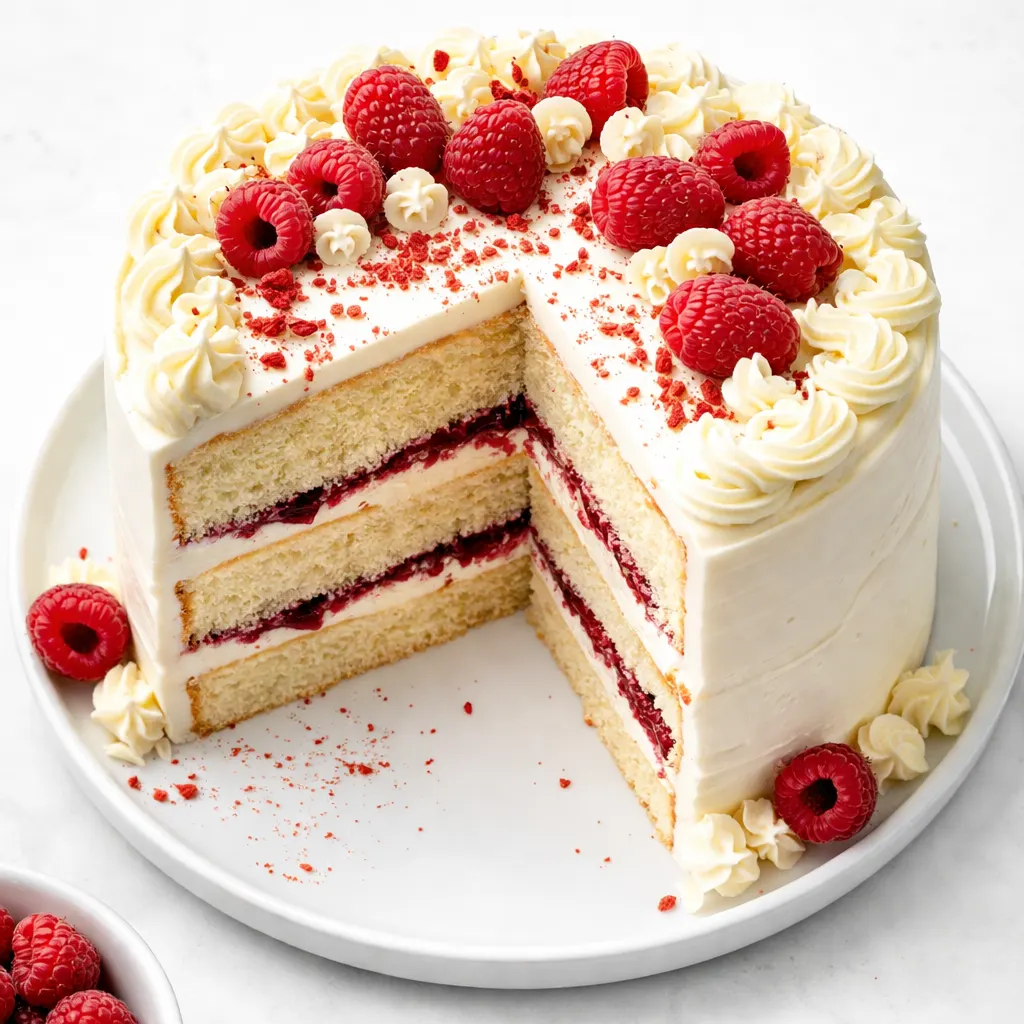
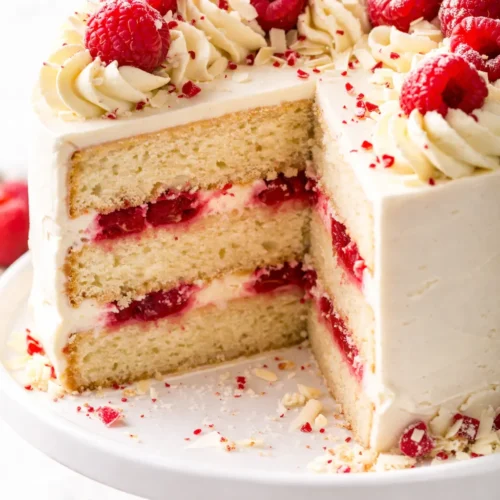
That first cut — when the layers slide apart and you see that deep ruby raspberry ribbon against the creamy white cake — is the exact moment everyone stops talking and reaches for their fork. This is the cake I make for birthdays that matter, for Sundays when I need to be in the kitchen with my hands busy and the house smelling sweet. It looks like you spent all day on it. The secret is that the cake part comes together in one bowl, no mixer required, and the rest is just a little patience.
The short version: A tender, moist white chocolate cake layered with a tart, jammy raspberry filling and finished with a silky white chocolate buttercream that’s actually easy to make.
My daughter Simone told me the first time I made this that it needed more raspberry flavor. I doubled the filling in the next version and added some lemon zest to the buttercream. She ate two slices and declared it “birthday-worthy.” That’s the highest honor in our house.
- Serves: 12–16 as a layer cake
- Hands-On Time: 45 min | Total Time: 3 hrs (includes cooling and chilling time)
- Difficulty: Doable for a confident beginner, impressive for everyone
- Cost per serving: ~$2.50
- Calories: ~480 per serving
- Dietary Notes: Not gluten-free or dairy-free as written, but I have swaps below
(Photo above: A three-layer cake on a simple white ceramic stand, the exterior swirled with fluffy white buttercream. A neat slice has been removed, revealing the three distinct layers: tender white cake, a thick ribbon of deep red raspberry filling, and more creamy frosting. A few fresh raspberries and white chocolate curls are scattered on top, with soft afternoon light coming from a kitchen window.)
The Trick That Makes This Cake Taste Like a Bakery Cake
Most homemade cakes are dry within twelve hours. This one stays moist for three days, and it’s not because of some magic ingredient — it’s because of the order you mix everything. You mix the butter into the dry ingredients first, before any liquid touches it. This coats the flour with fat and keeps the gluten from developing too much. The result is a cake that’s tender and sturdy enough to hold up to the filling and frosting without getting soggy. I learned this trick from an old cookbook my aunt gave me, and it changed every cake I’ve made since.
The raspberry filling is the other non-negotiable. You cook fresh or frozen raspberries down with a little sugar and lemon until they thicken into something that’s bright and concentrated, not syrupy and sweet. That tartness is what cuts through the rich white chocolate buttercream. Without it, the cake is just sweet on sweet. With it, every bite makes sense.
What Goes In — Plus My Honest Notes
- 3 cups cake flour (spooned and leveled): Cake flour gives you that fine, tender crumb that box mixes can’t replicate. If you only have all-purpose, you can substitute 3 cups AP flour minus 6 tablespoons, plus 6 tablespoons cornstarch, sifted together. But honestly, just buy cake flour for this one.
- 2 cups granulated sugar
- 1 cup unsalted butter, softened (that’s 2 sticks): Set it out an hour before you start. Cold butter doesn’t mix properly, and you’ll end up with a dense cake.
- 4 large egg whites, room temperature: The whites keep the cake pure white and fluffy. Save the yolks for custard or scrambled eggs the next morning.
- 1 cup whole buttermilk, room temperature: Buttermilk adds tenderness and a subtle tang that plays well with the white chocolate.
- 6 oz good quality white chocolate, melted and slightly cooled: Use a bar, not chips. Chips have stabilizers that don’t melt smoothly and leave a grainy texture. I learned this the hard way. Ghirardelli or Lindt bars work beautifully.
- 1 tablespoon vanilla extract
- 2 teaspoons baking powder
- ½ teaspoon salt
For the Raspberry Filling:
- 12 oz fresh or frozen raspberries (about 3 cups): I actually prefer frozen here. They break down faster and you don’t have to feel bad about cooking perfectly good fresh berries.
- ½ cup granulated sugar
- 2 tablespoons fresh lemon juice
- 1 ½ tablespoons cornstarch mixed with 2 tablespoons water (slurry)
For the White Chocolate Buttercream:
- 1 ½ cups (3 sticks) unsalted butter, softened
- 8 oz good quality white chocolate, melted and cooled
- 3 cups powdered sugar, sifted
- 3 tablespoons heavy cream
- 1 teaspoon vanilla extract
- Pinch of salt
The Setup (It’s Minimal, I Promise)
- Three 8-inch round cake pans (or two 9-inch rounds for a simpler version)
- Parchment paper rounds (trace the bottom of your pan and cut — it’s the secret to clean layers)
- Stand mixer or hand mixer for the buttercream
- A medium saucepan for the raspberry filling
- Offset spatula for frosting (totally worth the $8 investment)
- Cooling racks
Making the Dream Cake (Step by Step)
Read through the whole thing once before you start. The steps go fast, and there’s some waiting time for cooling that you’ll want to plan around.
Preheat the oven to 350°F. Position the racks in the center. Grease your cake pans, line the bottoms with parchment paper, and grease the parchment too.
- Make the raspberry filling first: Combine the raspberries, sugar, and lemon juice in a saucepan over medium heat. Stir gently until the berries break down and the mixture comes to a simmer. Let it cook for about 5 minutes, then stir in the cornstarch slurry. Cook for another 2-3 minutes until it thickens. You’ll know it’s ready when it coats the back of a spoon and leaves a clean trail when you run your finger through it. Pour it into a bowl and let it cool completely. It will thicken more as it cools.
- Mix the dry ingredients: In a large bowl, whisk together the cake flour, sugar, baking powder, and salt. (📸 Photo tip: You’ll see the flour mixture looks pale and uniform — this is your base.)
- Work in the butter: Add the softened butter to the dry ingredients. Use a hand mixer or a stand mixer on low speed until the mixture looks like wet sand, with no big chunks of butter. This takes about 2 minutes.
- Add the wet ingredients: In a separate bowl or liquid measuring cup, whisk together the buttermilk, egg whites, melted white chocolate, and vanilla. Pour about half of this into the dry mixture and mix on medium speed for 1 minute. Scrape the bowl, add the rest, and mix for another 30 seconds until smooth. Don’t overmix — stop as soon as the streaks disappear.
- Bake the layers: Divide the batter evenly among the prepared pans. Bake for 25-30 minutes, rotating the pans halfway through. The cakes are done when they’re golden around the edges and a toothpick inserted in the center comes out with a few moist crumbs (not wet batter). (📸 Photo tip: The tops should spring back when lightly pressed.)
- Cool completely: Let the cakes cool in the pans for 10 minutes, then turn them out onto cooling racks. Peel off the parchment paper and let them cool completely. This is non-negotiable. I know it’s tempting to frost them warm. Don’t. The frosting will slide right off and you’ll be frustrated. I’ve been there.
- Make the buttercream: While the cakes are cooling, beat the softened butter in a stand mixer with the paddle attachment on medium-high for 5 minutes until it’s pale, light, and fluffy. Reduce the speed to low and gradually add the sifted powdered sugar. Once it’s incorporated, add the melted and cooled white chocolate, heavy cream, vanilla, and salt. Beat on medium-high for another 3-4 minutes until it’s silky and spreadable. If it looks curdled at any point, keep beating — it will come together.
- Assemble the cake: Place one cake layer on your serving plate. Spread a thin layer of buttercream on top. Pipe a ring of buttercream around the edge of the layer to create a dam. Fill the center with about ⅓ of the raspberry filling, spreading it evenly. Top with the second layer. Repeat for the third layer. (📸 Photo tip: The dam keeps the raspberry filling from leaking out the sides — this is the step that makes your cake look professional.)
- Crumb coat and chill: Spread a thin layer of buttercream over the entire cake to trap the crumbs. Don’t worry about making it pretty. Refrigerate for 30 minutes until the coating is firm.
- Final coat: Use the rest of the buttercream to frost the cake. Use your offset spatula to create swirls or a smooth finish, whichever you prefer. Top with fresh raspberries and white chocolate curls if you’re feeling fancy.
How I Make This Ahead for a Crowd
This cake is perfect for busy weekends because almost every component can be made in advance. I often bake the cake layers and make the raspberry filling on a Thursday evening, then assemble on Friday morning before a party.
- Fridge: The cake keeps well in the fridge for up to 3 days. Let it sit at room temperature for 20 minutes before serving for the best texture.
- Freezer: You can freeze the unfrosted cake layers for up to a month. Wrap them tightly in plastic wrap and then foil. Thaw at room temperature before assembling.
- Reheat: Not applicable here — serve at room temperature.
Things I Wish I’d Known the First Time
- Melt the white chocolate gently: White chocolate is fussy. Melt it in a double boiler or in the microwave in 20-second intervals, stirring each time. If it seizes up, you’ve overheated it. Start over with a fresh batch — it’s cheaper than ruining a whole batch of buttercream.
- Room temperature ingredients matter: Cold butter, cold eggs, cold buttermilk — they won’t mix properly and your cake will be dense. Set everything out an hour before you start.
- The crumb coat isn’t optional: That thin layer of frosting you spread on before chilling? It traps all the loose crumbs so your final coat is clean and beautiful. Skip it and you’ll have little brown specks all through your white frosting. Still delicious, just not as pretty.
- Use a hot knife for clean slices: Run your knife under hot water, wipe it dry, and then cut. Clean the knife between slices. It makes a huge difference, especially with a tall, layered cake.
Make It Yours: Easy Variations
- Gluten-Free: Substitute the cake flour with a high-quality 1:1 gluten-free baking flour. I’ve had good results with King Arthur’s and Bob’s Red Mill. Add 1 teaspoon of xanthan gum if your blend doesn’t include it.
- Lemon Raspberry: Add the zest of one lemon to the cake batter and another lemon’s worth of zest to the buttercream. The lemon brightens everything beautifully.
- Kid-Friendly: If your kids aren’t into tart raspberry filling, skip it between the layers and just use buttercream. Swirl some of the raspberry filling into the top layer of frosting for a marbled effect.
- Strawberry Version: Use the same method with frozen strawberries instead of raspberries. You’ll need to cook them a few minutes longer because strawberries have more water content.
Questions I Get About This Cake All the Time
Q: Why did my cake layers dome in the center?
A: Your oven was running too hot, or you overmixed the batter. Use an oven thermometer to check the temperature, and mix just until the flour disappears. If they still dome, you can level them with a serrated knife after they cool.
Q: Can I use milk chocolate instead of white chocolate?
A: You can, but you’ll lose the classic “dream cake” look. Milk chocolate will give you a tan-colored cake and a darker buttercream. If you do swap, use a high-quality milk chocolate bar and reduce the sugar in the cake by a ¼ cup since milk chocolate is sweeter than white.
Q: How long does this cake last? Can I freeze the whole thing?
A: It keeps in the fridge for up to 3 days. Let it sit out for 20 minutes before serving. You can freeze the fully assembled and frosted cake for up to 2 months. Thaw it overnight in the fridge, then bring to room temperature before serving.
Q: What do you serve with this cake?
A: Honestly, it’s rich enough to stand on its own. But if you want to stretch it, a scoop of vanilla bean ice cream or a dollop of lightly sweetened whipped cream is lovely. My family loves it with fresh berries on the side and a cup of strong coffee.
More Recipes My Family Makes on Repeat
If you liked this one, here are a few others that get the same reaction at our table:
- [INTERNAL LINK PLACEHOLDER: My Grandmother’s Red Velvet Cake] — The one Celestine made for every family gathering. Tender, deeply chocolatey, with a silky cream cheese frosting.
- [INTERNAL LINK PLACEHOLDER: The Lemon Blueberry Pound Cake] — A simpler option that’s perfect for brunch. Soaks up the morning coffee beautifully.
- [INTERNAL LINK PLACEHOLDER: Chocolate Sour Cream Bundt Cake] — The cake my daughter Simone asks for on her actual birthday. Rich, fudgy, and practically foolproof.
This cake takes a little time, but none of it is hard. It’s just one careful step after another — that’s how you build something that looks like a dream. Whether it’s for a birthday, a holiday, or a Sunday afternoon when you just want the house to smell like vanilla and raspberries, this one delivers every single time.
If you try it, drop a comment below or tag me on Pinterest — I love seeing your slices!
📌 White Chocolate Raspberry Dream Cake recipe that tastes like a specialty bakery cake — save this for your next birthday party or special occasion.
White Chocolate Raspberry Dream Cake
Equipment
- Three 8-inch round cake pans
- Parchment paper rounds
- Stand mixer or hand mixer
- Medium saucepan
- Offset spatula
- Cooling racks
- Mixing Bowls
Ingredients
Cake
- 3 cups cake flour (spooned and leveled)
- 2 cups granulated sugar
- 1 cup unsalted butter, softened (2 sticks)
- 4 large egg whites, room temperature
- 1 cup whole buttermilk, room temperature
- 6 oz good quality white chocolate, melted and slightly cooled
- 1 tablespoon vanilla extract
- 2 teaspoons baking powder
- ½ teaspoon salt
Raspberry Filling
- 12 oz fresh or frozen raspberries (about 3 cups)
- ½ cup granulated sugar
- 2 tablespoons fresh lemon juice
- 1 ½ tablespoons cornstarch mixed with 2 tablespoons water (slurry)
White Chocolate Buttercream
- 1 ½ cups unsalted butter, softened (3 sticks)
- 8 oz good quality white chocolate, melted and cooled
- 3 cups powdered sugar, sifted
- 3 tablespoons heavy cream
- 1 teaspoon vanilla extract
- 1 pinch salt
Instructions
- Preheat the oven to 350°F. Position the racks in the center. Grease your cake pans, line the bottoms with parchment paper, and grease the parchment too.
- Make the raspberry filling first: Combine the raspberries, sugar, and lemon juice in a saucepan over medium heat. Stir gently until the berries break down and the mixture comes to a simmer. Let it cook for about 5 minutes, then stir in the cornstarch slurry. Cook for another 2-3 minutes until it thickens. It should coat the back of a spoon. Pour into a bowl and let cool completely.
- Mix the dry ingredients: In a large bowl, whisk together the cake flour, sugar, baking powder, and salt.
- Work in the butter: Add the softened butter to the dry ingredients. Use a hand mixer or stand mixer on low speed until the mixture looks like wet sand, about 2 minutes.
- Add the wet ingredients: In a separate bowl, whisk together the buttermilk, egg whites, melted white chocolate, and vanilla. Pour about half into the dry mixture and mix on medium speed for 1 minute. Scrape the bowl, add the rest, and mix for another 30 seconds until smooth. Do not overmix.
- Bake the layers: Divide the batter evenly among the prepared pans. Bake for 25-30 minutes, rotating halfway. Cakes are done when golden around edges and a toothpick inserted comes out with a few moist crumbs.
- Cool completely: Let cakes cool in pans for 10 minutes, then turn out onto cooling racks. Peel off parchment and cool completely before frosting.
- Make the buttercream: Beat softened butter on medium-high for 5 minutes until pale and fluffy. Gradually add sifted powdered sugar. Add melted white chocolate, heavy cream, vanilla, and salt. Beat for 3-4 minutes until silky and spreadable.
- Assemble the cake: Place one cake layer on serving plate. Spread thin buttercream layer. Pipe a ring of buttercream around the edge to create a dam. Fill center with about ⅓ of the raspberry filling. Repeat for remaining layers.
- Crumb coat and chill: Spread a thin layer of buttercream over the entire cake to trap crumbs. Refrigerate for 30 minutes until firm. Then apply final coat of buttercream and decorate with fresh raspberries and white chocolate curls if desired.