
TLDR: Italian zucchini scarpaccia is a savory summer flatbread that uses shredded zucchini, a simple batter of flour and cornmeal, and loads of olive oil. The secret to its crispy edges and tender center is salting and weighting the zucchini for 2 hours to remove excess moisture. Expect a golden, fragrant slice that works as an appetizer, side dish, or light vegetarian main.
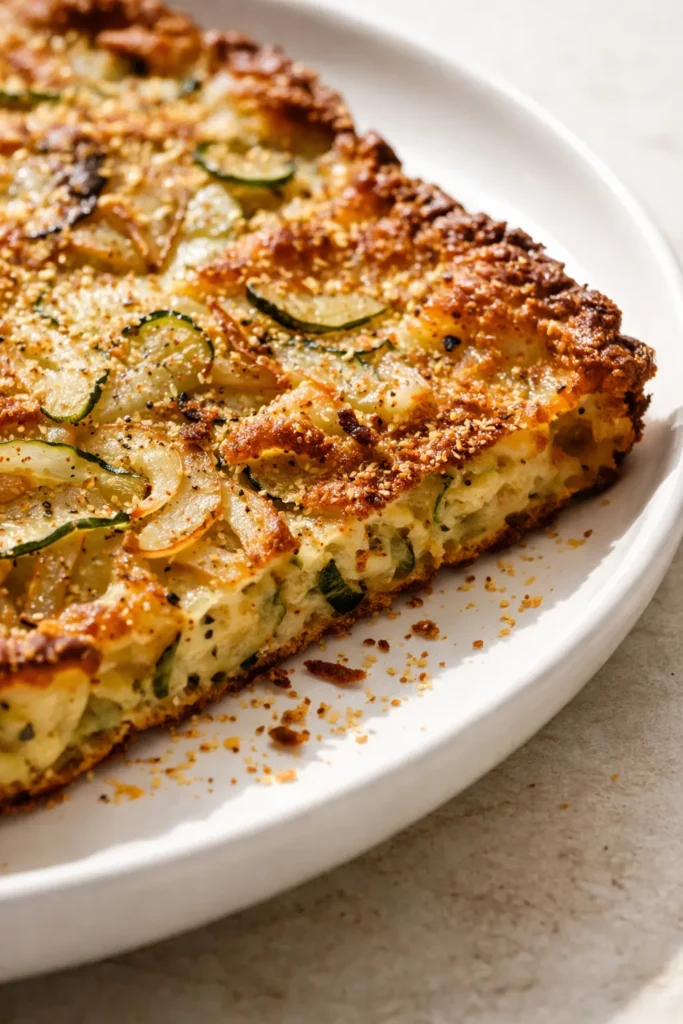
The first time I made this, I pulled it out of the oven and stood there staring at the golden, crispy edges, the fragrant rosemary, the way it looked like a savory summer cake. My husband asked if it was for dinner. I said it was dinner. We ate half of it standing over the counter, cutting squares straight from the pan. It’s that kind of recipe — unfussy, forgiving, and absolutely delicious. And because it only takes about 15 minutes of hands-on work (the rest is just waiting), it’s the kind of thing I make on a lazy Sunday afternoon when I want something that feels special without breaking a sweat.
The first two times I attempted this, the scarpaccia came out soggy on the bottom — I hadn’t let the zucchini drain long enough. The third time, I committed to the full 2-hour weighted rest in a colander, and the difference was night and day: the edges turned shatteringly crisp, the center stayed tender but not wet, and the whole thing lifted cleanly off the parchment. Now I set a timer and walk away. That patience is the only trick worth knowing.
- Serves: 6 as an appetizer or side dish
- Hands-On Time: 15 min | Total Time: 3 hours (includes 2 hours passive draining and 1 hour cooling)
- Difficulty: Easy — the hardest part is waiting for the zucchini to drain
- Cost per serving: ~$1.50
- Nutrition Estimate: 190 Calories, 4g Protein, 28g Carbs, 7g Fat, 1g Saturated Fat, 2g Fiber, 480mg Sodium per serving
- Dietary Notes: Naturally vegetarian / Can be made gluten-free with a 1:1 gluten-free flour blend (texture will be slightly more delicate)
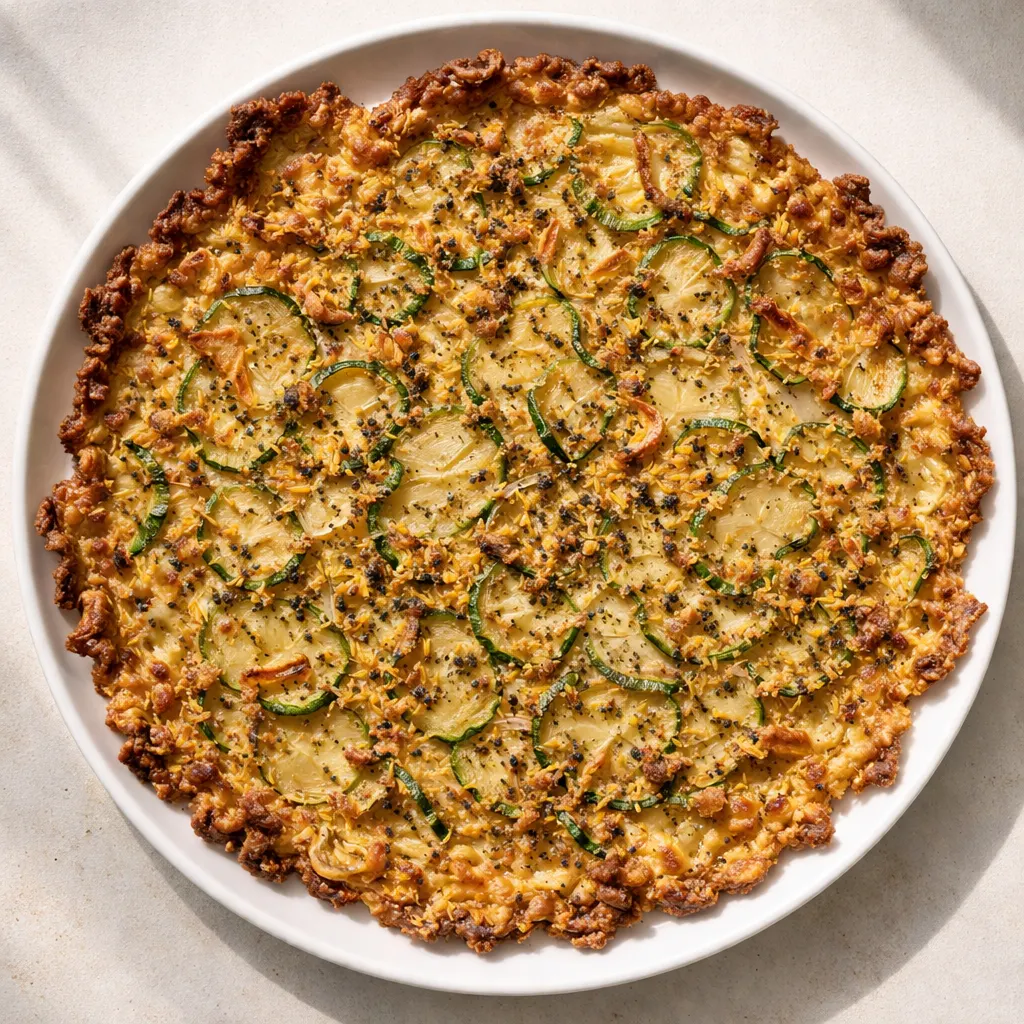
(Photo above: overhead shot of a large rectangular baking sheet lined with parchment, the scarpaccia cut into rough squares, golden brown on top with flecks of dark green zucchini and rosemary. Natural light from a window on the left catches the crispy edges and the slight sheen of olive oil.)
Why Draining Is Essential for Crispy Italian Zucchini Scarpaccia
Zucchini is mostly water — about 95% by weight. If you skip salting and weighting, that water releases during baking and turns the batter into a soggy, steam-cooked mess. I learned this the hard way. The 2-hour weighted rest in a colander pulls out enough liquid that the flour-and-cornmeal batter can fry in the olive oil, creating a crisp crust similar to a frittata’s edge. Without that step, you’ll end up with something closer to zucchini pudding — tasty, but not the shatteringly crisp scarpaccia you’re after. According to USDA nutritional data, one large zucchini contains nearly 400 grams of water, so that weight loss is significant.
Everything You Need (And a Few Notes From Me)
- 1 kg zucchini, sliced very thin: You want them paper-thin so they soften and release water quickly. A mandoline makes this effortless — you’ll be done in 2 minutes.
- 1 piece onion, thinly sliced: Adds a subtle savory sweetness. Use a yellow or sweet onion. Slice it as thin as the zucchini so everything cooks evenly.
- 1 tsp salt: This isn’t just for flavor; it draws out the moisture. Don’t skimp.
- 0.25 tsp ground black pepper: Just a little warmth. You can add more after baking if you like.
- 130 g white flour (you’ll use 120g in the batter): The structure of the batter. I use all-purpose. The extra 10g is for any dusting, though you won’t need it here.
- 40 g yellow cornmeal: This is the secret to that delicate crunch. Don’t substitute with more flour — the cornmeal provides color and texture.
- 50 ml extra virgin olive oil (you’ll use about 1 tbsp in the batter, the rest for the pan and drizzle): Use a good one — it’s the dominant fat in the recipe. The flavor comes through.
- 1 tbsp dried or fresh rosemary, finely chopped: Rosemary pairs beautifully with zucchini. If using dried, rub it between your fingers to release the oils.
- Optional: half a glass of water, if batter is thick: The zucchini juice you’ve drained might need a little help to thin the batter to a liquid cream consistency. Use this only if the batter seems too pasty.
What to Pull Out Before You Start
- Mandoline slicer: For those even, paper-thin slices. A sharp knife works, but it’ll take longer.
- Colander: To drain the zucchini. Place it over a bowl to catch the liquid.
- Bowl: To catch the drained liquid. You’ll use that liquid for the batter — don’t throw it out!
- Plate and weight (e.g., jars of tomato sauce): To press the zucchini down and encourage the liquid to release.
- Whisk: For the batter.
- Large oven sheet (37×47 cm or similar): A half-sheet pan works perfectly.
- Baking paper + parchment paper: One to line the pan, another to press the batter flat. Brush with oil.
- Brush: For spreading oil on the parchment.
- Spoon: For spreading the batter.
- Oven: Preheated to 220°C (425°F) — fan setting if you have it for extra crispiness.
How to Make Italian Zucchini Scarpaccia (Step by Step)
Set up your draining station first — then the process feels like a breeze.
Prep and drain the zucchini: Start this 2 hours before you plan to bake.
- Wash and slice: Wash the zucchini and cut into very thin slices using a mandoline. Put them in a large bowl.
- Add the onion: Slice the onion thinly and add to the bowl with the zucchini.
- Season and massage: Sprinkle with 1 teaspoon salt and a little black pepper. Mix everything well with your hands for 5 minutes, until the squash softens and starts to release water. You’ll feel the texture change — it becomes limp and wet.
- Weight it: Transfer the vegetables to a colander placed in a bowl. Arrange a plate over the zucchinis and add 1-2 kg of weight on top (jars of tomato sauce are perfect). Let sit for 2 hours. Go read a book or walk the dog.
- Save the liquid: After 2 hours, lift the colander. The bowl underneath will have several tablespoons of greenish zucchini juice. Do not discard it — this is the base of your batter.
- Make the batter: To the zucchini juice, add 120g of white flour, 40g of cornmeal, and 1 tablespoon of olive oil. Beat well with a whisk. If the batter looks thick and dense, add about half a glass of water — you want it to resemble a more liquid cream, the consistency of thin pancake batter.
- Combine: Pour this batter over the drained vegetables and mix very well. Every slice should be coated.
- Prepare the pan: Line the large oven sheet with baking paper. Sprinkle a little olive oil on the paper and brush it to coat evenly.
- Spread the mixture: Pour the scarpaccia mixture onto the pan and spread evenly. Press it down thoroughly — you can use a spoon or lay another sheet of parchment over the mixture and press with your palms. Remove the top parchment.
- Final touches: Drizzle a little more olive oil over the top. Sprinkle with chopped rosemary.
- Bake: Place in the preheated oven at 220°C (425°F) for 35-40 minutes, until nicely browned. If your oven has a fan setting, turn it on — it makes the edges even crispier. Look for a deep golden color and edges that pull slightly away from the paper.
- Cool: Let cool in the pan for at least 1 hour. This is essential — the scarpaccia firms up as it cools. Then cut into squares and serve.
How I Meal Prep These for the Week
This scarpaccia keeps beautifully, so I often double the recipe and bake two sheets. I wrap cooled leftovers in parchment and store them in an airtight container. They’re just as good cold from the fridge the next day with a dollop of yogurt or a fried egg on top.
- Fridge: Store in an airtight container for up to 4 days. Place parchment between layers so the squares don’t stick.
- Freezer: Yes! Freeze cooled scarpaccia on a baking sheet, then transfer to a freezer bag for up to 2 months. Reheat directly from frozen.
- Reheat: Toast in a 180°C (350°F) oven for 10-12 minutes to restore crispiness. The microwave makes it soft — avoid it unless you’re okay with a chewier texture.
Testing the Recipe: What I Discovered Across Four Batches
I tested this recipe four times before I felt confident sharing it with you. The first attempt was a waterlogged disaster — I only let the zucchini drain for 45 minutes and skipped the weight entirely. The batter was loose, the bottom never crisped, and we ate it with a spoon, trying to be kind. Batch two was better: I used the weight but only waited an hour. The edges were faintly crisp, but the center still had that damp, steamed texture I was trying to avoid. For batch three, I committed fully: 2 hours with a heavy jar of tomatoes pressing down. The difference was remarkable — the edges were shatteringly crisp, the center tender but not wet, and the whole thing lifted cleanly off the parchment. Batch four was the control: I repeated batch three exactly and got the same result. The 2-hour weighted rest is non-negotiable. I also tested oven temperatures — 220°C (425°F) with the fan on gave the best crust, while 200°C (390°F) produced a softer, more bread-like texture that some might prefer for a less crunchy version.
Troubleshooting: What to Do When Things Go Wrong
Q: Why did my scarpaccia come out wet and limp instead of crispy?
A: Most likely the zucchini wasn’t drained long enough or with enough weight. The 2-hour weighted rest is non-negotiable. Also, check that your oven is fully preheated to 220°C (425°F) and that you’re using the fan setting if available — low heat or a crowded oven leads to steaming instead of baking. Even if it’s a little soggy, cut it into small pieces and pan-fry them in a little oil to rescue the texture. I’ve been there.
Q: Can I use a different type of squash?
A: Yes. Yellow summer squash works perfectly — it has the same water content. Avoid hard winter squashes like butternut; they don’t release enough liquid and won’t soften properly.
Q: How do I know when it’s done?
A: The edges should be deep golden brown and pulling away from the parchment. Insert a knife into the center — it should come out clean, not wet. If the top is browning too fast but the center is still wet, tent loosely with foil for the last 10 minutes of baking.
Q: Can I make this dairy-free or vegan?
A: It’s already dairy-free and vegan as written! The recipe contains no butter, milk, or eggs. Just zucchini, flour, cornmeal, oil, and seasonings. Perfect for anyone avoiding animal products.
Storage and Reheating
Q: How long does it last, and how should I store it?
A: Store cooled scarpaccia in an airtight container in the fridge for up to 4 days. I stack squares with parchment in between so they don’t stick or steam each other.
Q: Can I make it ahead of time / freeze it?
A: Yes. You can assemble the unbaked scarpaccia on the sheet, cover it, and refrigerate for up to 8 hours before baking. For freezing, bake and cool completely, then freeze in a single layer on a sheet pan before transferring to a freezer bag. Reheat straight from frozen at 180°C (350°F) for 12-15 minutes.
Q: What’s the best way to reheat it?
A: Oven or toaster oven is best. Bake at 180°C (350°F) for 8-10 minutes to bring back the crisp. The microwave will soften it, but if you’re in a rush, a 30-second blast followed by a quick toast in a dry skillet works.
Q: What do you serve with this scarpaccia?
A: It’s wonderfully versatile. I love it alongside a simple tomato salad with basil, or with grilled chicken and a squeeze of lemon. It also makes a great base for bruschetta — top a square with fresh tomatoes, basil, and a drizzle of balsamic. My odd but addictive pairing: next to a bowl of creamy white beans with garlic, the contrast of textures is perfect.
Things I Wish I’d Known the First Time
- Don’t skip the weight. I know it seems fussy, but that 2-hour rest with a heavy jar on top is the difference between a crispy, edible scarpaccia and a wet, soggy one. Trust me on this one — I’ve tried shortcuts and they don’t work.
- Slice as evenly as possible. If some zucchini slices are thick and others paper-thin, they’ll release water unevenly. A mandoline makes this foolproof.
- Press the batter firmly. When you spread the mixture onto the pan, press it down with the back of a spoon or your hands (through parchment). Even thickness = even baking. If some spots are thicker, they’ll stay soft while the edges burn.
- Let it cool completely. I know it’s tempting to cut into it right out of the oven, but the scarpaccia needs that hour to set. Slice too soon and it will fall apart. Even if you mess up the cooling time a little — say you wait only 45 minutes — it’ll still taste good. I’ve done that too.
Swaps That Actually Work
- Gluten-free version: Use a 1:1 gluten-free all-purpose flour blend (not just rice flour). The cornmeal already helps; the blend will provide structure. The texture will be slightly more crumbly, so handle gently.
- Spicy twist: Add 1/2 teaspoon red pepper flakes to the batter. It cuts through the richness and pairs well with the rosemary.
- Herb variation: Swap rosemary for fresh thyme or oregano, or use a mix. Basil is too delicate; it blackens in the oven.
- Cheese add-in: Sprinkle 1/2 cup grated Parmesan or pecorino over the top before baking for a salty, crispy crust.
I’ve made this scarpaccia for summer potlucks, lazy Sunday lunches, and even as a snack while watching movies. It never lasts long. That first bite — the crunch, the tender zucchini inside, the faint whisper of rosemary — always brings me right back to a rustic Italian kitchen, even when I’m standing in my own.
If you try it, drop a comment below — I love hearing how it goes for you! Tag me on Pinterest so I can see yours!
📌 Italian zucchini scarpaccia recipe that stays crispy even the next day — save it for your next summer zucchini haul.
Italian Zucchini Scarpaccia That’s Crispy and Golden — With Only 15 Minutes Hands-On
Equipment
- Mandoline slicer
- Colander
- Bowl
- Plate and weight (e.g., jars of tomato sauce)
- Whisk
- Large oven sheet (37×47 cm or similar)
- Baking paper
- Parchment Paper
- Brush
- Spoon
- Oven
Ingredients
- 1 kg zucchini sliced very thin
- 1 piece onion thinly sliced
- 1 tsp salt
- 0.25 tsp ground black pepper
- 130 g white flour
- 40 g yellow cornmeal
- 50 ml extra virgin olive oil
- 1 tbsp dried or fresh rosemary finely chopped
- 0.5 glass water optional, if batter is thick
Instructions
- Wash and slice: Wash the zucchini and cut into very thin slices using a mandoline. Put them in a large bowl.
- Add the onion: Slice the onion thinly and add to the bowl with the zucchini.
- Season and massage: Sprinkle with 1 teaspoon salt and a little black pepper. Mix everything well with your hands for 5 minutes, until the squash softens and starts to release water. You’ll feel the texture change — it becomes limp and wet.
- Weight it: Transfer the vegetables to a colander placed in a bowl. Arrange a plate over the zucchinis and add 1-2 kg of weight on top (jars of tomato sauce are perfect). Let sit for 2 hours. Go read a book or walk the dog.
- Save the liquid: After 2 hours, lift the colander. The bowl underneath will have several tablespoons of greenish zucchini juice. Do not discard it — this is the base of your batter.
- Make the batter: To the zucchini juice, add 120g of white flour, 40g of cornmeal, and 1 tablespoon of olive oil. Beat well with a whisk. If the batter looks thick and dense, add about half a glass of water — you want it to resemble a more liquid cream, the consistency of thin pancake batter.
- Combine: Pour this batter over the drained vegetables and mix very well. Every slice should be coated.
- Prepare the pan: Line the large oven sheet with baking paper. Sprinkle a little olive oil on the paper and brush it to coat evenly.
- Spread the mixture: Pour the scarpaccia mixture onto the pan and spread evenly. Press it down thoroughly — you can use a spoon or lay another sheet of parchment over the mixture and press with your palms. Remove the top parchment.
- Final touches: Drizzle a little more olive oil over the top. Sprinkle with chopped rosemary.
- Bake: Place in the preheated oven at 220°C (425°F) for 35-40 minutes, until nicely browned. If your oven has a fan setting, turn it on — it makes the edges even crispier. Look for a deep golden color and edges that pull slightly away from the paper.
- Cool: Let cool in the pan for at least 1 hour. This is essential — the scarpaccia firms up as it cools. Then cut into squares and serve.
Notes
Related posts:
 Creamy Pasta Salad That Doesn’t Get Soggy on Day Two — Finally
 Low Calorie Banana Bread That Doesn’t Taste Like a Compromise — Finally
 Coconut Flour Banana Bread Muffins That Stay Moist for Days (Not Crumbly)
 Homemade Soft Pretzel Bites: The One-Bowl Recipe That Stays Soft for Days (If They Last That Long)