
I have made this dish at least twenty times, and the number one mistake people make is rushing the onions. You get impatient, you crank the heat, they brown instead of going sweet and soft, and the whole foundation of the dish is off by a few degrees. That is the difference between a skillet that tastes like it cooked all day and one that just tastes rushed. This version? It tastes like patience, even though it only takes twenty minutes from start to plate.
The short version: Smoky, tender chickpeas with perfectly runny eggs in 20 minutes. One skillet. Zero fuss.
I sent a photo of this to my sister the first time I got it right. She called me immediately to ask what spices I used. That is the exact reaction you are going for — the kind where someone thinks you pulled off something complicated when really you just bloomed your paprika in the right fat and let the chickpeas get a little crust before the eggs went in.
- Serves: 4 as a main
- Hands-On Time: 10 min | Total Time: 20 min
- Difficulty: Easy enough for a weekday, impressive enough for guests
- Cost per serving: ~$2.50
- Calories: ~350 per serving
- Dietary Notes: Naturally vegetarian and dairy-free. High protein, adaptable for gluten-free.
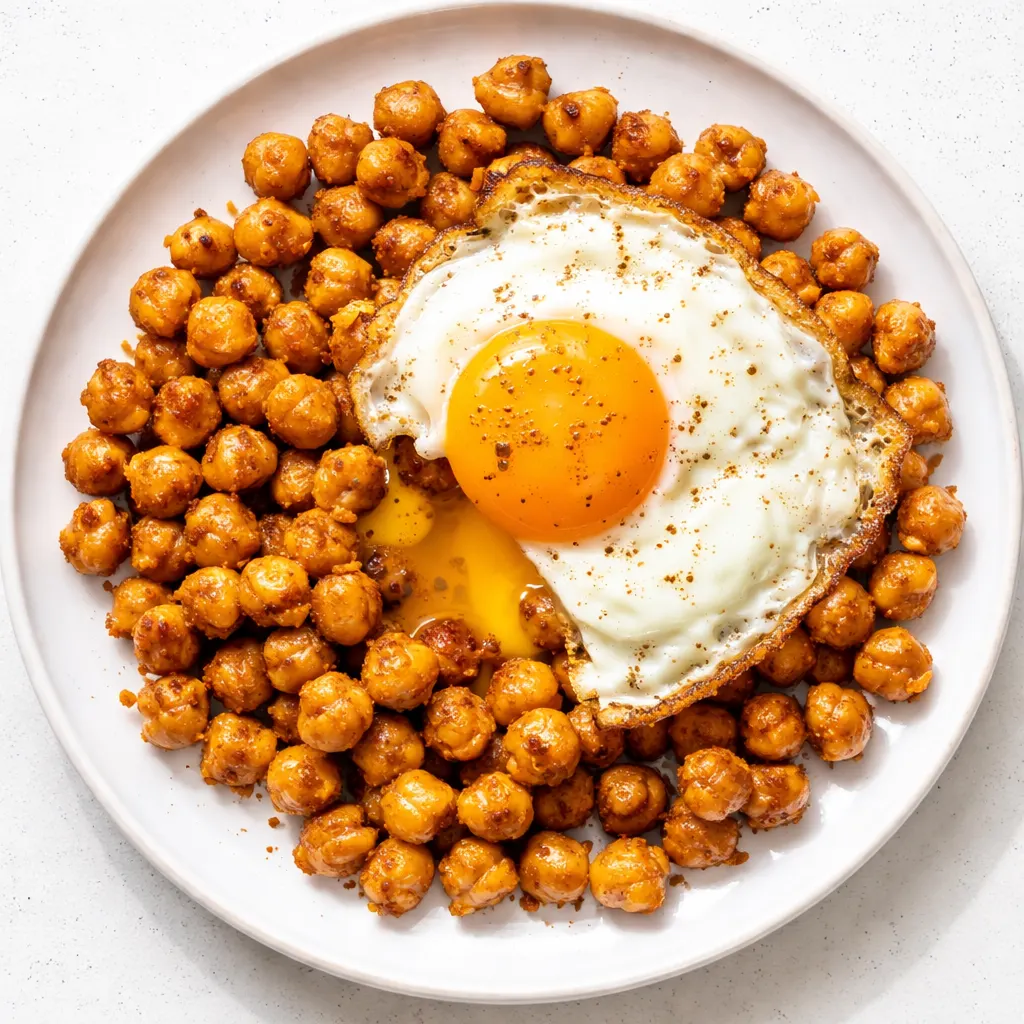
(Photo above: Overhead shot of a dark cast iron skillet filled with spiced chickpeas, four eggs nestled in divots, whites set and yolks glossy and bright orange. A spoon rests on the side, and a slice of toasted sourdough is propped against the pan. Warm golden morning light from the left.)
The Trick That Stops the Eggs from Overcooking Before the Chickpeas Are Ready
The problem with most egg-and-chickpea skillets is timing. You either get rubbery yolks waiting for the chickpeas to warm through, or undercooked whites because you pulled it too early. The fix is a two-step sear: you let the chickpeas get a little crust in the hot pan before you add any liquid. That head start means the base is fully hot and seasoned by the time the eggs go in, so the eggs only need four minutes under a lid to set.
The other trick is moisture control. Canned chickpeas hold a surprising amount of water in their skins. If you skip drying them, they steam instead of sear, and you end up with a watery base that makes the eggs float instead of nestle. Pat them dry. It takes thirty seconds and it changes everything.
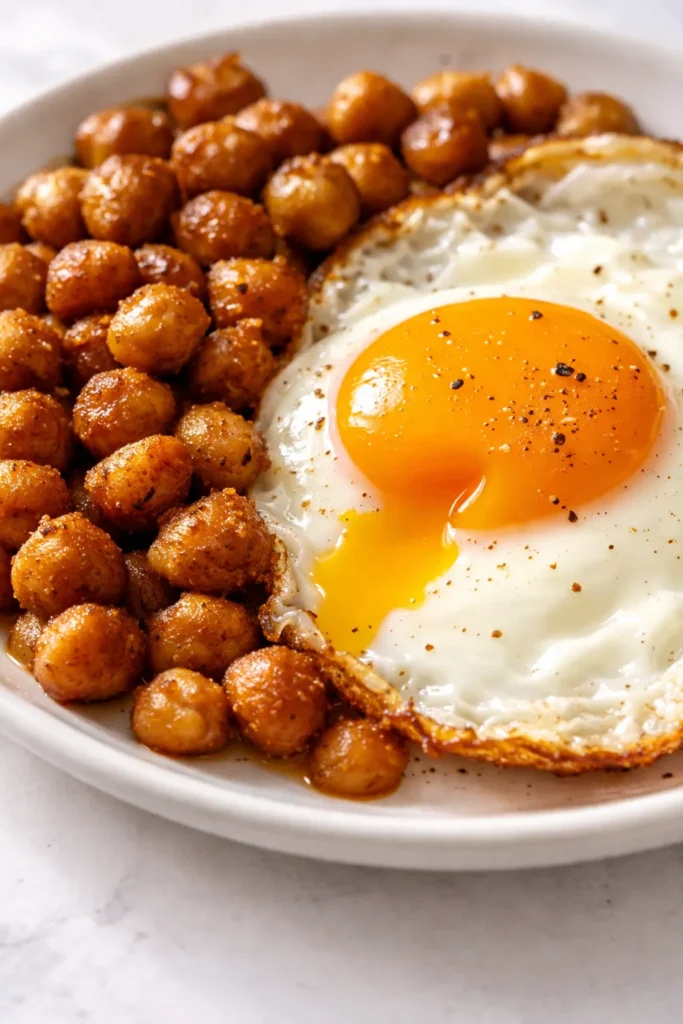
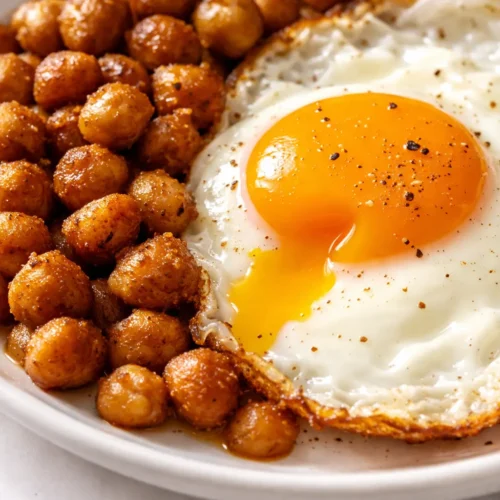
The result is a skillet that looks like you braised the chickpeas for an hour — deeply seasoned, slightly smoky, with edges that have darkened and crisped against the pan — but with yolks that still break and run across the plate.
Everything You Need (Plus a Note on the Spices)
Most of this is pantry stuff. The only thing I will not compromise on is the smoked paprika. Sweet paprika is not a substitute. It brings color but none of the depth. Smoked paprika is what makes the kitchen smell like you have been cooking all morning.
- 2 tablespoons olive oil: Enough to coat the pan and start the aromatics. You want a generous slick, not a drizzle.
- 1 medium yellow onion, finely diced: Simone will not touch this if the onion pieces are too big, so I mince them fine. By the time they cook down, they melt into the base.
- 3 cloves garlic, minced: Goes in after the onion is soft. Garlic burns fast, so do not rush this step.
- 1 ½ teaspoons smoked paprika: This is the backbone. Non-negotiable. The deep, smoky flavor comes entirely from this spice.
- ½ teaspoon ground cumin: Adds an earthy warmth that rounds out the smoke.
- ¼ teaspoon cayenne pepper: Optional, but I add a pinch. It is not enough to make it spicy — it just wakes up the other flavors.
- 1 can (15 oz) chickpeas, drained and rinsed: One standard can. Spread them on a paper towel and roll them around to get the skins as dry as possible.
- ½ teaspoon salt, plus more for finishing: Season the base, then season the eggs separately.
- ¼ teaspoon black pepper
- ½ cup fire-roasted crushed tomatoes: This is the saucy element. You do not need a full can — half a cup is enough to create a little steam for the eggs without turning the dish into soup.
- 4 large eggs: The fresher, the better. A fresh egg holds a taller yolk and spreads less in the pan.
- Fresh parsley or cilantro for finishing: A bright, green finish against the smoky red base.
What to Pull Out Before You Start
- 12-inch cast iron skillet: A heavy-bottomed pan holds heat evenly and gives the chickpeas a good sear. If you do not have cast iron, a stainless steel skillet works too. Just make sure it has a lid.
- Wooden spoon or silicone spatula
- Small bowl for cracking eggs: Crack them into a bowl first so no shell fragments end up in the skillet.
If your skillet does not have a tight-fitting lid, a baking sheet or a piece of foil tented over the top works exactly the same.
Making Chickpea Fried Eggs: My Exact Process
This moves fast once the onions go in, so have your spices measured and your eggs cracked into a bowl before you turn on the heat.
- Sauté the aromatics: Heat the olive oil in your skillet over medium heat. Add the diced onion and a pinch of salt. Cook, stirring occasionally, until the onion is soft and translucent — about 4 minutes. Do not rush this. You want it sweet, not browned. Add the garlic and cook for 30 seconds until fragrant. (📸 Photo tip: Onions turning translucent at the edges, just starting to catch a little color.)
- Bloom the spices: Add the smoked paprika, cumin, and cayenne. Stir constantly for 1 minute until the spices are deeply fragrant and have turned the onions a brick red. (📸 Photo tip: Skillet showing the red-brown paste coating the onions.)
- Sear the chickpeas: Add the drained and thoroughly dried chickpeas. Spread them into a single layer. Let them cook undisturbed for 3 minutes. You want to see them blister and darken on one side before you stir. This is the step that gives them that almost-meaty texture.
- Simmer the base: Add the fire-roasted crushed tomatoes and ¼ cup of water. Stir, scraping up any browned bits from the bottom of the pan. Let it simmer for 2 minutes until it thickens slightly. Taste and adjust for salt.
- Nestle the eggs: Use the back of a spoon to create 4 shallow wells in the chickpea mixture. Crack one egg into each well. Season the tops of the eggs lightly with salt and pepper. (📸 Photo tip: Four golden yolks nestled securely into the red-brown chickpea base, whites just starting to set around the edges.)
- Cover and cook: Reduce the heat to low. Cover the skillet and cook for 4 to 6 minutes. The exact time depends on your stove and how you like your eggs. At 4 minutes, the whites will be set and the yolks will be completely runny. At 6 minutes, the yolks will be jammy. I pull mine at 4 and let the residual heat in the pan finish the job.
- Finish: Remove the lid. Sprinkle with fresh parsley or cilantro, a pinch of flaky salt, and a crack of black pepper. Serve immediately.
How I Make This Work for a Week of Lunches
Honestly, I make a double batch of the chickpea base on Sunday and eat it for three days straight. It gets better as it sits. The trick is to store the base and the eggs separately until you are ready to eat.
- Fridge: Store the chickpea base in an airtight container for up to 4 days. When you are ready to serve, reheat it in a small skillet, make a well, and crack a fresh egg into it. Cover and cook 4 minutes. You get a freshly cooked egg every time.
- Freezer: The chickpea base freezes beautifully for up to 2 months. Thaw overnight in the fridge before reheating.
- Reheat: Skillet is best. Add a splash of water to rehydrate the sauce if it has thickened in the fridge. The microwave works in a pinch but the chickpeas will be softer.
Things I Wish I’d Known the First Time
- Dry chickpeas are better chickpeas. Spread them on a paper towel and roll them around to get the skins bone-dry. If they are even slightly damp, they will steam in the pan instead of sear. You lose that little bit of crust that makes the texture interesting.
- If you want runny yolks, pull the pan early. The carryover heat in a cast iron skillet is significant. If you wait until the yolks look exactly right in the pan, they will be overcooked by the time you sit down. Pull them when the whites are just set and the yolks are still jiggly. Trust the residual heat.
- Don’t skip the lid. Stovetop heat cooks the bottoms of the eggs, but the steam trapped by the lid is what cooks the tops of the whites. Without a lid, you will end up with a layer of raw egg white over the yolks that requires overcooking the whole thing to fix. Even a piece of foil will do the job.
- Crack the eggs into a small bowl first. One bad egg can ruin a whole skillet. Also, it is much easier to slide an egg gently into a well from a bowl than to control the crack directly over the pan.
Swaps That Actually Work
- Vegan-ish: I have tested this with soft tofu crumbled into the base and a vegan egg substitute poached on top. It is not the same, but it is good in its own way.
- Greens: Stir a handful of spinach or chopped kale into the base right before you add the eggs. It wilts into the sauce and adds a little extra green.
- Cheesy: Crumble feta or grate Parmesan over the top right after you pull it from the heat. The saltiness against the smoky chickpeas is excellent.
- Spicy: Slice a jalapeño thin and scatter it over the eggs before you cover the skillet. It steams into the whites just enough to give the whole thing a subtle heat.
- Meaty: Add 4 ounces of crumbled andouille or chorizo with the onions. Drain some of the fat before you add the spices. Marcus asks for this version every time.
Questions I Get About This Recipe All the Time
Q: Why did my yolks turn out hard?
A: It happens to all of us. The most common reason is the heat was too high or the lid was on too long. Stick to low heat and check at 4 minutes. If the whites are not set yet, give it one more minute. I pull mine at 4 and let the residual heat in the cast iron finish the job off the burner.
Q: Can I use dried chickpeas instead of canned?
A: Yes. Cook them completely beforehand — they should be tender but not mushy. One 15-ounce can equals about 1 ½ cups of cooked chickpeas. I usually just use canned for this recipe because it is already fast, but if you have dried on hand, they work just fine.
Q: Can I make this without a lid?
A: Yes. Use a baking sheet or a piece of heavy-duty foil tented tightly over the skillet. It traps enough steam to set the egg whites. Just make sure it is snug.
Q: What do you serve with this?
A: A thick slice of sourdough toast is my favorite — it soaks up the yolk and the pan sauce. My kids love it with warm flour tortillas for scooping. If I am serving it for dinner, I put a bowl of creamy grits or rice on the table and let everyone spoon the chickpeas and egg right over the top.
More Recipes My Family Makes on Repeat
If this skillet is in your rotation, here are a few other recipes that get the same reaction at our table:
- Shakshouka on Toast — Crispy potatoes, black beans, and a fried egg. Same energy, different pantry.
- Cheesy Potato Egg Scramble — Creamy, slow-stirred grits topped with blistered tomatoes and a soft egg.
- Breakfast Crunchwrap Recipe — A weeknight version of the classic. Comes together in the same cast iron pan.
This is the kind of breakfast that makes you slow down, even on a Tuesday. The yolks break over the smoky chickpeas and suddenly the whole morning shifts. If you try it, drop a comment below — I love hearing how it goes for your family.
📌 Save this spiced chickpea fried eggs recipe for your next lazy weekend morning or busy weeknight dinner — it comes together in 20 minutes and tastes like it simmered all day.
Spiced Chickpea Fried Eggs That Taste Like They Simmered for Hours (Ready in 20 Minutes)
Equipment
- 12-inch cast iron skillet
- Wooden spoon or silicone spatula
- Small Bowl
- Lid (or foil/baking sheet)
Ingredients
- 2 tablespoons olive oil
- 1 medium yellow onion, finely diced
- 3 cloves garlic, minced
- 1 ½ teaspoons smoked paprika
- ½ teaspoon ground cumin
- ¼ teaspoon cayenne pepper (optional)
- 1 can (15 oz) chickpeas, drained and rinsed
- ½ teaspoon salt, plus more for finishing
- ¼ teaspoon black pepper
- ½ cup fire-roasted crushed tomatoes
- 4 large eggs
- Fresh parsley or cilantro for finishing
Instructions
- Sauté the aromatics: Heat the olive oil in your skillet over medium heat. Add the diced onion and a pinch of salt. Cook, stirring occasionally, until the onion is soft and translucent — about 4 minutes. Do not rush this. You want it sweet, not browned. Add the garlic and cook for 30 seconds until fragrant.
- Bloom the spices: Add the smoked paprika, cumin, and cayenne. Stir constantly for 1 minute until the spices are deeply fragrant and have turned the onions a brick red.
- Sear the chickpeas: Add the drained and thoroughly dried chickpeas. Spread them into a single layer. Let them cook undisturbed for 3 minutes. You want to see them blister and darken on one side before you stir. This is the step that gives them that almost-meaty texture.
- Simmer the base: Add the fire-roasted crushed tomatoes and ¼ cup of water. Stir, scraping up any browned bits from the bottom of the pan. Let it simmer for 2 minutes until it thickens slightly. Taste and adjust for salt.
- Nestle the eggs: Use the back of a spoon to create 4 shallow wells in the chickpea mixture. Crack one egg into each well. Season the tops of the eggs lightly with salt and pepper.
- Cover and cook: Reduce the heat to low. Cover the skillet and cook for 4 to 6 minutes. The exact time depends on your stove and how you like your eggs. At 4 minutes, the whites will be set and the yolks will be completely runny. At 6 minutes, the yolks will be jammy. I pull mine at 4 and let the residual heat in the pan finish the job.
- Finish: Remove the lid. Sprinkle with fresh parsley or cilantro, a pinch of flaky salt, and a crack of black pepper. Serve immediately.