
I love a good burger. I do not always love the bun. And a lettuce wrap, while perfectly fine, usually leaves me feeling vaguely disappointed about fifteen minutes later — like I ate the idea of a burger but missed the actual thing. This Smash Burger Bowl solves both problems with one very specific technique: you get the shatteringly crisp, browned crust of a classic smash burger, piled over a fresh, crunchy bowl, without the bread getting in the way of the flavor. The first time I made this, my nine-year-old Simone told me it was “better than a real burger,” and I almost dropped the spatula.
The short version: This comes together in 25 minutes flat and hits every single savory note a real burger does — no bun required, no sad lettuce wrap energy.
“Better than a real burger,” Simone said. I have not bought burger buns since. This is the version I make for lunch, for dinner, and once for a very skeptical neighbor who came back for seconds. The crust does the work, the sauce pulls it together, and the whole thing is on the table before you’ve finished scrolling for takeout.
- Serves: 4 as a main
- Hands-On Time: 20 min | Total Time: 25 min
- Difficulty: Easier than shaping burger patties — honestly
- Cost per serving: ~$5.00
- Calories: ~450 per serving
- Dietary Notes: Naturally gluten-free if you use GF Worcestershire; adaptable for Whole30 and dairy-free
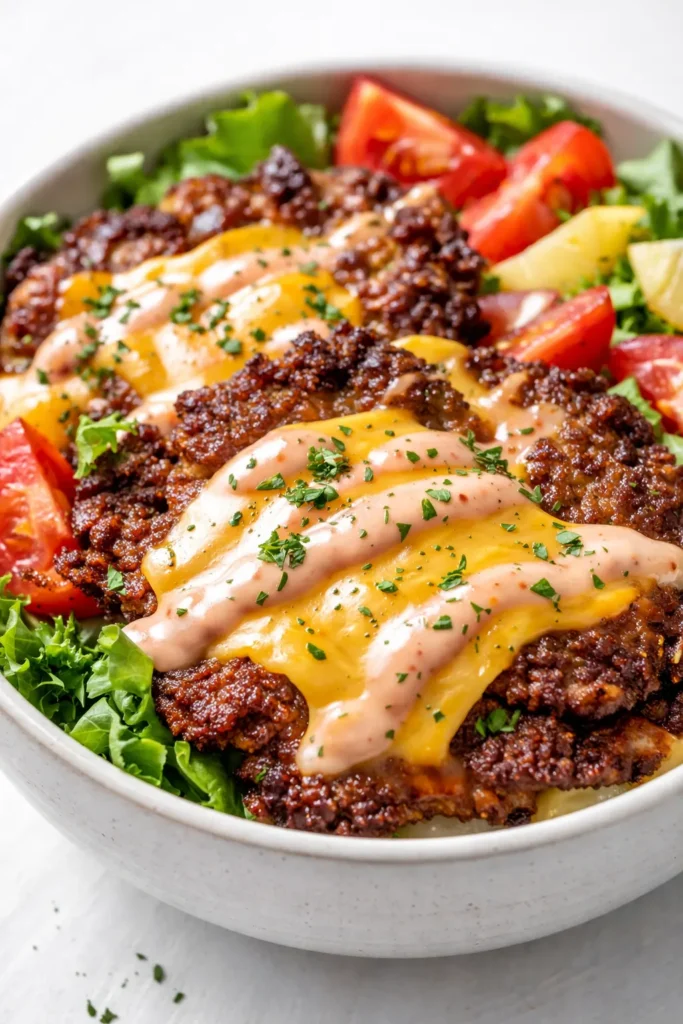
(Photo above: Overhead shot of a perfectly smashed patty in a cast-iron skillet, lacy brown edges curling up around melting cheddar cheese, a bowl of fresh romaine, diced tomatoes, red onion, and pickles in the background, with a small ramekin of creamy burger sauce. Morning light from the left, wooden cutting board underneath.)
The Trick That Changed Everything (It’s the Crust)
The enemy of a good smash burger is a crowded pan and a timid hand. It’s not about the bread at all — it’s about the brown, craggy edges on that smashed patty. Getting the pan screaming hot and not touching the meat for 90 seconds is the difference between a gray, sad disc and a lacy-edged, beefy-crusted masterpiece. That crust is doing the same work a bun usually does — giving you texture, structure, and something to sink your teeth into.
I learned this the hard way after way too many dry, dense patties that tasted like boiled ground beef with ambition. The technique is simple: high heat, paper-thin patties, and the discipline to let them cook undisturbed. The reward is a pile of crispy, beefy edges that actually want to be in a bowl with lettuce and sauce. My husband Marcus, who is not usually one for kitchen hyperbole, called it “the best thing I’ve made in months.” That’s the kind of energy we’re going for.
This smash burger bowl produces a deeply savory, textured meal that satisfies the exact same craving a drive-through burger does — just without the soggy bun and the regret.
Ingredients Worth Talking About
- 1 lb ground beef (80/20 is ideal here): The fat percentage is not a suggestion. 80/20 renders beautifully, creating those crispy, lacy edges that are the whole point of this recipe. If you use leaner beef, you will end up with a dry, sad patty. My grocer looked at me funny when I asked for the 80/20 specifically. I bring my own parchment paper to the counter. It’s fine.
- 1 tbsp kosher salt + 1 tsp black pepper: Season the beef after you smash it, not before. The salt hitting the hot surface creates a better crust. This is non-negotiable.
- 1 tsp garlic powder + 1 tsp onion powder: These are the gentle aromatics that build depth without screaming “seasoning blend.” They bloom in the heat of the pan.
- 4 slices cheddar cheese (or your favorite melting cheese): American, cheddar, provolone — choose something that melts smoothly and doesn’t separate. Pre-shredded cheese melts a little less elegantly, but on a busy Tuesday, it works.
- Burger sauce (makes about ½ cup): ½ cup mayonnaise, 2 tbsp ketchup, 1 tbsp dill pickle relish, 1 tsp Worcestershire sauce, ½ tsp smoked paprika. This is the glue that binds the bowl. My daughter Simone will eat this by the spoonful if I’m not watching.
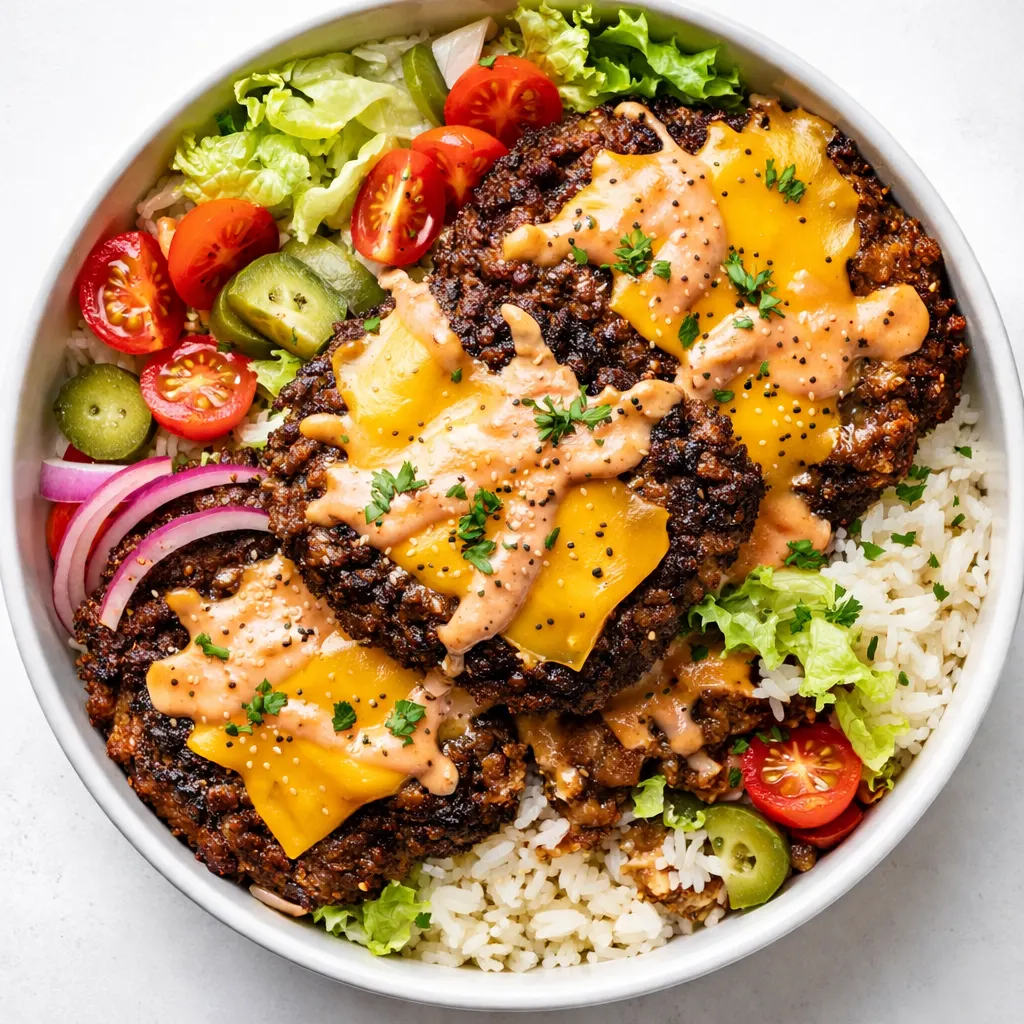
- For the bowl: 4 cups chopped romaine lettuce, 1 cup diced tomatoes, ½ cup thinly sliced red onion, ½ cup dill pickle chips, ½ cup shredded cheddar (or leave it off).
What to Pull Out Before You Start
- A large cast-iron skillet or flat-top griddle — the heavier the better for even heat.
- A sturdy metal spatula (the thin, sharp kind — not a flimsy turner). You need this to scrape under the crust cleanly.
- Parchment paper squares (enough for each patty). Seriously, don’t skip this. It prevents sticking and makes the smash step infinitely easier.
- Two bowls: one for mixing sauce, one for assembling.
If you have a second heavy skillet or a flat-bottomed pan, use it as the smasher. A ceramic mug works in a pinch, but a skillet gives you even pressure.
Let’s Make It (Step by Step)
This goes fast, so read through once before you start. The actual cooking happens in about 3 minutes per batch.
Prep and preheat: The pan needs to be screaming hot. Set it over high heat for a full 5 minutes before you add the beef. While it heats, divide the ground beef into 8 equal balls (about 2 oz each). Mix the sauce ingredients together in a small bowl. Prep your bowl ingredients.
- Smash them thin: Working in batches of 2-3 patties (don’t overcrowd the pan), place a ball of beef on the hot, dry skillet. Top it immediately with a square of parchment paper. Using your second skillet or a heavy spatula, press down firmly to flatten the ball into a very thin patty — about ¼ inch thick. Remove the parchment. (📸 Photo tip: Smashed patty on the skillet, edges already starting to sizzle and brown, parchment paper set aside.)
- Season and sear: Sprinkle the exposed surface generously with salt, pepper, garlic powder, and onion powder. Let the patty cook undisturbed for 1.5 to 2 minutes. Do not move it. Do not peek. You will see the edges turn deep brown and crispy. That’s the crust forming. If your vent hood turns on, that’s correct. The high heat is doing its job. (📸 Photo tip: Close-up of the patty edges turning deep golden brown and lacy, with the surface looking caramelized.)
- Scrape and flip: Slide your thin metal spatula under the patty and scrape firmly to release the crispy edges from the pan. The crust should come up cleanly if the pan was hot enough. Flip the patty onto the other side. The cooked side should be dark brown and craggy.
- Cheese immediately: Lay a slice of cheese (or a generous sprinkle of shredded) onto the flipped patty. Cook for another 30 seconds, until the cheese melts and the second side gets a little color. Remove to a plate and repeat with the remaining beef balls.
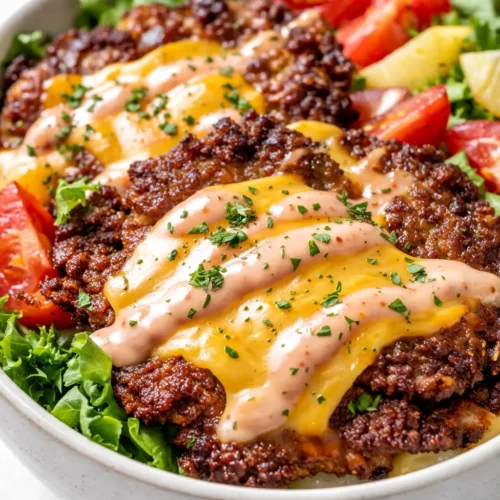
- Build your bowls: Divide the romaine lettuce between four bowls. Top each with 2 crispy-cheesy patties. Add tomatoes, red onion, pickle chips, and any extra shredded cheese. Drizzle generously with the burger sauce. Serve immediately.
How I Prep These for the Week
This recipe is problem-solver for busy weeks. I make a double batch of patties on Sunday and we’re set for lunch or a quick dinner. The key is storing the components separately so nothing gets soggy.
- Fridge: Store cooked patties in an airtight container for up to 4 days. Keep the sauce in a separate jar. Pre-chop your lettuce and veggies and store them in a container lined with a paper towel to absorb moisture. I stack the patties with parchment between them so they don’t stick together.
- Freezer: Yes! Cook the patties, let them cool completely on a baking sheet, then freeze in a single layer. Once frozen, transfer to a freezer bag. They’ll keep for 2 months. Freeze the sauce in an ice cube tray for perfect portions.
- Reheat: The microwave works in a pinch but it will make the crust soft. For crispy edges, reheat in a dry skillet over medium-high heat for 1 minute per side. My husband tried the microwave version once and now he waits for the skillet.
Things I Wish I’d Known the First Time
- Parchment paper is not optional: I know it’s an extra step. Do it anyway. The beef will stick to your smashing tool if you skip it, and you’ll end up tearing the patty. I have a dedicated box of parchment squares in my kitchen drawer just for this recipe.
- Hot pan, cold meat: The beef should be straight from the fridge. Cold meat hits the hot pan and sears immediately, giving you a better crust. If the beef sits out and warms up, it will steam instead of sear. I form the balls while the pan is heating and keep them in the fridge until the last minute.
- Scrape, don’t pry: Use a thin, sharp metal spatula. Slide it firmly under the patty and lift. If you try to pry it up with a thick turner, you’ll tear the crust. I ruined my first batch of these with a flimsy plastic spatula. Don’t be me.
- Sauce is mandatory: This is not a suggestion. The sauce is the glue that makes the bowl feel cohesive. Without it, you have dry beef on lettuce. With it, you have a real meal. Simone calls it “the special sauce” and asks for extra.
Swaps That Actually Work
- Whole30 / Paleo: Omit the cheese and use a Whole30-compliant mayonnaise, ketchup, and relish. Add a splash of coconut aminos to the sauce for extra depth. This is the version I make for my sister-in-law — she says it’s better than the regular one.
- Spicy version: Add 1 tbsp sriracha or your favorite hot sauce to the burger sauce. Top the bowl with pickled jalapeños and a sprinkle of crushed red pepper. My husband adds a second layer of hot sauce at the table, but I think it’s perfect as written.
- Kid-friendly: My kids love this with shredded cheddar and little buttered potatoes on the side. I leave the onions out of their bowls and let them add ketchup directly. Simone asked for this three times last week. I’m not complaining.
- Ground turkey or chicken version: It works, but you need to add a tablespoon of oil to the pan since leaner meats won’t produce the same crust. The flavor will be milder, so season aggressively. I’ve tested this and it’s good — just not the same level of crispy.
Questions I Get About This Recipe All the Time
Q: Why did my patties stick to the pan?
A: Ugh, I’ve been there. The pan wasn’t hot enough, or you tried to flip too soon. The crust needs time to form — 1.5 to 2 minutes undisturbed. If it sticks, let it cook another 30 seconds and try again. Next time, preheat the pan for a full 5 minutes. You’ve got this.
Q: Can I use ground chicken or turkey?
A: You can, but you’re trading the fat that creates the crust. Add a tablespoon of oil to the pan and season the patties more aggressively. They won’t get the same lacy edges, but they’ll still be good. I’ve had readers report back that it works — just don’t expect it to taste exactly like beef.
Q: How long do the cooked patties last and can I freeze them?
A: Cooked patties last 4 days in the fridge in an airtight container with parchment between layers. They freeze beautifully for up to 2 months. Reheat in a dry skillet over medium-high heat for 1 minute per side to bring back the crispiness. The microwave works in a pinch but it will make the crust soft.
Q: What do you serve with this smash burger bowl?
A: I like it as a standalone meal — it’s hearty enough. But if you want sides, try roasted sweet potato wedges, a simple side of steamed broccoli, or a handful of crunchy potato chips. My kids love this with little buttered potatoes on the side.
More Recipes My Family Makes on Repeat
If you liked this one, here are a few others that get the same reaction at our table:
- My Go-To Stovetop Smashburgers — The bun version for when you want the full experience, with the same crispy crust technique.
- Sheet Pan Chicken Fajitas for Families — Another 25-minute meal that comes together on one pan, with zero soggy elements.
- The Only Taco Salad Recipe You’ll Ever Need — The same “bowl > bun” logic, but with taco seasoning and all the fixings.
This Smash Burger Bowl is proof that leaving off the bun doesn’t mean skipping the flavor. The crust does the work, the sauce pulls it all together, and the whole thing is on the table before you’ve finished scrolling for takeout. It’s the kind of meal that makes you wonder why you ever settled for a sad lettuce wrap in the first place.
If you try it, drop a comment below — I love hearing how the crust turned out for you. And if your kids tell you it’s “better than a real burger,” you know you’ve done something right.
📌 Smash Burger Bowl recipe that actually feels like a real meal — save it for healthy weeknight dinners that everyone loves, even the skeptical eaters.
Smash Burger Bowl: The Crispy-Crust Version That Actually Feels Like a Real Meal
Equipment
- Large Cast-Iron Skillet or Flat-Top Griddle
- Sturdy Metal Spatula
- Parchment Paper Squares
- Mixing Bowl
- Second Heavy Skillet or Flat-Bottomed Pan (for smashing)
Ingredients
For the Patties
- 1 lb ground beef (80/20 is ideal)
- 1 tbsp kosher salt
- 1 tsp black pepper
- 1 tsp garlic powder
- 1 tsp onion powder
- 4 slices cheddar cheese (or your favorite melting cheese)
For the Burger Sauce (makes about 1/2 cup)
- 1/2 cup mayonnaise
- 2 tbsp ketchup
- 1 tbsp dill pickle relish
- 1 tsp Worcestershire sauce
- 1/2 tsp smoked paprika
For the Bowl
- 4 cups chopped romaine lettuce
- 1 cup diced tomatoes
- 1/2 cup thinly sliced red onion
- 1/2 cup dill pickle chips
- 1/2 cup shredded cheddar cheese (optional)
Instructions
- Preheat a large cast-iron skillet or flat-top griddle over high heat for a full 5 minutes. While it heats, divide the ground beef into 8 equal balls (about 2 oz each). Mix the sauce ingredients together in a small bowl. Prep your bowl ingredients (romaine, tomatoes, onion, pickles).
- Working in batches of 2-3 patties (do not overcrowd), place a ball of beef on the hot, dry skillet. Top immediately with a square of parchment paper. Using a second heavy skillet or a flat-bottomed pan, press down firmly to flatten the ball into a very thin patty (about 1/4 inch thick). Remove the parchment.
- Sprinkle the exposed surface generously with salt, pepper, garlic powder, and onion powder. Let the patty cook undisturbed for 1.5 to 2 minutes. Do not move it. The edges will turn deep brown and crispy as the crust forms.
- Slide a thin metal spatula under the patty and scrape firmly to release the crispy edges. Flip the patty. Immediately lay a slice of cheese (or a generous sprinkle of shredded) onto the flipped patty. Cook for another 30 seconds, until the cheese melts and the second side gets a little color. Remove to a plate. Repeat with the remaining beef balls.
- Divide the romaine lettuce between four bowls. Top each with 2 crispy-cheesy patties. Add tomatoes, red onion, pickle chips, and any extra shredded cheese. Drizzle generously with the burger sauce. Serve immediately.
Notes
Related posts:
 High Protein Banana Pudding Yogurt That Doesn’t Taste Like a Protein Shake — Finally
 Easy High-Protein Philly Cheesesteak Mac That Beats Takeout Every Time (30 Minutes)
 Crock Pot Mississippi Beef Noodles That Never Turn Out Watery — Finally
 My Go-To Asian-Style Ground Beef Lettuce Wraps: Faster Than Delivery, Crispier Than Restaurant Versions