
That first bite — the crunch that echoes in your ears and doesn’t fade into sad, steamy breading halfway through — is what took me years to nail in the oven. We love fried chicken tenders in this house, but I don’t love the grease hassle or the guilt on a Tuesday night. So I went on a mission to get that same shatteringly crisp coating using just my oven. After more test batches than Marcus cares to remember — he kept asking “can we just go back to fried?” and I kept saying “not yet, it’s not right” — this version finally cracked the code. It stays crunchy even after they’ve sat out for ten minutes, which is exactly how long it takes me to get Simone’s plate sorted and her ketchup situation figured out.
The short version: These baked chicken tenders stay crunchy for ages, need just 25 minutes in the oven, and my eight-year-old asks for them by name every single week without fail.
I’ve made these roughly thirty times since I perfected the method last fall. They’ve been approved by Simone’s picky playdate crew and by my neighbor who “doesn’t trust baked chicken.” She asked for the recipe. That was the moment I knew it was ready to share with you.
- Serves: 4 as a main
- Hands-On Time: 15 min | Total Time: 30 min
- Difficulty: Easy enough for a school night, impressive enough for company
- Cost per serving: ~$2.50
- Calories: ~350 per serving
- Dietary Notes: Can be made gluten-free with a simple swap
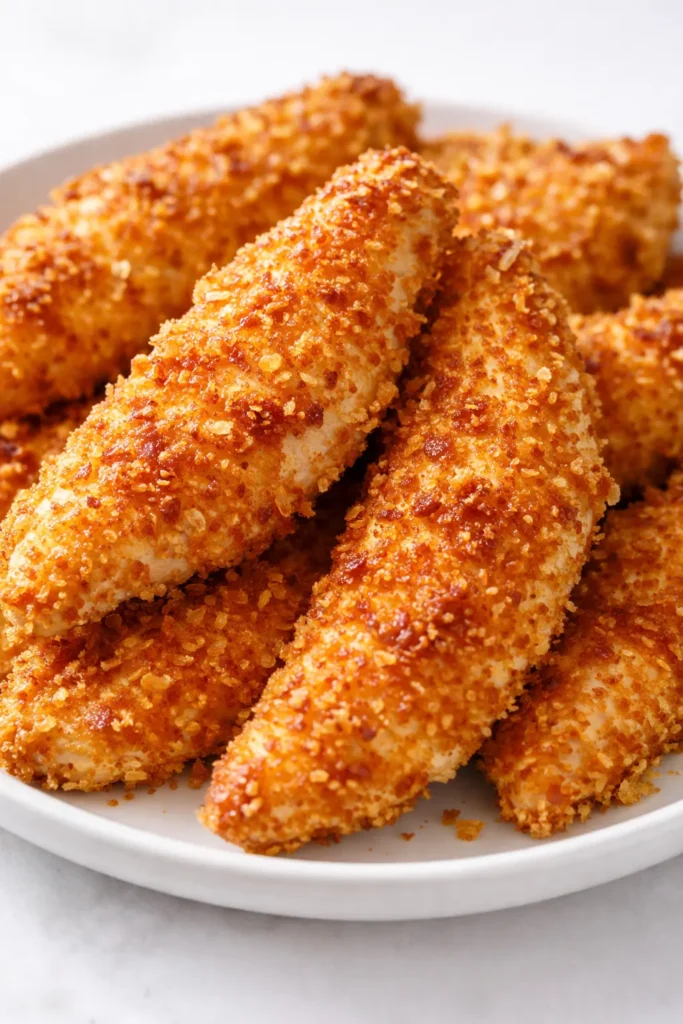
(Photo above: A rustic white platter piled high with golden-brown chicken tenders, a small bowl of honey mustard for dipping, scattered fresh parsley, warm afternoon light streaming in from the left showing the craggy, crispy coating.)
The Trick That Finally Keeps Baked Chicken Crunchy

The secret isn’t a complicated batter or a fancy technique Celestine would have rolled her eyes at. It’s about creating a barrier so the breading stays dry and crispy instead of steaming against the meat. I tried every method in the book — breadcrumbs alone, panko alone, adding oil to the breading. None of them held up until I started using a simple mayo-based binder.
I know it sounds weird. But here’s what happens: the mayo seals the chicken, locks in moisture, and gives the breading something to cling to without making it soggy. The result is a crust that cracks when you bite it — and stays cracked, even after they’ve sat on the counter while you finish the rest of dinner.
The other game-changer? Baking them on a wire rack set inside the sheet pan. That little bit of airflow underneath makes sure the bottom gets just as crispy as the top. No flipping required. No soggy bottoms. Just perfect crunch all the way around.
What You’ll Need (With My Honest Notes)
- 1.5 lbs chicken breast tenders (or boneless thighs): Tenders save time, but if you only have breasts, slice them into even strips — about 1-inch thick so they cook through at the same rate. Simone calls these “dinosaur fingers” and asks for them at least twice a week.
- 1/3 cup mayonnaise (full-fat, not light): This is the glue that holds the crunch. Trust me on this one. I’ve tested it with Greek yogurt and it works in a pinch, but the coating won’t be quite as shatteringly crisp.
- 1 cup panko breadcrumbs: Regular breadcrumbs get dense. Panko stays light and airy, which is exactly what you want here. Toasting them for a few minutes before coating adds even more crunch, but I skip that on busy nights and they’re still great.
- 1/2 cup finely grated Parmesan cheese: Adds saltiness and helps the browning. Don’t skip it. The pre-grated stuff in the can works, but fresh grated melts better and creates a nicer, more golden crust.
- 1 tsp garlic powder, 1 tsp smoked paprika, 1/2 tsp salt, 1/4 tsp black pepper: Simple seasoning that lets the chicken shine. My secret: I add a pinch of cayenne for the adults. Simone doesn’t notice it, but it adds a warmth that makes the whole dish feel more interesting.
- Cooking spray (avocado or olive oil): A light mist over the top before baking helps the panko toast to a deep golden brown. Don’t oversaturate, just a quick spritz — you’re not trying to deep fry them.
The Tools You’ll Actually Need
- Baking sheet (half-sheet size works best)
- Wire rack that fits inside the baking sheet
- Two shallow bowls (for the binder and the breading)
- Tongs or a fork (to keep your hands clean)
That wire rack is doing the heavy lifting here — it’s worth buying if you don’t have one. They’re cheap at any kitchen store and make every “baked crispy” recipe better. A rack with a grid pattern works better than one with wide bars, since the tenders won’t fall through.
Let’s Make These (Start to Finish in 30 Minutes)
This moves fast, so get your station set up before you start. I promise it’s worth the tiny bit of prep.
Preheat and prep your pan: Preheat your oven to 425°F. Place the wire rack inside the baking sheet and give it a light spray with cooking oil so the tenders don’t stick. (📸 Photo tip: See the rack setup in the photo above — it looks simple but it’s the secret weapon. The air needs to circulate underneath to keep the bottom crispy.)
- Set up your dredging station: In one bowl, mix the mayonnaise, garlic powder, smoked paprika, salt, and pepper. In another bowl, combine the panko and grated Parmesan. Stir until evenly mixed.
- Coat the chicken: Pat the chicken tenders dry with a paper towel. This step matters — wet chicken makes the mayo slip off. One at a time, dip each tender into the mayo mixture, coating all sides, then press it into the panko mixture. Really press the breading in — that’s what gives you the thick, crunchy crust. (📸 Photo tip: Your hands will get messy, but it’s worth it. The coating should look thick and shaggy, not thin and smooth.)
- Arrange on the rack: Place the breaded tenders on the wire rack, making sure they don’t touch. Crowding them traps steam and makes them soggy. I use two baking sheets if I’m doubling the recipe — it’s better to bake in batches than to overcrowd.
- Spray and bake: Lightly spray the tops of the tenders with cooking spray. Bake for 12-15 minutes, until the coating is deep golden brown and the chicken reaches 165°F in the thickest part. No need to flip — the wire rack does the work for you.
- Rest and serve: Let them rest on the rack for 2-3 minutes before serving. This sets the crust so it doesn’t fall off when you bite it. I know it’s hard to wait, but those 2 minutes make a difference. Trust me.
How I Prep These for the Week
I’m a big fan of making extra on Sunday so we have easy lunches or quick dinners ready to go. The key is storing them correctly so they stay crunchy.
- Fridge: Store baked and cooled tenders in an airtight container with a paper towel on the bottom. They keep for up to 4 days. The paper towel absorbs any extra moisture so the breading stays crisp longer.
- Freezer: Yes! You can freeze them either uncooked or cooked. For uncooked: freeze them on a baking sheet until solid, then transfer to a freezer bag. Bake from frozen, adding 5-7 minutes. For cooked: freeze as above and reheat in the oven or air fryer.
- Reheat: Air fryer is the MVP here. 350°F for 3-4 minutes and they taste just like fresh. Oven at 375°F on a wire rack for 5-7 minutes is my second choice. Microwave only if you’re in a pinch — it will soften the crunch.
Things I Learned the Hard Way (So You Don’t Have To)
- Don’t skip drying the chicken: I know it’s an extra step, but Celestine used to say “wet chicken is sad chicken” and she was never wrong. Pat those tenders dry first — it takes 10 seconds and changes everything.
- Press the breading in firmly: This isn’t a delicate dip. Really press the panko into the mayo mixture so it forms a thick, shaggy layer. That thick layer is what gets crunchy. You should barely see the chicken through the coating.
- Give them space on the pan: I know it’s tempting to cram as many as possible on the pan, but crowding creates steam. Steam is the enemy of crispy. Use two pans if you need to — it’s worth the extra minute of cleanup.
- Don’t skip the rest time: Those 2 minutes on the rack after baking are crucial. The crust is fragile when it’s piping hot. Let it set and it’ll hold together perfectly when you bite into it.
Make These Your Own (Easy Swaps That Work)
- Gluten-free: Use gluten-free panko (they make great ones now) and skip the Parmesan or use a GF alternative. I tested this for my sister-in-law and it still got the crunch seal of approval from everyone at the table.
- Spicy version: Add 1 tsp cayenne pepper to the mayo mixture and a pinch of chili flakes to the panko. This is the version Marcus requests for game day — we dip it in ranch and pretend we’re being healthy.
- Lighter coating: Swap the mayo for a 2:1 ratio of Greek yogurt and Dijon mustard. The crust will be a little less shatteringly crisp, but still very good and significantly lighter.
- Kid-friendly dippers: Serve with honey mustard, ketchup, or a simple ranch. Simone’s favorite way is to dip them in “special sauce” — which is just ketchup mixed with a tiny bit of mayo and a dash of paprika. She thinks she invented it.
Questions I Get Asked All the Time About These Tenders
Q: “Why did my breading fall off?”
A: This usually happens for one of two reasons: the chicken wasn’t dry enough when you started, or you didn’t press the breading in firmly enough. The mayo needs a dry surface to cling to. Pat the chicken dry with paper towels first. And when you coat it, really press that panko mixture into the mayo — it should feel like it’s sticking, not just resting on top.
Q: “Can I make these dairy-free?”
A: Yes! Skip the Parmesan or use a dairy-free nutritional yeast-based replacement. The texture will be slightly less craggy, but they’ll still be delicious. I’ve used Kite Hill’s dairy-free parmesan-style shreds and they worked beautifully. Just keep an eye on the browning since dairy-free options can burn faster.
Q: “How long do these last? Can I freeze them?”
A: They keep in the fridge for up to 4 days in an airtight container with a paper towel. For freezing, I recommend freezing them uncooked on a baking sheet, then transferring them to a freezer bag. Bake from frozen, adding 5-7 minutes. They’re a lifesaver on busy nights when you forgot to thaw anything.
Q: “What do you serve with these?”
A: In my house, we rotate between three sides: a simple coleslaw (the vinegar kind, not creamy), roasted sweet potato wedges, or a big green salad with avocado and lemon vinaigrette. Simone’s favorite is the sweet potato wedges — she calls them “orange fries” and eats them with the same dipping sauce.
More Recipes My Family Makes on Repeat
If these tenders are a hit at your table — and I’m betting they will be — here are a few others that get the same level of enthusiasm at ours:
- [INTERNAL LINK PLACEHOLDER: Garlic Butter Rice with Parmesan] — The perfect side dish for pretty much any protein. My kids eat it by the bowlful and it comes together in one pot.
- [INTERNAL LINK PLACEHOLDER: Easy Sheet Pan Salmon with Lemon and Herbs] — Another weeknight hero that comes together in 20 minutes with minimal cleanup. The lemon gets all caramelized and sweet.
- [INTERNAL LINK PLACEHOLDER: The Only Banana Bread Recipe You’ll Ever Need] — Because once you’ve got dinner sorted, you deserve a good dessert. This one is Simone-approved and freezes beautifully.
These crispy baked chicken tenders have genuinely changed our weeknight dinner rotation. They’re fast enough for the chaos of a Tuesday, but good enough that I’d serve them to company without a second thought. I hope they become a staple in your kitchen too.
If you make them, let me know in the comments. I love hearing which dip your family chose — Simone is currently campaigning for us to start a “dipping sauce of the week” tradition, so I’m taking nominations. Drop your best sauce ideas below and I’ll put them to the test.
📌 Save this crispy baked chicken tenders recipe for your next busy weeknight — it’s the one that finally delivers on the crunch without the mess of frying, and your whole family will love it.
Crispy Baked Chicken Tenders That Don’t Get Soggy
Equipment
- Baking Sheet
- Wire rack
- Mixing Bowls
- Tongs
Ingredients
- 1.5 lbs chicken breast tenders (or boneless thighs)
Binder
- 1/3 cup mayonnaise (full-fat)
Breading
- 1 cup panko breadcrumbs
- 1/2 cup finely grated Parmesan cheese
Seasoning
- 1 tsp garlic powder
- 1 tsp smoked paprika
- 1/2 tsp salt
- 1/4 tsp black pepper
For baking
- cooking spray (avocado or olive oil)
Instructions
- Preheat your oven to 425°F. Place a wire rack inside a baking sheet and spray lightly with cooking oil.
- In one bowl, mix the mayonnaise, garlic powder, smoked paprika, salt, and pepper. In another bowl, combine the panko and grated Parmesan.
- Pat the chicken tenders dry with paper towel. Dip each tender into the mayo mixture, coating all sides, then press into the panko mixture until thickly coated.
- Place the breaded tenders on the wire rack, making sure they don’t touch. Lightly spray the tops with cooking spray.
- Bake for 12-15 minutes, until deep golden brown and internal temperature reaches 165°F. Let rest on the rack for 2-3 minutes before serving.