
Let me tell you about the week I finally convinced my eight-year-old that “chicken” doesn’t always have to come from a bird. These wraps have that perfect sticky-sweet-smoky barbecue thing going on, tangy coleslaw cutting through every bite, and a texture that’s so close to shredded chicken you’ll do a double take. The secret? Soy curls. I know, I know — but stick with me. Marcus, who can spot a meat substitute from across the table, asked for seconds before realizing it wasn’t chicken. That’s when I knew I had to write this one down.
The short version: You get saucy, caramelized “chicken” piled on a soft wrap with crunchy coleslaw, all in about 20 minutes of active work (plus an hour of hands-off soaking).
I’ve made this version at least a dozen times now, tweaking the sauce until it tasted like the one Celestine used to make for pulled pork — deep, tangy, with just enough heat to remind you it’s there. Simone ate two wraps in one sitting and asked for the leftovers in her lunchbox the next day. That’s the kind of win I live for.
- Serves: 4 as a main (2 wraps each)
- Hands-On Time: 20 min | Total Time: 1 hr 20 min (includes 1 hr soaking)
- Difficulty: Simple enough for a busy weeknight, impressive enough for company
- Cost per serving: ~$2.50 (soy curls are surprisingly cheap)
- Calories: ~450 per wrap (with coleslaw and wrap)
- Dietary Notes: Naturally vegan and dairy-free — just check your wraps
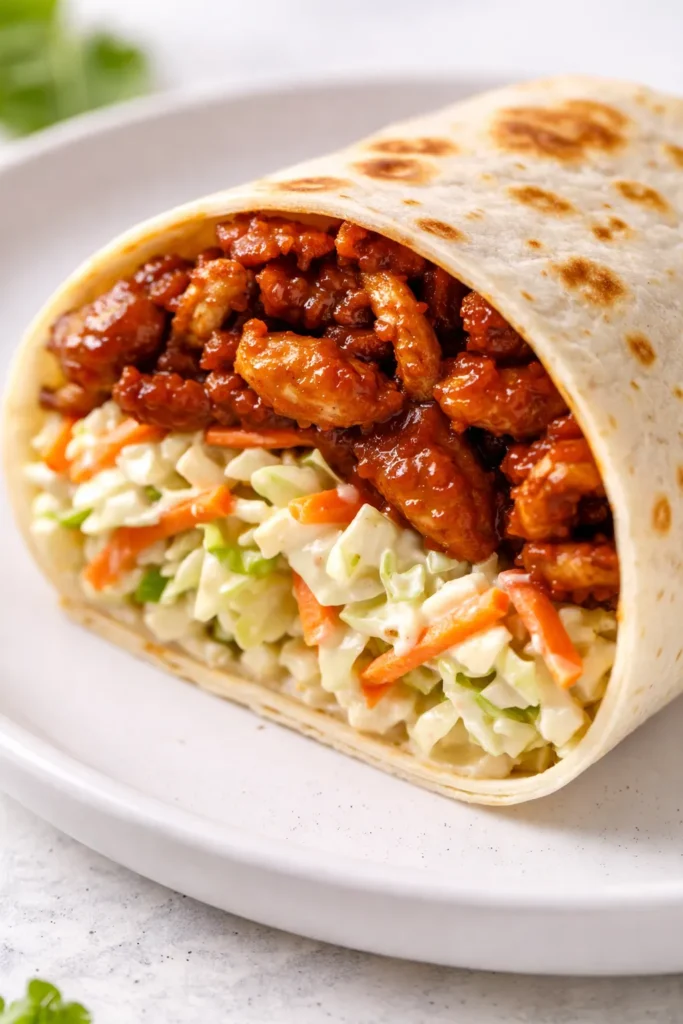
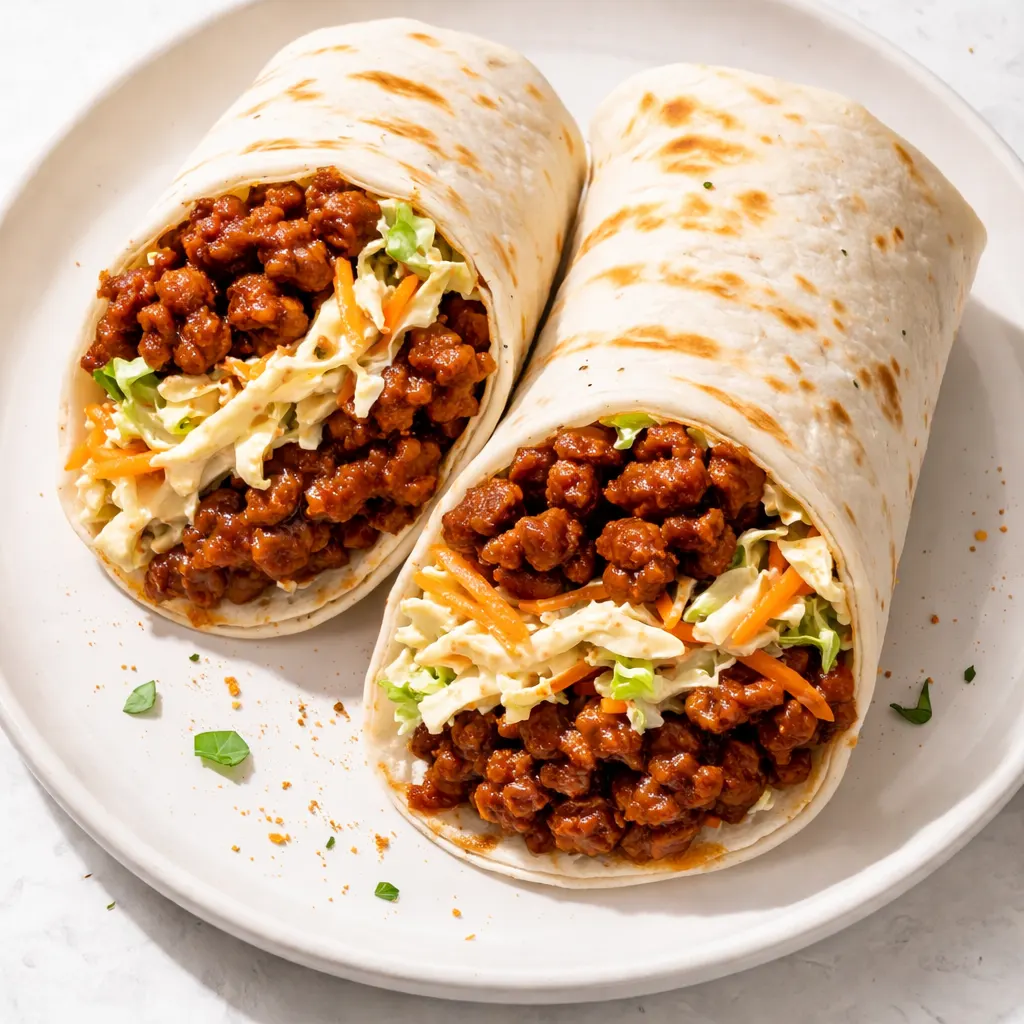
(Photo above: Overhead shot of two wraps cut in half on a wooden board, the filling spilling out slightly — dark caramelized soy curls mixed with creamy coleslaw, a few extra BBQ sauce drizzles on the side, natural afternoon light from the left.)
Why These Wraps Work So Dang Well
The thing that makes these truly work is the sauce. Not just any barbecue sauce — a homemade one that’s sweet from dates and molasses, tangy from vinegar, and smoky from paprika. It clings to the soy curls like it’s supposed to, because you coat them after they’re already browned. That little step — browning first, then saucing — is the difference between “good” and “my kid asked for seconds.”
And the soy curls? They soak up every bit of broth and seasoning during that hour in the fridge. When you cook them, they plump up and develop a texture that’s eerily close to shredded chicken. I’ve served these to people who swore they’d never eat plant-based meat and watched them go for thirds.
The coleslaw is the other half of the magic. Creamy, crunchy, cold against the hot, sticky filling. It’s a textural hug in every bite.
Ingredients Worth Talking About
- 1 cup Butler soy curls: These are the star. Don’t swap for TVP or tofu — they have a completely different texture. You can find them in the bulk section or online, and a bag lasts forever. I’ve also tested this with jackfruit and it works, but the soy curls get closer to shredded chicken.
- 1 ½ cups vegetable broth + 1 tsp smoked paprika + 2 tsp Bragg liquid aminos: This is your soaking liquid. It gets absorbed into the curls and seasons them from the inside. Don’t skip the paprika — it gives that first layer of smoke. If you don’t have Braggs, low-sodium soy sauce works fine.
- BBQ sauce ingredients: Sautéed onion, tomato paste, white wine vinegar, deglet dates, blackstrap molasses, more Braggs, smoked paprika, garlic powder, black pepper, and water. The dates are the sweetener that doesn’t make it cloying. Celestine would’ve used brown sugar, but I like the depth molasses and dates bring. Trust me.
- Coleslaw: Use your favorite store-bought or homemade. I do a quick version with shredded cabbage, carrot, and a creamy dressing of vegan mayo, apple cider vinegar, and celery seed. Simone even loves it — she calls it “salad that doesn’t taste like homework.”
- Wraps of your choosing: Flour tortillas, whole wheat, or even lettuce cups if you’re low-carb. I use burrito-sized tortillas for these so I can really load them up. Warm them briefly in a dry pan so they don’t crack when you fold.
What to Pull Out Before You Start
- Stainless steel pan — a 10- or 12-inch skillet works great for browning the soy curls. Nonstick works too, but you won’t get quite as much browning.
- Chef’s knife — for dicing the onion nice and small.
- Blender — to whiz the sauce smooth after sautéing the onions.
- Bowl for soaking the soy curls (I use a medium mixing bowl).
Here’s How I Do It
I like to get the soy curls soaking first, then make the BBQ sauce while they’re hanging out in the fridge. That hour is when I do all the rest of my dinner prep — chop the coleslaw, set out the wraps, pour myself a glass of something cold.
Soak the soy curls: In a medium bowl, whisk together the 1½ cups vegetable broth, 1 teaspoon smoked paprika, and 2 teaspoons Bragg liquid aminos. Add the soy curls, making sure they’re fully submerged. Cover and refrigerate for at least 1 hour — longer is fine, up to 4. (📸 Photo tip: You should see the curls plumping up and the liquid turning a deep reddish-brown. That’s the flavor soaking in.)
- Make the BBQ sauce: Dice the small onion. Sauté it in a dry pan (or a little oil if you prefer) over medium heat until lightly browned and soft — about 5 minutes. This is the base of the sauce, so don’t rush it. Once it’s done, transfer the onions to a blender along with the tomato paste, white wine vinegar, deglet dates, molasses, Braggs, smoked paprika, garlic powder, black pepper, and water. Blend until completely smooth. Taste it and adjust — I always add a pinch more vinegar if it feels too sweet. Set aside.
- Cook the soy curls: Place the soaked soy curls in a stainless steel pan (no need to drain them — you want that liquid). Cook over medium-high heat, stirring occasionally, until all the liquid is absorbed and the curls start to brown slightly — about 8–10 minutes. (📸 Photo tip: When the pan starts to look dry and you see golden edges forming on the curls, they’re ready. You want them a little crisp here.) If your pan gets too hot, lower the heat so they don’t burn.
- Sauce the curls: Pour in 1 cup of the BBQ sauce (reserve the rest for another use). Stir to coat everything evenly. Let it cook for another minute or two until the sauce is hot and sticky, clinging to every curl. Turn off the heat.
- Assemble the wraps: Warm your tortillas in a dry pan or microwave for a few seconds. Lay one tortilla flat, spoon a generous scoop of the BBQ soy curls down the center, and top with a scoop of coleslaw. Fold in the sides, then roll tightly from the bottom up. Slice in half if you want to show off that beautiful cross-section.
- Serve immediately: These are best warm, but I’ve also eaten them cold as a lunch wrap and they’re still fantastic.
How I Meal Prep These for the Week
This recipe is a Sunday dinner staple at our house. I make a double batch of the BBQ sauce and the soy curls, then we eat wraps for two nights. The sauce keeps so well that I’ve started stashing extra jars of it for quick dinners. My secret: I store the cooked soy curls separate from the coleslaw and wraps, and assemble fresh each day. That way nothing gets soggy.
- Fridge: Cooked soy curls in an airtight container for up to 5 days. The BBQ sauce keeps for up to a week in the fridge.
- Freezer: The cooked soy curls freeze beautifully — I portion them into freezer bags and reheat in a pan with a splash of water.
- Reheat: Best in a skillet over medium heat with a little extra sauce or water to loosen it. Microwave works in a pinch but the texture won’t be as good.
Things I Wish I’d Known the First Time
- Don’t skip the soak. I tried rushing this once with a 20-minute soak, and the soy curls were chewy and bland. The full hour lets them drink up all that smoky broth. Marktime it, set a timer, walk away.
- Browning matters. When you first put the soy curls in the pan, they’ll look pale and wet. Don’t add sauce yet. Let them dry out and get those golden-brown edges. That’s where the texture and flavor come from.
- Toasting the wraps is non-negotiable. A quick dry pan toast for about 20 seconds per side keeps them from tearing when you roll. Trust me, I’ve learned the hard way — unheated tortillas crack and you end up with a mess.
- The sauce thickens as it cools. If you’re making this ahead, the BBQ soy curls will be even thicker the next day. Just add a splash of water when reheating to get that sticky consistency back.
Make It Yours: Easy Variations
- Gluten-Free: Use corn tortillas or lettuce cups instead of flour wraps. The filling itself is naturally gluten-free — just double-check your broth and coleslaw dressing.
- Spicy: Add a chipotle pepper in adobo to the sauce before blending. Or drizzle hot sauce over the finished wraps. My spice-loving sister does the chipotle version every time.
- Kid-Friendly: My daughter prefers the sauce a little less tangy, so I cut the vinegar by a tablespoon and add an extra tablespoon of molasses. She’s never complained.
- Bulk It Up: Add some black beans or corn to the coleslaw for extra fiber. I do this when I want the wraps to be a full-meal deal — the kids don’t even notice because the coleslaw color stays the same.
Questions I Get About This Recipe All the Time
Q: Why did my soy curls turn out mushy instead of shredded?
A: That usually means you didn’t cook them long enough after soaking. They need that dry heat to evaporate the liquid and develop texture. Keep cooking until you hear them sizzle and see brown spots. Mushy is also a sign you didn’t drain them before the pan — but I actually prefer to dump the whole bowl in (liquid and all) and let it cook off. The liquid carries flavor.
Q: Can I make these with regular chicken instead of soy curls?
A: Yes! Just shred cooked chicken (rotisserie works great) and skip the soaking step. Heat the shredded chicken in a pan with a little oil, then stir in the BBQ sauce. The sauce is flexible like that. I’ve done it both ways depending on what I have on hand.
Q: How long does the BBQ sauce last? And can I freeze it?
A: The sauce keeps in an airtight jar in the fridge for up to a week. Yes, you can freeze it for up to three months — pour it into a freezer bag, lay flat, and thaw overnight in the fridge. It will separate a little; just give it a good shake or stir before using.
Q: What do you serve with these wraps?
A: I keep it simple. Extra coleslaw on the side, maybe some sweet potato fries or kettle chips. If I’m feeling fancy, I make a quick black bean and corn salad. On nights when the kids are starving, I just serve the filling over rice and skip the wraps entirely — that’s our “deconstructed” version.
More Recipes My Family Makes on Repeat
If you liked these wraps, you’ll probably love these other weeknight heroes from my kitchen:
- [INTERNAL LINK PLACEHOLDER: Smoky Black Bean Tacos with Avocado Crema] — Ready in 20 minutes, zero chopping once you have the crema made.
- [INTERNAL LINK PLACEHOLDER: One-Pot Creole Red Beans and Rice] — Celestine’s method, my shortcut, and enough leftovers to feed a small army.
- [INTERNAL LINK PLACEHOLDER: Crispy Oven-Fried Okra] — The trick to getting it actually crunchy without deep-frying.
I hope these become a staple in your house the way they have in mine. There’s something so satisfying about a wrap that’s equal parts sticky, crunchy, cool, and warm — and that even my picky eight-year-old asks for again. If you make them, leave a comment below — I love hearing what your family thinks. And tag me on Pinterest so I can see your beautiful wraps!
📌 This BBQ chicken coleslaw wraps recipe is the easiest plant-based dinner you’ll make all week — save it for the nights you need something fast, filling, and kid-approved.

BBQ Chicken Coleslaw Wraps (with Soy Curls)
Equipment
- Stainless Steel Pan (10- or 12-inch skillet)
- Chef’s Knife
- Blender
- Mixing Bowl
Ingredients
For the Soy Curls
- 1 cup Butler soy curls
- 1 1/2 cups vegetable broth
- 1 teaspoon smoked paprika
- 2 teaspoons Bragg liquid aminos (or low-sodium soy sauce)
For the BBQ Sauce
- 1 small onion, diced
- 2 tablespoons tomato paste
- 2 tablespoons white wine vinegar
- 4 deglet dates, pitted
- 1 tablespoon blackstrap molasses
- 2 teaspoons Bragg liquid aminos
- 1 teaspoon smoked paprika
- 1/2 teaspoon garlic powder
- 1/4 teaspoon black pepper
- 1/4 cup water
For the Coleslaw
- Your favorite coleslaw (store-bought or homemade, about 2 cups)
For Serving
- 4 large flour tortillas (or whole wheat, corn, lettuce cups)
Instructions
- Soak the soy curls: In a medium bowl, whisk together the vegetable broth, smoked paprika, and Bragg liquid aminos. Add the soy curls, ensuring they are fully submerged. Cover and refrigerate for at least 1 hour (up to 4 hours).
- Make the BBQ sauce: Dice the onion. Sauté in a dry pan over medium heat until lightly browned and soft, about 5 minutes. Transfer the onions to a blender along with the tomato paste, white wine vinegar, dates, molasses, Braggs, smoked paprika, garlic powder, black pepper, and water. Blend until completely smooth. Taste and adjust – add a pinch more vinegar if too sweet.
- Cook the soy curls: Place the soaked soy curls (with any remaining liquid) in a stainless steel pan over medium-high heat. Cook, stirring occasionally, until all liquid is absorbed and the curls begin to brown slightly, about 8–10 minutes. You want them a little crisp with golden edges.
- Sauce the curls: Pour in 1 cup of the BBQ sauce (reserve the rest for another use). Stir to coat evenly and cook for another 1–2 minutes until the sauce is hot and sticky, clinging to every curl. Turn off the heat.
- Assemble the wraps: Warm the tortillas briefly in a dry pan or microwave. Lay one tortilla flat, spoon a generous scoop of the BBQ soy curls down the center, and top with a scoop of coleslaw. Fold in the sides, then roll tightly from the bottom up. Slice in half if desired.
- Serve immediately. These are best warm, but also good cold. The flavors deepen overnight – perfect for meal prep.