
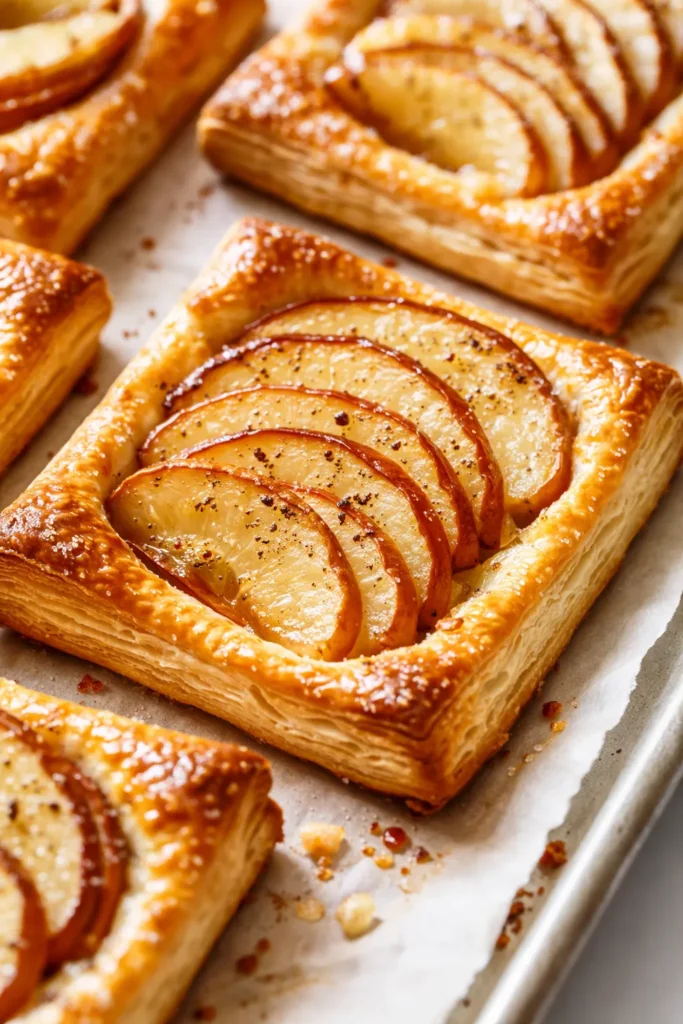
Golden, flaky puff pastry wrapped around tender, cinnamon-spiced apples with a sticky caramel glaze that pools in every crevice. Fifteen minutes of hands-on work. Store-bought puff pastry. Dessert is served.
The short version: Caramelized apple slices baked into frozen puff pastry until golden and bubbling — it’s the easiest dessert I know and my family begs for it weekly.
I’ve tested this with Honeycrisps, Granny Smiths, and even a sad Gala that was lingering in my fridge. They all work. The trick is the pre-cook and the pre-freeze.
- Serves: 6 as dessert
- Hands-On Time: 15 min | Total Time: 40 min
- Difficulty: Easy enough for a Tuesday, fancy enough for a dinner party
- Cost per serving: ~$1.50
- Calories: ~320 per serving
- Dietary Notes: Vegetarian. Easily vegan with plant-based butter and egg wash swap.
(Photo above: Overhead shot of two golden puff pastry apple tarts on a rustic wooden board, one cut open to reveal soft cinnamon-spiced apples, steam rising, with a scoop of melting vanilla ice cream on the side. Natural light from the left.)
The Trick That Keeps the Pastry Flaky (Not Soggy)
The enemy of puff pastry is moisture. If you toss raw apples onto pastry and bake, the steam makes the bottom gummy. I cook the apples first for a few minutes to evaporate the excess liquid. Then the real secret: I pop the assembled tarts in the freezer for 10 minutes before they go in the oven. That little chill is what gives you those sky-high, paper-thin layers that shatter when you bite into them.
What You Need (Plus a Few Notes From Me)
- 1 sheet puff pastry (thawed): One sheet, thawed overnight in the fridge. If it cracks when unfolding, just press it back together — it’s very forgiving. I always keep a box in my freezer for exactly this kind of moment.
- 2-3 medium apples (Honeycrisp or Granny Smith): Honeycrisp are my first choice — they hold their shape and aren’t too tart. Granny Smith work beautifully too if you like a sharper apple flavor cutting through the sweet caramel.
- 3 tbsp butter + 3 tbsp brown sugar: This combination makes the sauce. The butter softens the sugar into a syrup that coats every apple slice and soaks into the bottom of the pastry in the best way. My kids said “these taste like the ones at the fair.” High praise in this house.
- 1 tsp cinnamon + pinch of salt: Just enough to warm it up. Smoked cinnamon is incredible here if you have it — but regular is what I reach for 90% of the time.
- 1 egg (for wash): Gives the crust that deep golden color. If you skip it, the pastry bakes up pale and sad. Don’t skip it.
What to Pull Out Before You Start
- Baking sheet (rimmed, lined with parchment)
- Skillet (for the apples)
- Sharp knife or pizza cutter
- Pastry brush (for egg wash)
- Freezer space (to chill the assembled tarts)
Let’s Make These Tarts (It’s Almost Embarrassingly Easy)
Preheat your oven to 400°F. Line a baking sheet with parchment. Trust me on the parchment — these tarts get sticky with the caramel.
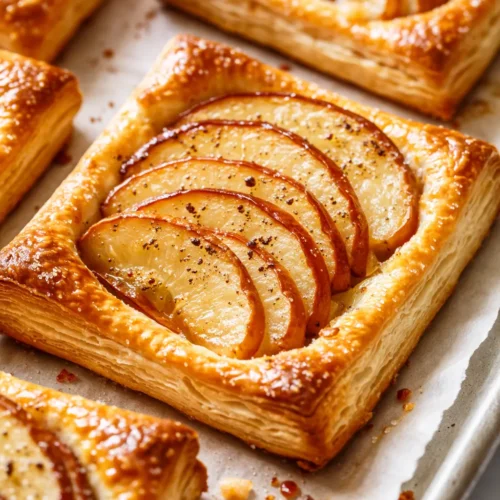
- Cook the apples: Melt butter in a skillet over medium heat. Add diced apples, brown sugar, cinnamon, and a pinch of salt. Cook for 3-4 minutes until the apples are just tender and the liquid has reduced to a syrupy glaze. Don’t over-cook — you want them to hold their shape slightly. (📸 Photo tip: You’ll know it’s ready when the bubbles in the pan get slow and syrupy and the apples look glossy.)
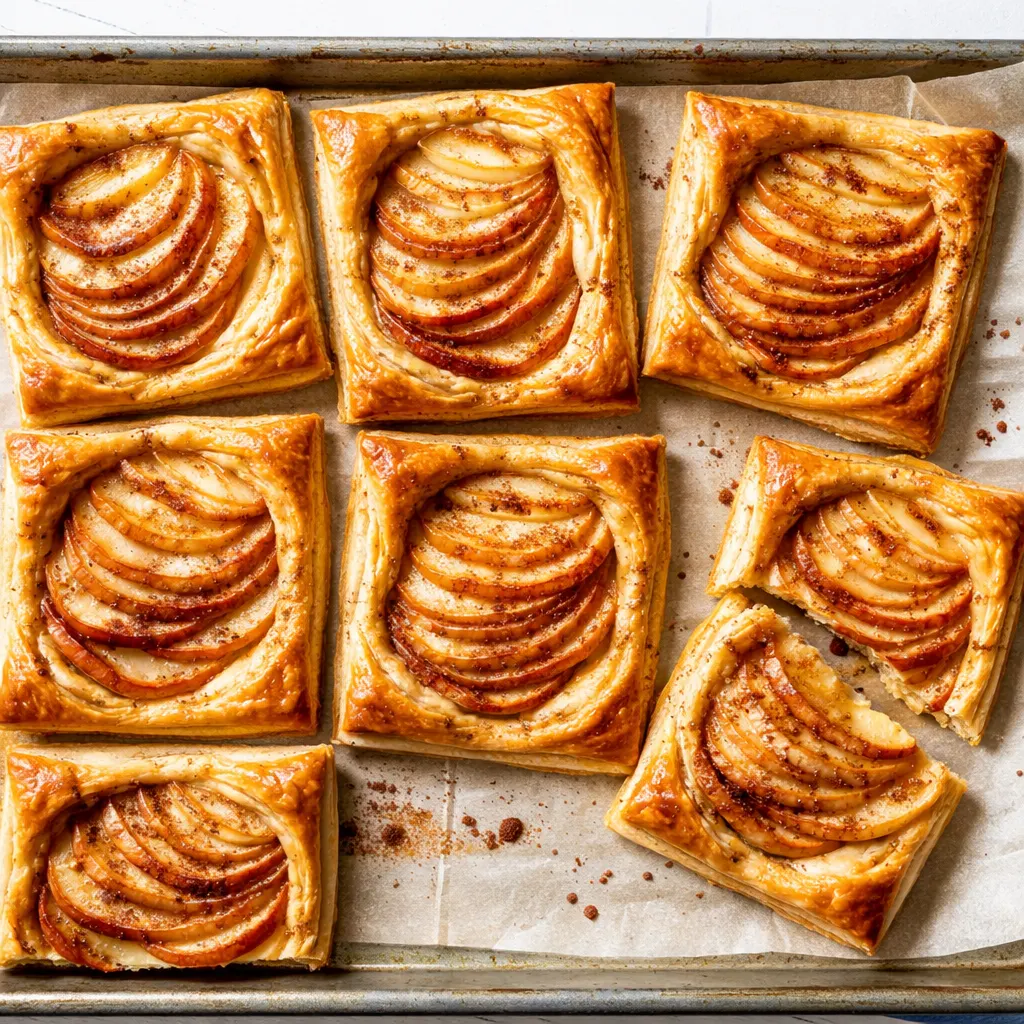
- Cut the pastry: Unfold your thawed puff pastry on a lightly floured surface. Cut it into 6 rectangles (or circles if you’re feeling fancy — I use a biscuit cutter). Place them on the parchment-lined sheet.
- Fill and fold: Spoon the apple mixture evenly onto the center of each piece of pastry. Leave a border. If you’re making open tarts, just pile them high. If you want little bundles, fold the corners over the filling.
- Chill them (the magic step): Here’s where the flakiness happens: put the baking sheet in the freezer for 10 minutes. Yes, really. This sets the butter in the pastry so it puffs up tall and flaky instead of melting into a flat disk. I know it sounds like an extra bother, but I’ve tested it side by side and it’s the difference between okay tarts and unforgettable ones.
- Egg wash and bake: Brush the pastry edges with egg wash and sprinkle a little extra brown sugar on top. Bake for 18-22 minutes, until the pastry is deeply golden and the caramel is bubbling around the edges. (📸 Photo tip: You’re looking for a deep amber color — pale pastry means it needed more time. Don’t be shy, let it get golden.)
- Cool and serve: Let them cool on the pan for 5 minutes. The caramel will be lava-hot straight out of the oven. Serve warm with a scoop of vanilla ice cream if that’s your thing. My family doesn’t even wait for the ice cream half the time.
Making These Ahead (For When You Need Dessert Ready Fast)
I pre-cook the apples up to 3 days in advance and store them in the fridge. When I’m ready, I assemble, freeze, and bake. They’re my favorite “I forgot I need to bring dessert” solution. You can also assemble the tarts completely (without egg wash) and freeze them on the sheet for up to a month. Bake straight from frozen — just add 5 extra minutes.
- Fridge: Pre-cooked apples keep in an airtight container for up to 4 days.
- Freezer: Unbaked assembled tarts freeze beautifully for up to 3 months. Bake from frozen.
- Reheat: Baked tarts reheat in a 350°F oven for 6-8 minutes to crisp the pastry back up. The microwave will make them soggy — don’t do it.
Things I Learned the Hard Way So You Don’t Have To
- Don’t skip the freeze. I know it feels like an extra step, but I’ve tested it side by side and the frozen batch puffed up three times higher. That’s the whole magic of puff pastry. Even if you’re in a rush, 5 minutes in the freezer is better than nothing.
- Use a sharp knife or pizza cutter for the pastry. If you drag a dull knife through it, you press the layers together and they won’t rise as well. Pizza cutter is my go-to — one clean motion, no dragging.
- Even if the apples leak a little (which happens sometimes — no judgment here), the caramel that bakes onto the parchment is basically a candy chip. My kids fight over the crispy caramel pieces after the tarts come off the pan. So don’t stress about perfect edges. The caramel bits are a bonus.
Ways to Make Them Yours
- Dairy-Free/Vegan: Use plant-based butter for the apples, and swap the egg wash for oat milk or maple syrup. The puff pastry is often accidentally vegan — check the brand! Pepperidge Farm is typically plant-based.
- Spiced Pear: Swap apples for firm pears, and use ginger and cardamom instead of cinnamon. So elegant, and it feels completely different.
- Bourbon Caramel: Add a spoonful of bourbon to the apples after they finish cooking (off the heat). Good Lord. That’s the adult version, and it disappears fast.
- Savory Version: Use the same method but with caramelized onions, goat cheese, and thyme. Dangerous for a weeknight snack. I’ve made this for lunch and called it a day.
Questions I Get All the Time About These Puff Pastry Apple Tarts
Q: Why did my puff pastry turn out soggy on the bottom?
A: You probably skipped the pre-cook for the apples or the freeze before baking. Pre-cooking evaporates the excess moisture, and the freeze chills the butter so it puffs immediately. Both steps matter — I know, I’ve tried skipping them to save time, and I regretted it every single time.
Q: Can I use crescent roll dough instead of puff pastry?
A: Honestly, it won’t be the same. Crescent roll dough is sweeter and doesn’t have the same laminated layers. The puff pastry is what makes these shatteringly flaky. If you’re in a pinch, pie crust would work better than crescent rolls. But puff pastry is the real star here.
Q: How long do these last? Can I freeze them after baking?
A: Baked tarts are best the day they’re made — that’s when the pastry is crispiest. If you have leftovers, store them loosely covered at room temp for a day. Reheat in the oven to revive the flakiness. Unbaked tarts freeze like a dream (see my meal prep notes above). I always keep a batch in my freezer for unexpected guests.
Q: What’s the best way to serve these?
A: Warm, with vanilla ice cream that melts into the caramel. If serving for brunch, a dusting of powdered sugar and a drizzle of maple syrup is gorgeous. They’re also incredible with a dollop of crème fraîche or Greek yogurt to cut the sweetness. My kids like them plain, straight off the pan, still warm.
More Recipes My Family Makes on Repeat
If you liked these apple tarts, here are a few others that get the same reaction at our table:
- Quick Puff Pastry Cheese Straws — Perfect for snacking, just as fast, and dangerously addictive. I make them for every party.
- 15-Minute Caramelized Banana Pancakes — My family’s favorite Saturday morning treat. The caramelized bananas are a game-changer.
- My Go-To Simple Vanilla Ice Cream — The easiest thing to make alongside these tarts. No ice cream maker required.
These tarts are my secret weapon. They take almost no effort but they look like you spent all afternoon in the kitchen. That’s my favorite kind of dessert — the one that makes you look like a hero while you relax with a cup of coffee.
If you make them, tag me in your photo or leave a comment telling me how fast they disappeared at your table. I always love hearing that.
📌 This puff pastry apple tart recipe stays perfectly flaky every time — save it for your next fall gathering or last-minute dessert emergency.
Puff Pastry Apple Tarts
Equipment
- Baking Sheet
- Skillet
- Pizza Cutter
- Pastry brush
Ingredients
- 1 sheet puff pastry (thawed)
- 2-3 medium apples (Honeycrisp or Granny Smith)
- 3 tbsp butter
- 3 tbsp brown sugar
- 1 tsp cinnamon
- 1 pinch salt
- 1 egg (for wash)
Instructions
- Cook the apples: Melt butter in a skillet over medium heat. Add diced apples, brown sugar, cinnamon, and a pinch of salt. Cook for 3-4 minutes until the apples are just tender and the liquid has reduced to a syrupy glaze.
- Cut the pastry: Unfold your thawed puff pastry on a lightly floured surface. Cut it into 6 rectangles (or circles if you like). Place them on the parchment-lined sheet.
- Fill and fold: Spoon the apple mixture evenly onto the center of each piece of pastry. Leave a border. If making open tarts, pile high; if you want little bundles, fold the corners over the filling.
- Chill them: Put the baking sheet in the freezer for 10 minutes. This sets the butter in the pastry so it puffs up tall and flaky.
- Egg wash and bake: Brush the pastry edges with egg wash and sprinkle extra brown sugar on top. Bake for 18-22 minutes at 400°F, until deeply golden and caramel is bubbling.
- Cool and serve: Let cool on the pan for 5 minutes. Serve warm with vanilla ice cream if desired.
Notes
Related posts:
 Baked Protein Pancake Bowls That Don’t Taste Like Cardboard — Finally
 Low Calorie Banana Bread That Doesn’t Taste Like a Compromise — Finally
 Coconut Flour Banana Bread Muffins That Stay Moist for Days (Not Crumbly)
 This Raspberry Lemon Cake With White Chocolate Is the Only Layer Cake You Need for Spring Celebrations