
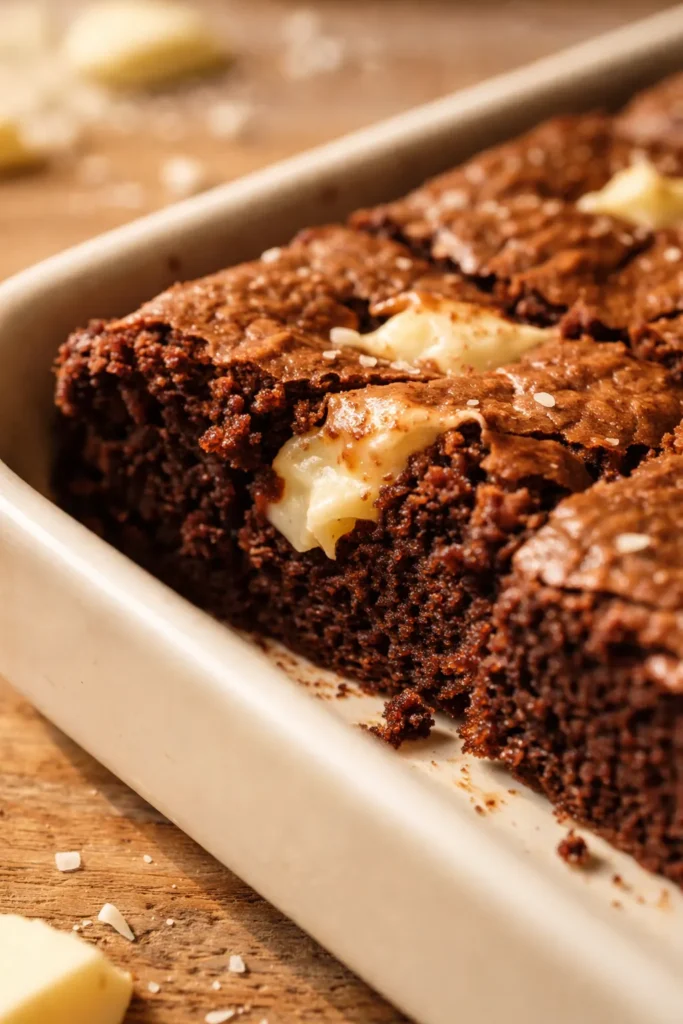
The first time I tried developing these, I used the exact same method as my dark chocolate brownies. Disaster. They spread thin as a pancake and turned into crispy lace cookies—delicious, sure, but not a brownie. The second time, the white chocolate seized in the microwave, leaving gritty streaks throughout the batter. The fix was two-fold: switching to a high-quality white chocolate bar (the kind meant for eating, not just baking) and heating gently in 20-second bursts. The third batch was magic. The edges set into a delicate, golden crust while the center stayed impossibly soft, dense, and studded with melty pockets of white chips.
I tested this recipe five times total, adjusting the butter-to-white-chocolate ratio, the egg count, and the bake time to nail the texture. The winning combination—10 tablespoons of butter to 6 ounces of premium white chocolate, plus an extra egg yolk for richness—hit that sweet spot between crisp exterior and gooey interior. I had friends and neighbors try each version blind, and this one won every time.
Why Real White Chocolate Bar (Not Just Chips) Makes All the Difference
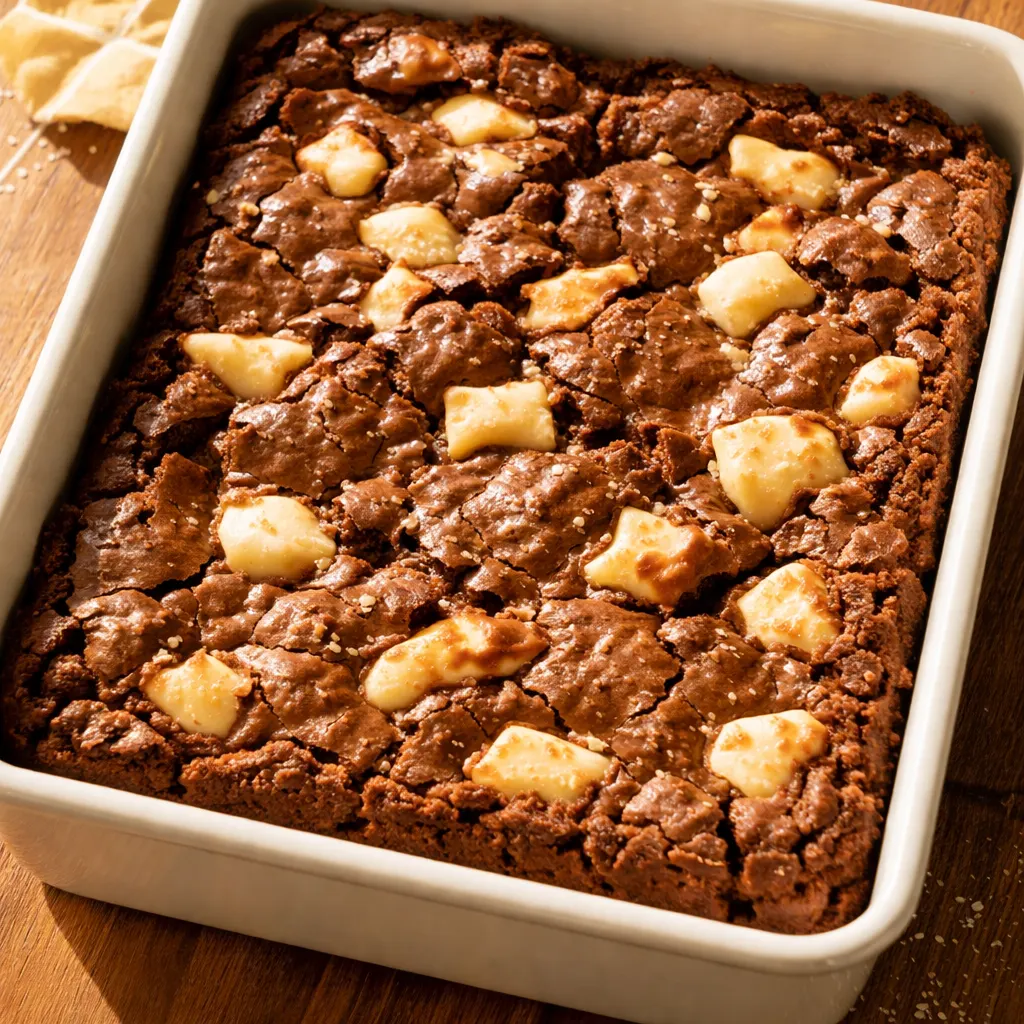
Most white chocolate chips contain stabilizers and less cocoa butter, which means they don’t melt into a smooth, cohesive base. Using a premium bar—like Lindt or Ghirardelli—gives you a higher cocoa butter content, which translates directly into that rich, melt-in-your-mouth texture. It’s the difference between a brownie that tastes flat and one that has a deep, toasty vanilla flavor with a velvety crumb. Baking at 325°F—rather than the standard 350°F—is another intentional choice. I’ve found it prevents the edges from drying out before the center is fully set, which is exactly what you need for that moist, fudgy interior. Based on general USDA nutritional data, a single batch of 16 squares provides a satisfying dessert that doesn’t rely on dark chocolate for its complexity.
Everything You Need (And a Few Notes From Me)
- 10 Tablespoons unsalted butter (cut into pieces): Butter is the backbone here. Using unsalted butter lets you control the salt level precisely. Cutting it into pieces ensures even melting.
- 6 oz premium white chocolate bar (like Ghirardelli or Lindt, chopped): This is non-negotiable for that smooth, creamy base. A real bar melts beautifully and gives these brownies their signature richness. I buy an extra bar just to snack on while I bake—don’t judge.
- 1 ¼ cups granulated sugar: White sugar provides the structure and sweetness. It also helps create that delicate, crackly top crust as they bake.
- 2 large eggs + 1 large egg yolk: The extra yolk is the secret to the dense, fudgy texture. It adds more fat and richness without making the batter too loose. Make sure they’re room temperature—cold eggs can seize the butter mixture and make the batter stiff.
- ½ teaspoon vanilla extract: It enhances the natural vanilla notes in the white chocolate. A little goes a long way.
- 1 ¾ cups all-purpose flour: This gives the brownies their structure. Spoon and level it into your measuring cup—scooping directly can pack the flour and make them dry.
- 1 teaspoon salt: Salt is crucial here. It balances the sweetness of the white chocolate and makes all the flavors pop.
- ¼ teaspoon baking powder: Just a touch. It adds a little lift without making them cakey. You want them dense, not puffy.
- 1 cup white chocolate chips: These little pockets of melty white chocolate are what make every bite exciting. Fold them in at the very end to keep them intact.
What to Pull Out Before You Start
- Microwave safe bowl: For melting the butter and white chocolate gently.
- Bowls: A large mixing bowl for the wet ingredients and a medium one for the dry.
- Whisk and Spatula: A whisk gets the eggs and sugar perfectly pale. A sturdy spatula is best for folding the dry ingredients and chips.
- Electric mixer (optional): Saves you 15 seconds of whisking, but honestly, a whisk works great.
- 9×9 inch baking pan and parchment paper: The exact size matters here. A bigger pan will make them thin; a smaller one will make them doughy in the center. Parchment paper with overhang makes lifting them out a dream.
- Toothpick: For testing doneness.
Let’s Make It (Step by Step)
This batter comes together in a single bowl with no special equipment. Here’s my exact process.
First, the Setup: Preheat your oven to 325°F (165°C). Line your 9×9 baking pan with parchment paper, leaving some overhang on two sides so you can easily lift the finished brownies out.
- Melt the Base: Combine the butter pieces and chopped white chocolate bar in a microwave safe bowl. Heat in 20-second increments, stirring well after each. It’s ready when it’s completely smooth and glossy. It’s easy to burn white chocolate, so don’t rush this step.
- Whisk Sugar and Eggs: In a separate large bowl, vigorously whisk the sugar, eggs, and egg yolk together until the mixture turns a pale yellow color. This takes about 30 seconds by hand or 15 seconds with an electric mixer on high. You’re looking for a light, frothy texture.
- Combine the Mixtures: Stir the vanilla extract into the egg mixture, then pour in the melted butter and white chocolate. Stir slowly but thoroughly until the batter is completely homogeneous.
- Add the Dry Ingredients: In a small bowl, whisk the flour, salt, and baking powder together. Dump this into the wet mixture and fold it in with your spatula until just combined. Don’t overmix here—a few small streaks of flour are okay. Overmixing develops gluten and can make the brownies tough.
- Fold in the Chips: Gently fold in the white chocolate chips until they’re evenly distributed. Spread the thick batter evenly into your prepared 9×9 pan. It will be very thick—use the spatula to coax it into the corners.
- Bake: Place the pan on the center rack of your preheated oven. Bake for exactly 42 minutes. The top should be a beautiful golden brown. A toothpick inserted into the center should come out clean or with a few moist, fudgy crumbs. If it comes out wet with raw batter, give it 2-3 more minutes.
- Cool (This is the Hard Part): Allow the brownies to cool completely in the pan on a wire rack. I know it’s tempting, but slicing them warm will result in a gooey, messy center. If you don’t mind that, then dive right in! Otherwise, patience gives you perfect, clean slices.
How I Make These Ahead (Because They Disappear Fast)
I often bake a double batch on Sunday. One goes into the freezer for school lunches or last-minute guests, and the other sits on the counter smelling divine. They actually taste better on day two—the flavors meld together beautifully.
- Fridge: Store in an airtight container at room temperature for up to 5 days. If you live in a humid climate, pop them in the fridge.
- Freezer: Yes! Cool completely, then wrap individual squares in plastic wrap, followed by a layer of foil. Freeze for up to 3 months.
- Reheat: Microwave a frozen or room-temperature square for 15-20 seconds for that just-baked, warm-and-gooey experience.
My Best Advice for Perfect Results
- Don’t Trust the Toothpick Alone: Wait—that sounds contradictory. I mean, look for moist crumbs, not a perfectly clean stick. If the toothpick is completely dry, you’ve likely overbaked them and lost the fudgy center. The edges should be set, but the middle should still feel soft when you gently press the top of the pan.
- Let Them Cool Completely: I say it in the steps, but it bears repeating. These brownies are incredibly soft when warm because of the high fat content from the white chocolate. Cooling them allows the structure to set. If you cut them too soon, you’ll end up with a delicious but messy puddle. I’ve done it plenty of times, and it still tastes good—it just won’t win any beauty contests.
- Use a Light-Colored Metal Pan: A dark, non-stick pan absorbs heat faster and can cause the edges to overbake while the middle is still raw. A 9×9 metal pan (like a standard USA Pan or similar) provides the most even heat distribution for this recipe.
Swaps That Actually Work
- Gluten-Free: Substitute the all-purpose flour with a good 1:1 gluten-free baking blend (the kind with xanthan gum). The texture will be slightly more delicate, but still deliciously fudgy.
- Add-ins: Swap the 1 cup of white chocolate chips for ½ cup dried cranberries and ½ cup chopped macadamia nuts for a tropical twist. Or add ½ cup dark chocolate chunks for a marbled effect.
- Flavor Twist: Add ½ teaspoon of almond extract along with the vanilla. It pairs beautifully with the white chocolate and makes them taste incredibly elegant.
- For a Party: Drizzle the cooled brownies with a simple melted dark chocolate ganache and sprinkle with flaky sea salt. It looks like you spent hours on it.
Troubleshooting
Q: Why did my batch spread too thin?
A: The most common reason is that the butter was too hot when you mixed it, or the batter was too warm going into the oven. Make sure your melted butter and chocolate mixture has cooled slightly (it should be warm, not hot) before mixing it into the eggs. Also, be sure your baking powder isn’t expired.
Q: Can I use only white chocolate chips instead of a bar?
A: You can, but the texture won’t be as creamy. Chips have stabilizers that prevent them from melting completely, which can result in a slightly gritty or grainy brownie. For the best results, use a bar for the base and chips for the chunks.
Q: How do I know when they are perfectly done?
A: The top should be a deep golden brown and look slightly crackly. Insert a toothpick into the center—if it comes out with a few moist, fudgy crumbs, it’s perfect. If it’s wet batter, it needs more time. If it’s completely clean and dry, it’s overbaked.
Q: Can I make these vegan?
A: I don’t recommend making this exact recipe vegan. The texture relies heavily on the eggs and milk fat in the white chocolate. You could try a vegan butter substitute and a flax egg, but the results will be significantly different and likely more cake-like than fudgy.
Q: What if my white chocolate seized while melting?
A: If it turns grainy or clumpy, you overheated it or got a drop of water in the bowl. Start over with a fresh batch, heat in shorter bursts (15 seconds), and make sure your bowl is completely dry. A seized batch can sometimes be saved by stirring in a teaspoon of vegetable oil, but it’s not guaranteed.
Storage and Make-Ahead Tips
Q: How long do these last, and how should I store them?
A: Stored in an airtight container at room temperature, they’ll stay perfectly soft and fresh for up to 5 days. I like to place a piece of bread in the container to absorb excess air—it keeps them extra moist.
Q: Can I make the batter ahead of time?
A: I don’t recommend storing the batter, as the baking powder will activate and lose its lift. However, you can bake the full batch and freeze the baked brownies for up to 3 months.
Q: What’s the best way to reheat a frozen brownie?
A: Microwave for 20-25 seconds. It makes the white chocolate chips melty again and brings back that just-baked texture. You can also let them thaw on the counter for 30 minutes—they’ll be perfectly soft and delicious at room temperature.
Q: What do you serve with these?
A: They’re incredible on their own, but a cold glass of milk is the classic pairing. For a dessert spread, try them with fresh raspberries (the tartness cuts the sweetness) or a scoop of vanilla bean ice cream. My personal favorite? Crumbled over a bowl of coffee ice cream for an impromptu sundae.
These white chocolate brownies are the kind of recipe I’m genuinely proud to share. They’re reliable, decadent, and surprisingly simple to pull together from pantry staples.
If you try them, drop a comment below or tag me on Pinterest—I love seeing your baking wins.
White Chocolate Brownies That Rival Any Dark Chocolate Batch (Yes, Really)
Equipment
- Microwave-safe bowl
- Large Mixing Bowl
- Medium Mixing Bowl
- Whisk
- Spatula
- Electric mixer (optional)
- 9×9 inch baking pan
- Parchment Paper
- Toothpick
Ingredients
For the Brownies
- 10 tablespoons unsalted butter
- 6 oz premium white chocolate bar (chopped)
- 1 1/4 cups granulated sugar
- 2 large eggs
- 1 large egg yolk
- 1/2 teaspoon vanilla extract
- 1 3/4 cups all-purpose flour
- 1 teaspoon salt
- 1/4 teaspoon baking powder
- 1 cup white chocolate chips
Instructions
- Preheat your oven to 325°F (165°C). Line your 9×9 baking pan with parchment paper, leaving some overhang on two sides so you can easily lift the finished brownies out.
- Melt the Base: Combine the butter pieces and chopped white chocolate bar in a microwave safe bowl. Heat in 20-second increments, stirring well after each. It’s ready when it’s completely smooth and glossy. It’s easy to burn white chocolate, so don’t rush this step.
- Whisk Sugar and Eggs: In a separate large bowl, vigorously whisk the sugar, eggs, and egg yolk together until the mixture turns a pale yellow color. This takes about 30 seconds by hand or 15 seconds with an electric mixer on high. You’re looking for a light, frothy texture.
- Combine the Mixtures: Stir the vanilla extract into the egg mixture, then pour in the melted butter and white chocolate. Stir slowly but thoroughly until the batter is completely homogeneous.
- Add the Dry Ingredients: In a small bowl, whisk the flour, salt, and baking powder together. Dump this into the wet mixture and fold it in with your spatula until just combined. Don’t overmix here—a few small streaks of flour are okay. Overmixing develops gluten and can make the brownies tough.
- Fold in the Chips: Gently fold in the white chocolate chips until they’re evenly distributed. Spread the thick batter evenly into your prepared 9×9 pan. It will be very thick—use the spatula to coax it into the corners.
- Bake: Place the pan on the center rack of your preheated oven. Bake for exactly 42 minutes. The top should be a beautiful golden brown. A toothpick inserted into the center should come out clean or with a few moist, fudgy crumbs. If it comes out wet with raw batter, give it 2-3 more minutes.
- Cool (This is the Hard Part): Allow the brownies to cool completely in the pan on a wire rack. I know it’s tempting, but slicing them warm will result in a gooey, messy center. If you don’t mind that, then dive right in! Otherwise, patience gives you perfect, clean slices.
Related posts:
 Low Calorie Banana Bread That Doesn’t Taste Like a Compromise — Finally
 This Raspberry Lemon Cake With White Chocolate Is the Only Layer Cake You Need for Spring Celebrations
 Soft, Pillowy White Chocolate Pumpkin Snickerdoodles with a Cinnamon-Sugar Crunch
 White Chocolate Pumpkin Snickerdoodles: The Soft, Bakery-Style Version That Actually Works