
That first bite — when the seasoned beef, the melty cheddar, and the tender elbows all come together in one forkful — is the exact moment my daughter Simone stopped asking for boxed mac and cheese on busy nights. This is the one she requests now. The one that actually fills everybody up. And the best part? It comes together in about the same time it takes to open a box and stir in powder, except this one has actual flavor that sticks to your ribs and makes the whole kitchen smell like Friday night.
The short version: Ground beef, taco seasoning, elbow macaroni, and a creamy cheese sauce all in one pot — done in 30 minutes flat, and my picky eight-year-old eats every bite without complaint.
I’ve made this version at least thirty times over the past year, tweaking the cheese-to-pasta ratio and testing whether the fire-roasted tomatoes really matter (they do). This is the batch that finally made Marcus say “don’t change anything else.”
- Serves: 6 as a main dish
- Hands-On Time: 15 min | Total Time: 30 min
- Difficulty: Easy enough for a Tuesday night, even with kids underfoot
- Cost per serving: ~$2.50
- Calories: ~480 per serving
- Dietary Notes: Can be made gluten-free with swap — see variations
(Photo above: A wide shallow bowl of creamy taco mac, elbows coated in a velvety orange cheese sauce with seasoned ground beef scattered throughout, a sprinkle of fresh cilantro and a few pickled jalapeños on top for color, shot from a slight angle in late afternoon light on a blue-and-white kitchen towel.)
The One Thing That Makes This Different From Every Other Taco Mac
The secret nobody tells you about taco mac is that the cheese sauce and the taco seasoning have to work together, not compete. Most versions end up tasting like either cheesy chili or bland pasta with vaguely spicy beef. The trick is blooming the taco seasoning in the beef fat before you add any liquid — that step wakes up every single spice and lets them settle into the meat instead of floating around in the sauce. Then you build the cheese sauce with the same pan, so the fond from the beef and seasoning melts right into the milk and cheese. No separate cheese sauce pot. No bland pasta waiting around. Everything happens in one skillet, and the layers stack up naturally.
I learned this after making a version where I just dumped seasoning into the liquid and wondered why it tasted flat. Celestine would have told me I was being impatient. She was right. That extra minute of blooming the spices changes the whole dish.
Ingredients Worth Talking About
- 1 lb ground beef (85/20): You want some fat here — it carries the seasoning and keeps the meat from drying out when it simmers with the pasta. I’ve used ground turkey in a pinch and it works but you’ll need an extra tablespoon of oil and a little more salt.
- 1 packet taco seasoning (or 3 tablespoons homemade): Store-bought is fine — just check the label and avoid ones with a ton of sugar or weird additives. My homemade blend uses chili powder, cumin, smoked paprika, garlic powder, onion powder, oregano, and a tiny bit of cayenne. Simone calls it “dad’s spice mix” because Marcus is the one who makes the big jar of it.
- 8 oz elbow macaroni (about 2 cups): Elbows are classic but any small pasta works — shells, rotini, even ditalini. The key is cooking it right in the sauce so it absorbs flavor instead of just sitting next to it.
- 1 can (10 oz) Rotel or fire-roasted diced tomatoes with green chiles: This is the ingredient that makes the dish taste like tacos instead of just cheesy beef pasta. Don’t drain it — the liquid counts toward the sauce. Regular diced tomatoes with a drained can of green chiles works too, but Rotel saves a step and brings more heat.
- 1 ½ cups shredded sharp cheddar (freshly shredded): Pre-shredded bagged cheese has anti-caking powder that makes sauces grainy. Grate it yourself and it melts like a dream. I buy blocks on sale and shred them in the food processor — takes two minutes and saves money.
- 1 cup whole milk: Half-and-half makes it even richer but whole milk is the sweet spot for weeknight cooking. I’ve tested this with 2% and it works but the sauce is noticeably thinner.
- 1 small onion, diced: Cooked until soft and translucent — this is the foundation that everything else builds on. If you’re in a rush, half a cup of frozen diced onion works fine, just cook it a little longer to evaporate the water.
- 3 cloves garlic, minced: Fresh garlic matters here — powdered won’t give you that punch that cuts through the cheese. I keep a jar of pre-minced garlic in the fridge for nights when I’m really tired and it’s okay but fresh is noticeably better.
- 2 tablespoons tomato paste: This deepens the color and adds a savory backbone that the canned tomatoes alone don’t give you. I buy the tube of tomato paste so I can squeeze out exactly what I need without wasting half a can.
- 1 ½ cups beef broth or water: You need enough liquid to cook the pasta — beef broth adds more depth but water works in a pinch. If you use water, add a half teaspoon of better-than-bouillon or a splash of Worcestershire to make up for the lost flavor.
- Toppings (optional but encouraged): Sour cream, green onions, cilantro, pickled jalapeños, diced avocado, hot sauce. Simone likes hers with a dollop of Greek yogurt and a sprinkle of crushed tortilla chips on top. Marcus goes for the full taco bar treatment.
What to Pull Out Before You Start
- A large, deep skillet or Dutch oven — 12-inch with high sides is ideal
- Wooden spoon or silicone spatula for stirring
- Cutting board and knife for the onion and garlic
- Measuring cups and spoons
- Box grater or food processor for the cheese (do this first!)
That’s it. One-pot meals are the best thing that ever happened to weeknight dinner.
Let’s Make It — Step by Step, No Fancy Skills Required
This moves fast once you start, so have everything prepped and within arm’s reach. It’s not complicated — just a few minutes of active cooking and then a short simmer while the pasta does its thing.
Start by grating the cheese and dicing the onion: If you do one prep step ahead of time, make it the cheese. Grate a block of sharp cheddar while the kids are doing homework or during a commercial break. It takes two minutes and makes the whole recipe go smoother.
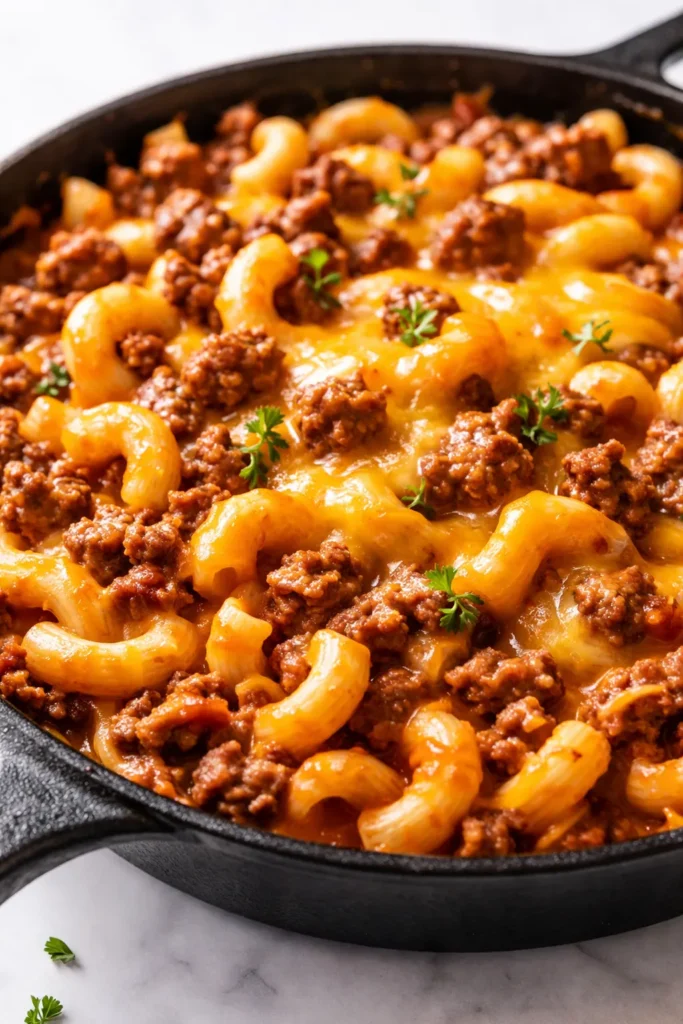
- Brown the beef: Heat your skillet over medium-high heat. Add the ground beef and cook, breaking it into small pieces with your spoon, until it’s browned and no longer pink — about 5–6 minutes. Don’t drain all the fat; leave about a tablespoon in the pan for flavor. If there’s more than that, tilt the pan and spoon off the excess. (📸 Photo tip: You want the beef in small, even crumbles — not big chunks — so it distributes evenly through the pasta.)
- Bloom the seasoning: Add the diced onion and cook for 2 minutes until it starts to soften. Then add the minced garlic and tomato paste and stir for 30 seconds until the paste darkens and smells fragrant. Sprinkle the taco seasoning over everything and stir constantly for 1 minute — this is the step that wakes up all the spices. The smell will tell you it’s working. Skip this step and your seasoning will taste raw and flat. I know it’s tempting to rush it. Don’t. This minute matters.
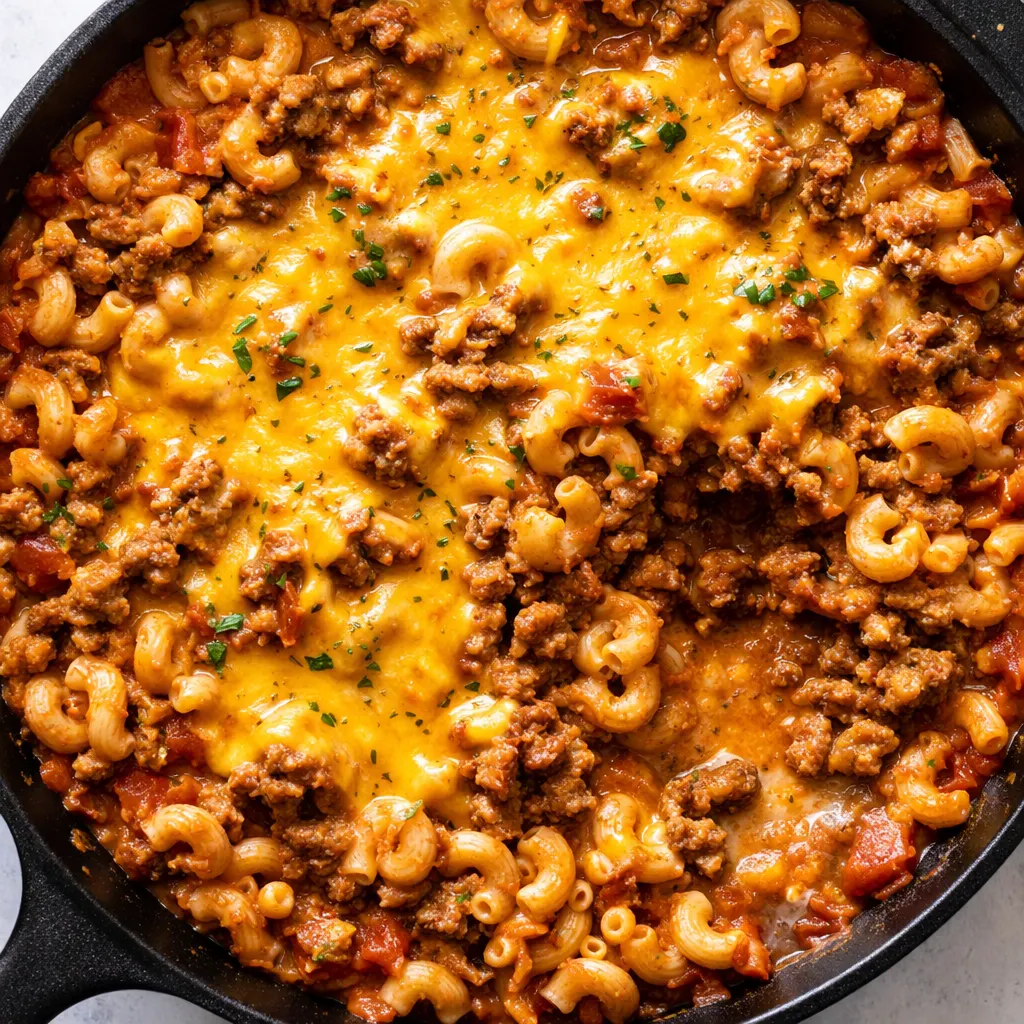
- Add the tomatoes and broth: Pour in the undrained Rotel (or diced tomatoes with green chiles), the beef broth, and the milk. Stir everything together, scraping up any browned bits from the bottom of the pan. (📸 Photo tip: The liquid should look a little thin and reddish-orange at this point — that’s fine, the pasta will absorb it and the cheese will thicken it.)
- Add the pasta: Stir in the dry elbow macaroni. Bring the mixture to a boil, then reduce the heat to a steady simmer. Cover the pan and cook for 10–12 minutes, stirring once halfway through, until the pasta is tender and most of the liquid is absorbed. If the pasta looks dry before it’s done, add a splash more broth or water. If it looks too soupy at the end, let it sit uncovered for a minute or two.
- Add the cheese and finish: Remove the pan from the heat. Sprinkle the shredded cheddar over the top and stir until it’s fully melted and the sauce is creamy. Taste it and add salt and pepper if needed — the taco seasoning and cheese bring plenty of salt already, so go easy. Add the cheese off the heat so it doesn’t break and get greasy. This is the most important tip in the whole recipe, I swear.
- Serve with toppings: Scoop into bowls and let everyone add their own toppings. We do sour cream, green onions, and a sprinkle of fresh cilantro at our house. Some nights we add crushed tortilla chips right on top for crunch. Some nights Simone eats hers plain because she’s eight and that’s how she rolls.
How I Meal Prep This for the Week
This is one of those recipes that actually tastes better on day two, so I make a double batch on Sunday and we eat it for lunch through Wednesday. The flavors settle overnight and the pasta absorbs even more of the sauce, so every bite is perfectly seasoned.
- Fridge: Store in an airtight container for up to 4 days. Add a splash of milk or broth when reheating to bring back the creamy texture.
- Freezer: Yes, it freezes well! Let it cool completely, then portion into freezer-safe containers. Freeze for up to 3 months. Thaw overnight in the fridge before reheating.
- Reheat: The microwave works fine — add a tablespoon of milk per serving and stir halfway through. For the stovetop, warm it over medium-low heat with a splash of milk, stirring until hot and creamy again. If you’re reheating from frozen, the stovetop method is better for even heating.
Things I Wish I’d Known the First Five Times I Made This
- Don’t overcook the pasta: Cook it to al dente — it will keep cooking in the residual heat after you add the cheese. If you cook it fully soft in the pan, it turns to mush by day two. I learned this the hard way after serving what I can only describe as “taco porridge” to my family. They were nice about it but I knew.
- Freshly grated cheese is non-negotiable for the sauce: I know, I know, the bagged shreds are convenient. But they have potato starch and cellulose powder that prevents the cheese from melting smoothly. You’ll get a grainy sauce instead of a velvety one. Buy a block and grate it yourself — it takes ninety seconds and the difference is dramatic.
- Add the cheese off the heat every single time: If you add cheese to a boiling sauce, the fat separates and you end up with a greasy, clumpy mess. Take the pan off the stove, sprinkle the cheese in, and stir gently. It will melt from the residual heat and stay smooth and beautiful.
- Season as you go, not just at the end: The salt in the taco seasoning and the cheese is usually enough, but if you’re using low-sodium broth, you might need a pinch of salt at the end. Taste the sauce before you add the cheese — that’s your chance to adjust. Even if you forget this step, it’ll still taste good. I’ve forgotten it plenty of times and nobody complained.
Swaps That Actually Work
- Gluten-Free: Use gluten-free elbow pasta or any small GF pasta shape. The cooking time might vary by a minute or two, so check it a little early. Everything else in the recipe is naturally gluten-free.
- Dairy-Free: Use unsweetened oat milk or canned coconut milk (the full-fat kind, not the one in the carton) and a good dairy-free cheddar shred. I’ve tested this with several brands and it works — the sauce is a little thinner but still creamy enough. This is the version I make for my nephew who can’t do dairy — he loves it and asks for the leftovers.
- Spicier version (the adult after-bedtime version): Use hot Rotel, add a diced jalapeño with the onion, and stir in a teaspoon of chipotle powder with the taco seasoning. Top with pickled jalapeños and a drizzle of hot sauce. Marcus calls this “taco mac with a personality.”
- Kid-Friendly (extra mild): Use regular diced tomatoes instead of Rotel, skip the cayenne in the seasoning, and add a tablespoon of cream cheese at the end for extra creaminess. Simone ate this version for months before she graduated to the spiced-up original.
- Vegetarian: Replace the ground beef with two cans of drained and rinsed black beans or a 12-oz bag of frozen crumbled veggie protein. Add them with the tomatoes and broth. The cook time stays the same.
- Add more veggies (the “I’m a responsible adult” version): Toss in a cup of frozen corn kernels and a diced bell pepper with the onion. You won’t even notice them but you’ll feel very virtuous.
Questions I Get About This Recipe All the Time
Q: Why did my cheese sauce turn out grainy and clumpy instead of smooth?
A: Ugh, I’ve been there — it’s so frustrating! Two things probably happened: either you used pre-shredded cheese (the anti-caking powder makes it grainy) or you added the cheese while the sauce was still boiling (high heat breaks the emulsion and turns it greasy). Fix: always grate your own cheddar from a block, and always take the pan off the heat before you stir in the cheese. You’ve got this next time — once you know these two things, it works every time.
Q: Can I make this with ground turkey or chicken instead of beef?
A: Yes, absolutely! Use 93/7 ground turkey or ground chicken. Add a tablespoon of olive oil to the pan before browning since leaner meats need a little help. You might also want to add an extra pinch of salt since poultry is milder than beef. I make it with turkey about half the time and nobody in my house has ever noticed the swap.
Q: How long does this last in the fridge? Can I freeze it?
A: It keeps in an airtight container in the fridge for up to 4 days. The pasta absorbs more liquid as it sits, so add a splash of milk when reheating to bring back the creamy consistency. It freezes beautifully for up to 3 months — portion it into individual containers for easy lunches. Thaw overnight in the fridge and reheat on the stovetop with a little milk for the best texture.
Q: What do you serve with taco mac to make it a full meal?
A: At our house, we keep it simple: a side of steamed broccoli or a green salad with lime vinaigrette cuts through the richness perfectly. On nights when I want it to feel like a fiesta, I add a bowl of tortilla chips with salsa and guacamole on the side. Simone loves it with a handful of baby carrots and ranch dip — whatever works, honestly.
More Recipes My Family Makes on Repeat
If you liked this one, here are a few others that get the same reaction at our table — the kind where the pot comes to the table and everyone just serves themselves without me having to say a word:
- One-Pot Cheesy Sausage and Rice Skillet — Smoked sausage, bell peppers, and rice all cooked together in one pan with a cheesy finish. Ready in 25 minutes and my kid calls it “the pink rice” because of the tomatoes.
- Easy Black Bean and Corn Enchilada Casserole — Layered tortillas, black beans, corn, and enchilada sauce with melted cheese on top. No rolling required and it feeds a crowd for under ten bucks.
- 15-Minute Creamy Southwest Chicken Skillet — Diced chicken, corn, black beans, and cream cheese come together fast for a burrito-bowl-style dinner that works over rice or with tortilla chips.
This is the dinner I make when I need everybody to eat without negotiation. It comes together fast, uses ingredients I usually have on hand, and leaves us with leftovers that are maybe even better the next day. That’s the kind of recipe worth keeping in your back pocket.
If you try this one, drop a comment below and let me know how it went for your family — I genuinely love hearing what worked and what you added. And if you make it for a crowd, tag me on Pinterest so I can see your bowl of cheesy goodness.
📌 This easy taco mac recipe comes together in just 30 minutes with one pot and simple ingredients — save it for your busiest weeknights when you need dinner that everyone will actually eat.

Easy Taco Mac That’s Creamy, Cheesy, and on the Table in 30 Minutes
Equipment
- Large deep skillet or Dutch oven (12-inch with high sides)
- Wooden spoon or silicone spatula
- Cutting board and knife
- Measuring Cups and Spoons
- Box grater or food processor
Ingredients
- 1 lb ground beef (85/20)
- 1 packet taco seasoning (or 3 tablespoons homemade)
- 8 oz elbow macaroni (about 2 cups)
- 1 can (10 oz) Rotel or fire-roasted diced tomatoes with green chiles, undrained
- 1 ½ cups shredded sharp cheddar (freshly shredded)
- 1 cup whole milk
- 1 small onion, diced
- 3 cloves garlic, minced
- 2 tablespoons tomato paste
- 1 ½ cups beef broth or water
For serving (optional)
- Sour cream
- Green onions, sliced
- Fresh cilantro, chopped
- Pickled jalapeños
- Diced avocado
- Hot sauce
Instructions
- Grate the cheese and dice the onion. Have everything prepped before you start — this moves fast.
- Brown the beef: Heat your skillet over medium-high heat. Add the ground beef and cook, breaking it into small pieces, until browned and no longer pink (5-6 minutes). Leave about a tablespoon of fat in the pan.
- Bloom the seasoning: Add the diced onion and cook 2 minutes. Add garlic and tomato paste, stir 30 seconds. Sprinkle taco seasoning over everything and stir constantly for 1 minute until fragrant. This step wakes up the spices — do not skip it.
- Add the undrained Rotel, beef broth, and milk. Stir, scraping up browned bits. Add the dry elbow macaroni. Bring to a boil, then reduce to a steady simmer. Cover and cook 10-12 minutes, stirring once halfway, until pasta is tender and most liquid is absorbed.
- Remove from heat. Sprinkle shredded cheddar over the top and stir until fully melted and creamy. Taste and add salt and pepper if needed (the seasoning and cheese bring plenty of salt).
- Serve in bowls with your choice of toppings: sour cream, green onions, cilantro, pickled jalapeños, diced avocado, hot sauce. Enjoy!