

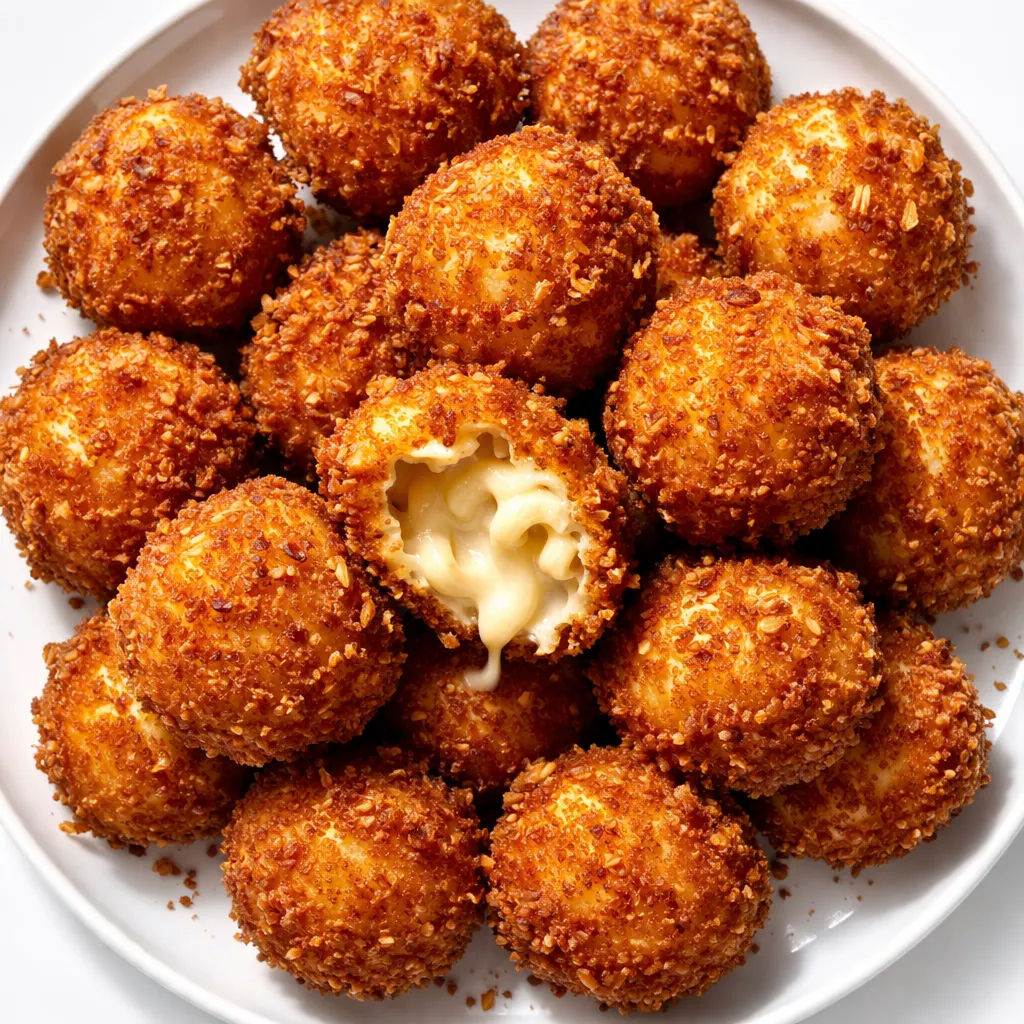
You know that first bite of a fried mac and cheese ball where the outside shatters and the inside spills out, hot and smooth and exactly what you wanted? That’s the one I’m teaching you today. No gritty cheese sauce. No greasy breading. Just a sharp cheddar and smoked paprika mac that stays creamy through the fry, with a crust that holds up on a party platter without falling apart.
The short version: These are the appetizer that disappears before the main course every single time I bring them to a party.
I’ve tested these for two Super Bowls, one birthday party, and a random Tuesday when Simone asked for “something dippable.” This is the version that works. Thirty minutes of hands-on work, thirty minutes of chill time, and you’ve got a platter of golden-brown, creamy-centered fried mac and cheese balls that will make your guests hover around the kitchen island.
- Serves: 12 as an appetizer (makes about 36 balls)
- Hands-On Time: 30 min | Total Time: 60 min (including 30 min chill)
- Difficulty: Easy — the hardest part is waiting for them to chill
- Cost per serving: ~$2.00 per serving
- Calories: ~220 per 3-ball serving
- Dietary Notes: Vegetarian. Can be made gluten-free with GF breadcrumbs and flour.
(Photo above: An overhead shot of a rustic wooden board piled high with golden-brown fried mac and cheese balls. A small bowl of spicy remoulade sits in the center for dipping. Warm, late-afternoon light catches the crispy breading. A few are cut in half to reveal the creamy, cheesy center with specks of paprika and parsley.)
The Thing That Keeps These from Falling Apart in the Fryer
Most recipes want you to start with leftover mac and cheese. That’s fine if you have it, but I find leftovers are usually too dry to roll into balls that hold their shape. So we’re starting fresh, and we’re starting with a roux. A proper butter-and-flour roux thickens the cheese sauce from the inside out, creating a filling that’s sturdy enough to bread and fry without turning into a puddle.
The second secret is the chill. Thirty minutes in the fridge is non-negotiable. That’s how long the cheese sauce needs to firm up so you can roll it into neat little balls without wearing half of it. I learned this the hard way after one very frustrating afternoon.
And the third thing? A double dredge in panko. It gives you that shatteringly crisp shell that contrasts perfectly with the creamy center. No soggy spots, no bare patches — just a golden crust that holds up from the first fry to the last ball on the platter.
Everything You Need (And a Few Notes From Me)
For the Mac and Cheese
- 1 lb elbow macaroni or cavatappi: I use cavatappi because the ridges hold more sauce. My kids don’t care about the shape as long as it’s cheesy, so use whatever you’ve got.
- 4 tbsp unsalted butter: Real butter. Margarine isn’t doing you any favors here.
- 1/4 cup all-purpose flour: The base of the roux.
- 2 cups whole milk: Whole milk makes a creamier sauce. If you only have 2%, it’ll still work, just won’t be as luxurious.
- 1 cup heavy cream: This is what makes the filling set up thick enough to roll.
- 4 cups sharp cheddar cheese, shredded: Sharp cheddar gives the most flavor. Pre-shredded has anti-caking agents that can make the sauce grainy — shred your own if you can.
- 1 tsp smoked paprika: Adds that subtle warmth. Regular paprika works if that’s what you have.
- 1/2 tsp garlic powder
- 1/2 tsp mustard powder: Brings out the cheese flavor.
- Salt and black pepper to taste
For the Breading and Frying
- 3 large eggs
- 2 cups panko breadcrumbs: Panko stays crispier than regular breadcrumbs. I’ve tested both, and panko wins every time.
- 1 cup all-purpose flour
- 1 tsp salt
- 1/2 tsp black pepper
- Vegetable oil for frying: Peanut oil works great too.
What You’ll Need (Beyond the Usual Pots and Pans)
- A 4-quart pot for the pasta
- A 3-quart saucepan for the cheese sauce
- A baking sheet lined with parchment paper (for the chill step)
- A deep skillet or Dutch oven for frying (the Dutch oven holds heat better)
- A wire rack set over a baking sheet (for draining)
- A food thermometer (this is the one tool I won’t let you skip)
Making Fried Mac and Cheese Balls, Start to Finish
Listen, the process here is simple — cook, chill, bread, fry. Don’t rush the chill step. Trust me.
Prep everything first: Grate your cheese, measure your flour, line your baking sheet. This goes fast once you start.
- Cook the pasta: Boil the macaroni in salted water until very al dente (about 1 minute less than the package says). Drain and set aside. It’ll cook a little more in the sauce.
- Make the roux: In a large saucepan, melt the butter over medium heat. Whisk in the flour and cook for 1-2 minutes until it smells like toasted biscuits. This is Celestine’s rule — cook the flour taste out. (📸 Photo tip: The roux should be bubbly and smooth, the color of light caramel.)
- Build the cheese sauce: Slowly whisk in the milk and cream. Cook, stirring constantly, until it thickens enough to coat the back of a spoon — about 3-4 minutes. Add the smoked paprika, garlic powder, mustard powder, salt, and pepper.
- Melt the cheese: Reduce heat to low. Add the shredded cheddar a handful at a time, stirring until fully melted before the next addition. This is where patience pays off — if you dump it all at once, it can seize up. (📸 Photo tip: The finished sauce should be smooth and glossy, no lumps.)
- Combine and chill: Stir the cooked pasta into the cheese sauce until every piece is coated. Pour it onto a parchment-lined baking sheet and spread it into an even layer. Refrigerate for at least 30 minutes, or until firm. I’ve made the mistake of skipping this and ending up with a sticky mess on my hands. Don’t be me.
- Form the balls: Scoop the chilled mac and cheese into rounded tablespoons (about 1.5 inches wide) and roll them firmly into balls. Place them back on the parchment.
- Set up the breading station: In one bowl, whisk the eggs with a splash of water. In another bowl, mix the flour, salt, and pepper. In a third bowl, add the panko.
- Bread the balls: Roll each ball first in the flour, then dip in the egg, then coat thoroughly in the panko. Press the breading gently to adhere. Place them back on the sheet. If you want an extra-crispy crust, do the egg and panko a second time.
- Heat the oil: Pour about 2 inches of oil into a deep skillet or Dutch oven. Heat to 350°F (175°C).
- Fry in batches: Carefully add 5-6 balls to the hot oil. Don’t crowd the pot — it lowers the oil temperature and makes them greasy. Fry for 2-3 minutes, turning occasionally, until golden brown and heated through. (📸 Photo tip: They should be deep golden brown, the color of a perfect biscuit.)
- Drain and serve: Transfer to a wire rack set over a baking sheet. Sprinkle with a little flaky salt while they’re still hot. Serve immediately with your favorite dipping sauce.
Making These for a Party Without Losing Your Mind
I make these for every gathering where I actually want to enjoy the first hour. Here’s how I do it:
- Fridge: Store uncooked, breaded balls in a single layer on a baking sheet, covered tightly with plastic wrap, for up to 24 hours. Fry them just before serving.
- Freezer: Yes! Flash-freeze the breaded balls on a baking sheet for 1 hour, then transfer to a freezer bag. Fry directly from frozen, adding 1-2 minutes to the cooking time. You don’t even need to thaw them.
- Reheat: If you have leftovers (unlikely in my house), reheat them in a 350°F oven for 5-7 minutes to crisp the breading back up. The microwave makes them soggy — don’t do it.
Things I Screwed Up So You Don’t Have To
- Don’t skip the chill step. The cheese sauce needs time to set up. If you try to roll warm mac and cheese, you’ll end up with a cheesy paste on your hands and nothing on the baking sheet. Simone calls this a “cheese disaster,” and she’s not wrong.
- Shred your own cheese. Pre-shredded cheese has anti-caking agents that can make the sauce grainy. I know it’s an extra step. I do it anyway because the texture is worth it.
- Watch the oil temperature. If your oil is too hot (over 375°F), the outside will burn before the inside is warm. Too low (under 325°F), and they’ll absorb oil and become greasy. A thermometer is $10 and solves this permanently.
- Season the breading. The flour and panko both get a little salt and pepper. If you only season the cheese, the breading tastes flat. Season every layer — that’s how Southern cooking gets its depth.
- Make them bite-sized. Nobody wants a mac and cheese ball the size of a baseball. Aim for 1.5 inches — two bites, perfect for a party platter.
Ways to Make These Your Own
- Spicy Cajun Version: Add 1 tsp of Creole seasoning to the cheese sauce and serve with a spicy remoulade. This is the version Marcus requests for game days.
- Bacon Cheddar Ranch: Crumble 6 slices of cooked bacon into the mac and cheese before chilling, and serve with ranch dressing. Simone gives this a thumbs up, and she’s picky about bacon.
- Gluten-Free: Use gluten-free pasta, a gluten-free all-purpose flour blend in the roux, and gluten-free panko breadcrumbs. I’ve tested this with my sister-in-law, and it works beautifully.
- Lobster Mac and Cheese Balls: Fold in 1 cup of chopped cooked lobster meat before chilling. Fancy enough for New Year’s Eve, easy enough that you won’t stress.
The Questions I Get About These Every Single Time
Q: Why did my balls fall apart in the fryer?
A: This usually happens for one of two reasons: either the mac and cheese wasn’t chilled long enough to set up, or the oil wasn’t hot enough. Make sure you’re at 350°F and the balls are firm before they hit the oil.
Q: Can I make these with Velveeta instead of cheddar?
A: You can, but I wouldn’t. Velveeta melts very smoothly, but it doesn’t have the sharp flavor that balances the richness of the fry. If you want that super creamy texture, you can use Velveeta and add a cup of sharp cheddar for flavor.
Q: How far in advance can I bread these?
A: You can bread them up to 24 hours ahead and keep them in the fridge. If you’re going longer than that, freeze them. The breading will hold up fine from frozen.
Q: What dipping sauces go best with these?
A: We do a spicy remoulade (mayo, hot sauce, Cajun seasoning, pickle juice), a classic ranch, and sometimes just a little hot honey. Simone eats them with ketchup, which I don’t agree with but I respect.
More Recipes My Family Makes on Repeat
If you liked this one, here are a few others that get the same reaction at our table:
- My Grandmother’s Baked Mac and Cheese with Evaporated Milk — No roux, no fuss, just custardy, golden-topped perfection.
- Crispy Cajun Shrimp Po’ Boys with Remoulade — The sandwich that makes my Atlanta friends jealous of my New Orleans roots.
- Smoked Gouda and Bacon Grits Bites — The make-ahead appetizer that disappeared faster than the spicy meatballs.
These fried mac and cheese balls are the kind of appetizer you make when you want to hear people go quiet over something you made. They’re creamy, crispy, and exactly what a party needs. I hope they become a staple in your kitchen the way they have in mine.
If you try them, drop a comment below and let me know how they turned out — especially if you tried one of the variations. I love hearing what y’all come up with!
📌 This crispy fried mac and cheese balls recipe stays creamy in the center every time — save it for your next game day or party platter!

Crispy Fried Mac and Cheese Balls That Stay Creamy Inside (Finally)
Equipment
- 4-quart pot for pasta
- 3-quart saucepan for cheese sauce
- Baking sheet lined with parchment paper
- Deep skillet or Dutch oven for frying
- Wire rack set over a baking sheet
- Food thermometer
Ingredients
For the Mac and Cheese
- 1 lb elbow macaroni or cavatappi
- 4 tbsp unsalted butter
- 1/4 cup all-purpose flour
- 2 cups whole milk
- 1 cup heavy cream
- 4 cups sharp cheddar cheese, shredded
- 1 tsp smoked paprika
- 1/2 tsp garlic powder
- 1/2 tsp mustard powder
- Salt and black pepper to taste
For the Breading and Frying
- 3 large eggs
- 2 cups panko breadcrumbs
- 1 cup all-purpose flour
- 1 tsp salt
- 1/2 tsp black pepper
- Vegetable oil for frying
Instructions
- Cook the pasta in salted boiling water until very al dente (about 1 minute less than package directions). Drain and set aside.
- Make the roux: In a large saucepan, melt the butter over medium heat. Whisk in the flour and cook for 1-2 minutes until it smells like toasted biscuits. This is Celestine’s rule — cook the flour taste out.
- Build the cheese sauce: Slowly whisk in the milk and cream. Cook, stirring constantly, until it thickens enough to coat the back of a spoon — about 3-4 minutes. Stir in smoked paprika, garlic powder, mustard powder, salt, and pepper.
- Melt the cheese: Reduce heat to low. Add shredded cheddar a handful at a time, stirring until fully melted before the next addition. Patience pays off here — dumping it all at once can seize the sauce.
- Combine and chill: Stir the cooked pasta into the cheese sauce until fully coated. Pour onto a parchment-lined baking sheet and spread into an even layer. Refrigerate for at least 30 minutes, or until firm.
- Form the balls: Scoop the chilled mac and cheese into rounded tablespoons (about 1.5 inches wide) and roll firmly into balls. Place back on the parchment.
- Set up breading station: In one bowl whisk the eggs with a splash of water. In another bowl mix the flour, salt, and pepper. In a third bowl add the panko.
- Bread the balls: Roll each ball first in flour, then dip in egg, then coat thoroughly in panko. Press gently to adhere. For extra-crispy crust, repeat egg and panko a second time.
- Heat oil: Pour about 2 inches of oil into a deep skillet or Dutch oven. Heat to 350°F (175°C).
- Fry in batches: Add 5-6 balls to the hot oil. Do not crowd the pot. Fry for 2-3 minutes, turning occasionally, until golden brown and heated through.
- Drain and serve: Transfer to a wire rack set over a baking sheet. Sprinkle with flaky salt while hot. Serve immediately with your favorite dipping sauce.
Notes
Related posts:
 Breakfast Crunchwraps That Stay Golden and Crisp in 30 Minutes — The Only One You’ll Need
 Marry Me Chickpeas: The Creamy, Garlicky Version That’s Actually Worth the Hype – in 30 Minutes
 Tortellini Carbonara That’s Creamier Than Any Restaurant — in 30 Minutes
 Crock Pot Mississippi Beef Noodles That Never Turn Out Watery — Finally