
The first time I made these, Marcus ate four before I could even sit down. That was the review I needed. These sliders are exactly what a weeknight dinner should be — fast enough to pull together with no planning, easy enough that the kids can help assemble them, and genuinely good enough that you’ll be glad you made a full tray. The bottoms stay perfectly crunchy, the tops are brushed with garlic butter, and the filling is basically rotisserie chicken made fancy by pesto and provolone.
The short version: These come together in 10 minutes, bake in 20, and my family has never once left a single one behind.
I’ve tested this with fancy homemade pesto, the jarred stuff from the grocery store, and even a basil vinaigrette in a real pinch. The version I’m giving you here is the one Simone asks for by name. She calls them “the green chicken sandwiches” and she means it as the highest compliment.
- Serves: 6 as a main / 12 as an appetizer
- Hands-On Time: 10 min | Total Time: 30 min
- Difficulty: Easy enough for a Tuesday night with zero stress
- Cost per serving: ~$3.50
- Calories: ~420 per 2-slider serving
- Dietary Notes: Easily made nut-free with a seed-based pesto
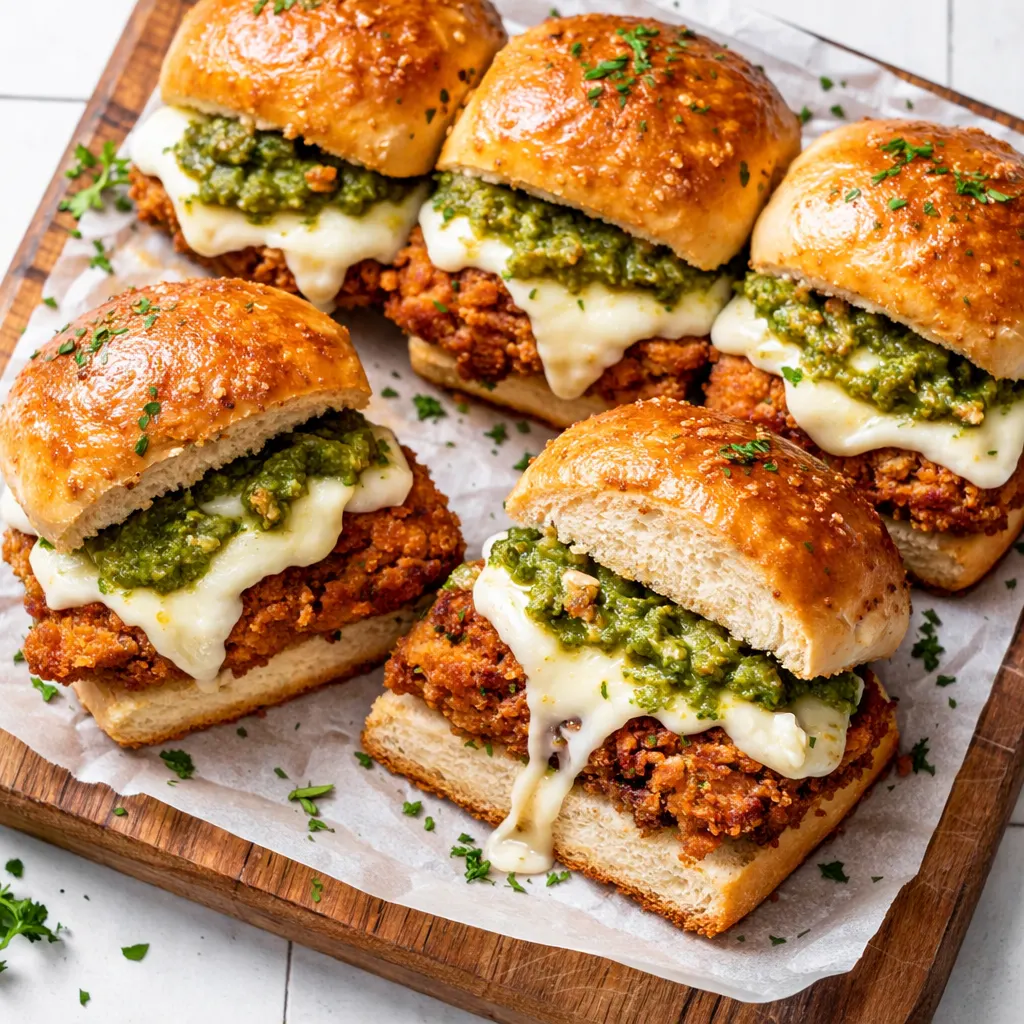
(Photo above: overhead shot of the slider tray on a weathered wooden board, the tops of the Hawaiian rolls brushed with garlic butter and toasted golden brown, melted provolone peeking out from the edges, a small ramekin of extra pesto for dipping in the corner.)
The Secret to Sliders That Stay Crispy (Not Soggy)
The kiss of death for a chicken slider is a soggy bottom. The pesto and chicken release moisture, and if you just pile it on the roll, you end up with a mess. The fix is two-fold: toast the rolls first, and use just enough sauce to coat the chicken, not drown it. That’s the whole trick.
We’re using rotisserie chicken here because it’s already seasoned and cooked perfectly. Shredding it warm and mixing it with the pesto and garlic lets the flavors soak in without having to cook the chicken again. This is the move — it saves you time and adds depth you don’t get from plain boiled chicken.
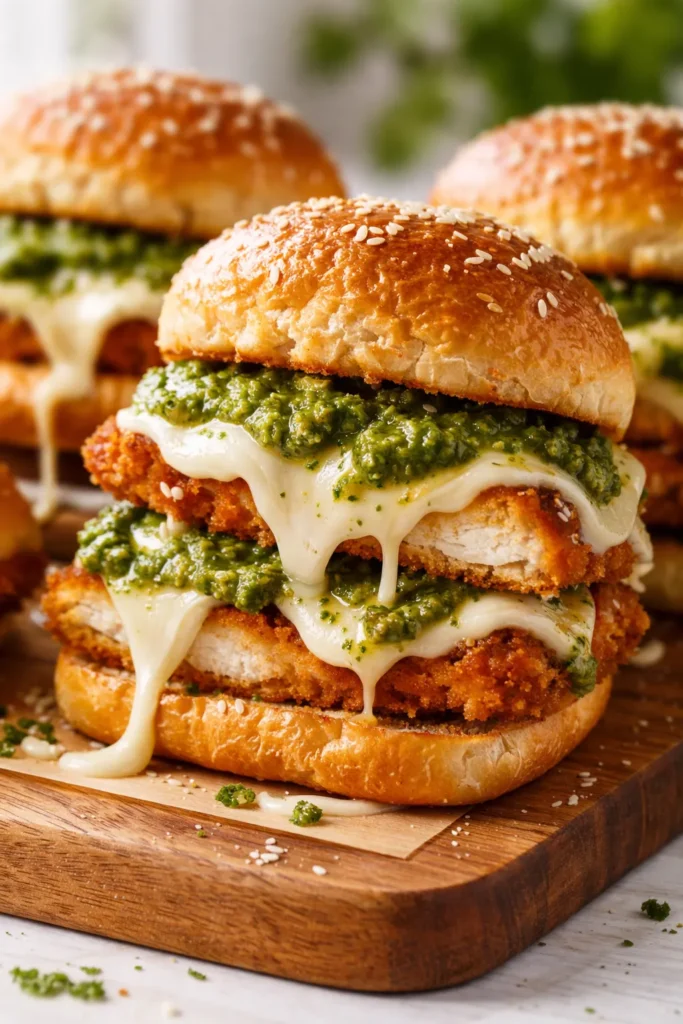
The garlic butter brushed on top is non-negotiable. It bakes into the crown of the roll, making the top slightly crispy and intensely savory, while the cheese keeps the inside perfectly soft. That contrast between the crunchy top and the soft, cheesy center is exactly what makes these sliders work.
What You’ll Need (And What I Actually Use)
- 1 (12-count) package Hawaiian sweet rolls: The slight sweetness is the perfect counter to the savory garlic and pesto. Don’t substitute with plain dinner rolls — it changes the whole vibe. The sweetness is doing important work here.
- 2 cups shredded rotisserie chicken: Warm chicken shreds easier and mixes better. If you’re cooking chicken just for this, poach it in seasoned water, but honestly, the rotisserie chicken is the move. Simone can smell the difference when I use leftover baked chicken — she’s never wrong.
- 1/2 cup basil pesto: Get the good refrigerated stuff — it has more flavor and less oil than the shelf-stable jars. Costco’s pesto is genuinely solid. If you’re feeling ambitious, make your own, but I do that maybe twice a year and buy it the other fifty times.
- 6 slices provolone cheese: Provolone melts beautifully without getting greasy. You can use mozzarella, but provolone has a little more personality. It doesn’t turn into a watery mess.
- 1/4 cup salted butter: We’re going to brown it slightly with the garlic. Don’t skip the browning step — it takes thirty seconds and changes everything.
- 4 cloves garlic: Fresh. Minced. Not the jarred stuff. I love my garlic press but a knife works perfectly here. This is the backbone of the whole dish.
- 1 tbsp fresh parsley (optional): For color at the end. Not mandatory, but it makes the tray look pretty when you’re bringing it to the table.
Tools You’ll Need
- 9×13 baking dish (or a rimmed baking sheet — use what you’ve got)
- Small saucepan for the garlic butter
- Chef’s knife and cutting board
- Pastry brush (or just a spoon if you’re me on a Tuesday)
That’s it. Nothing fancy required.
Making the Sliders (Start to Finish)
This moves fast, so get everything prepped before you turn on the oven. I lay out the rolls, shred the chicken, and mince the garlic first. It takes five minutes and saves you from scrambling mid-recipe.
Preheat: 350°F. Get it going while you assemble.
- Slice: Without separating the individual rolls, slice the whole slab in half horizontally through the middle. Place the bottom half in your greased 9×13 dish. (📸 Photo tip: A serrated knife makes this cut clean without squishing your rolls. Use a gentle sawing motion.)
- Mix: In a bowl, combine the shredded chicken, pesto, and half the minced garlic. Stir until evenly coated. Taste it here — does it need salt? Probably not if you used rotisserie, but taste it and adjust.
- Layer: Lay the provolone slices over the bottom rolls, overlapping slightly. Spread the pesto chicken mixture evenly over the cheese. (📸 Photo tip: You want an even layer so every slider gets a good bite — no one wants the end piece with nothing on it.)
- Top: Place the top half of the rolls over the chicken. Press down gently so everything settles.
- Garlic Butter: In a small saucepan, melt the butter over medium heat. Add the remaining garlic and cook for 30 seconds until fragrant. Don’t let the garlic burn — you want it golden and smelling amazing. Brush this mixture generously over the tops of the rolls. Use every drop.
- Bake: Cover with foil and bake for 15 minutes. Uncover and bake for another 5-7 minutes, until the tops are golden and the cheese is melted and bubbly around the edges.
- Finish: Sprinkle with parsley if using. Let rest for 2 minutes — I know it’s hard, but that rest keeps them from falling apart the second you pick them up. Then slice between the rolls and serve.
Making These Ahead (Because Life is Busy)
Assembling these the night before is my favorite meal prep hack. I put them together, don’t brush on the butter, cover tightly, and refrigerate. When I get home, I pour the garlic butter over the top and bake. It saves me the ten minutes of assembly on a chaotic weeknight.
- Fridge: Assembled (without butter) for up to 24 hours. Add the butter right before baking.
- Freezer: Not recommended — the texture of the rolls gets weird after thawing. These are best made fresh or the day before.
- Reheat: The microwave works in a pinch, but the oven at 350°F for 5-7 minutes brings the crispness back. Worth the extra few minutes.
A Few Things I’ve Learned Along the Way
- Don’t skip the foil. It steams the rolls just enough to soften them without drying out the chicken. If you bake them uncovered from the start, the tops burn before the center is hot. Foil first, then uncovered for the final crisp.
- Use a serrated knife to slice the rolls. It cuts cleanly without squishing them. A bread knife works beautifully. I learned this after destroying a few trays with a straight blade.
- Add a little heat. If your pesto doesn’t have red pepper flakes, add a pinch when you mix the chicken. It’s not spicy — it just wakes up the other flavors. Even my kids don’t notice it, and they notice everything.
- Let them rest. I know you want to grab one immediately. Just give it two minutes. The cheese sets slightly, the structure firms up, and you get a clean bite instead of a collapsing mess. It’s worth it.
Ways to Make This Your Own
- Nut-Free: Use a nut-free pesto (like one made with seeds or just basil and Parm). Classic pine nuts are fine for most, but I have friends who need the swap and it works perfectly.
- Spicy: Add a few pickled jalapeños under the cheese. Marcus loves this version. It cuts through the richness and adds a vinegary kick.
- Veggie: Swap the chicken for thinly sliced zucchini that’s been roasted until tender, or use roasted mushrooms. My sister swears by the mushroom version.
- Dairy-Free: Use dairy-free cheese and butter. The texture will be slightly different, but the flavor is still great. Use a very flavorful pesto to compensate for the milder cheese.
Questions I Get About These Sliders
Q: Why did my bottoms get soggy?
A: Most likely, the rolls weren’t toasted enough, or you used too much pesto. I know it’s tempting to load it up, but 1/2 cup is really the sweet spot. Next time, try toasting the bottom half in the oven for 2 minutes before adding the filling. That extra step guarantees crispness.
Q: Can I use chicken breasts instead of rotisserie?
A: Yes, but cook and shred them first. Season the chicken well — rotisserie chicken carries a lot of salt and seasoning, so you need to make up for it if you’re starting from plain chicken. Add a pinch of salt, garlic powder, and onion powder to the chicken before mixing it with the pesto.
Q: How do I store leftovers?
A: Keep them in an airtight container in the fridge for up to 3 days. Reheat in a 350°F oven so they don’t get sad and soggy. The microwave works but sacrifices the texture on the tops.
Q: What goes best with these?
A: A simple green salad with lemon vinaigrette balances the richness perfectly. My kids love them with raw veggie sticks and ranch. For a full meal, I do a side of roasted broccoli or a quick tomato soup for dipping.
More Weeknight Wins From My Kitchen
If you liked this one, here are a few others that get the same reaction at our table:
- Garlic Butter Turkey Sliders with Cranberry Mayo — A Thanksgiving-style slider that works in October or March. Same method, totally different flavor.
- The Easiest Tomato Basil Soup — The perfect thing to dip these sliders into, honestly. It takes 20 minutes and uses canned tomatoes.
- My Mother-in-Law’s Famous Baked Mac and Cheese — Because why stop at one carb-heavy side? This one is creamy, crispy on top, and feeds a crowd.
These sliders are the thing I make when I need everyone to just sit down and eat without complaints. They’re fast, they’re reliable, and they taste like you put in way more effort than you actually did. That’s my favorite kind of recipe.
If you make them, tag me on Instagram — I want to see your golden, bubbly trays.
📌 Cheesy Garlic Pesto Chicken Sliders ready in 30 minutes and stay perfectly crispy — save this recipe for your next busy weeknight dinner.

Cheesy Garlic Pesto Chicken Sliders
Equipment
- 9×13 Baking Dish or Rimmed Baking Sheet
- Small saucepan
- Chef’s Knife and Cutting Board
- Pastry brush or spoon
- Serrated Knife
Ingredients
For the Sliders
- 1 package (12-count) Hawaiian sweet rolls
- 2 cups shredded rotisserie chicken (warm)
- 1/2 cup basil pesto
- 6 slices provolone cheese
- 1 tbsp fresh parsley (optional, for garnish)
For the Garlic Butter
- 1/4 cup salted butter
- 4 cloves garlic, minced
Instructions
- Preheat oven to 350°F. Grease a 9×13 baking dish or rimmed baking sheet.
- Without separating the individual rolls, slice the whole slab of Hawaiian rolls in half horizontally through the middle. Place the bottom half in the prepared dish.
- In a bowl, combine shredded chicken, pesto, and half the minced garlic. Stir until evenly coated. Taste and adjust salt if needed (rotisserie chicken is usually well-seasoned).
- Lay provolone slices over the bottom rolls, overlapping slightly. Spread the pesto chicken mixture evenly over the cheese.
- Place the top half of the rolls over the chicken. Press down gently.
- In a small saucepan, melt the butter over medium heat. Add the remaining garlic and cook for 30 seconds until fragrant. Do not let garlic burn. Brush the mixture generously over the tops of the rolls.
- Cover with foil and bake for 15 minutes. Uncover and bake for another 5-7 minutes, until tops are golden and cheese is bubbly around the edges.
- Sprinkle with parsley if using. Let rest for 2 minutes before slicing between the rolls and serving.
Notes
Related posts:
 California Club Wraps That Actually Stay Crisp for Lunch — 20 Minutes
 Honey Garlic Sausage and Sweet Potato Sheet Pan Dinner That’s Actually Crispy — in 35 Minutes
 The Best Crockpot BBQ Chicken for Busy Weeknights: Tender, Tangy, Minimal Effort
 Buffalo Chicken Dip That Doesn’t Turn Into a Greasy Mess — Finally