
The first time I made French toast with flour in the batter, Simone looked up from her plate and said, “This is the good kind, Mom.” At our house, that is the highest culinary accolade. She’s eight. She has opinions. And she was completely right — the flour changes everything. It gives the outside a thin, golden, slightly crisp shell that holds up against the syrup without turning into a sad, soggy situation. The inside stays tender and almost pudding-like in the best possible way.
The short version: One secret ingredient — flour — turns ordinary French toast into the kind that makes my kid request it for her birthday breakfast.
I’ve made this version about forty times now, tweaking the amounts until it was exactly right. Not too eggy, not too sweet, just perfectly balanced. Trust me on the flour. It’s the game-changer.
- Serves: 4 as breakfast or brunch
- Hands-On Time: 15 min | Total Time: 25 min
- Difficulty: Easy enough for a Saturday morning with the kids helping
- Cost per serving: ~$1.50
- Calories: ~350 per serving
- Dietary Notes: Vegetarian. Easily adaptable for dairy-free
(Photo above: Overhead shot of golden brown French toast stacked on a white plate, dusted with powdered sugar, with a small pitcher of maple syrup on the side and fresh berries scattered around. Warm morning light from the window hits the crispy edges.)
The Thing That Makes This Different
A lot of French toast recipes are basically just scrambled eggs poured over bread. And you can taste it — rubbery, uneven, and it goes soggy before you finish your first cup of coffee. This version fixes that with two small but important changes.
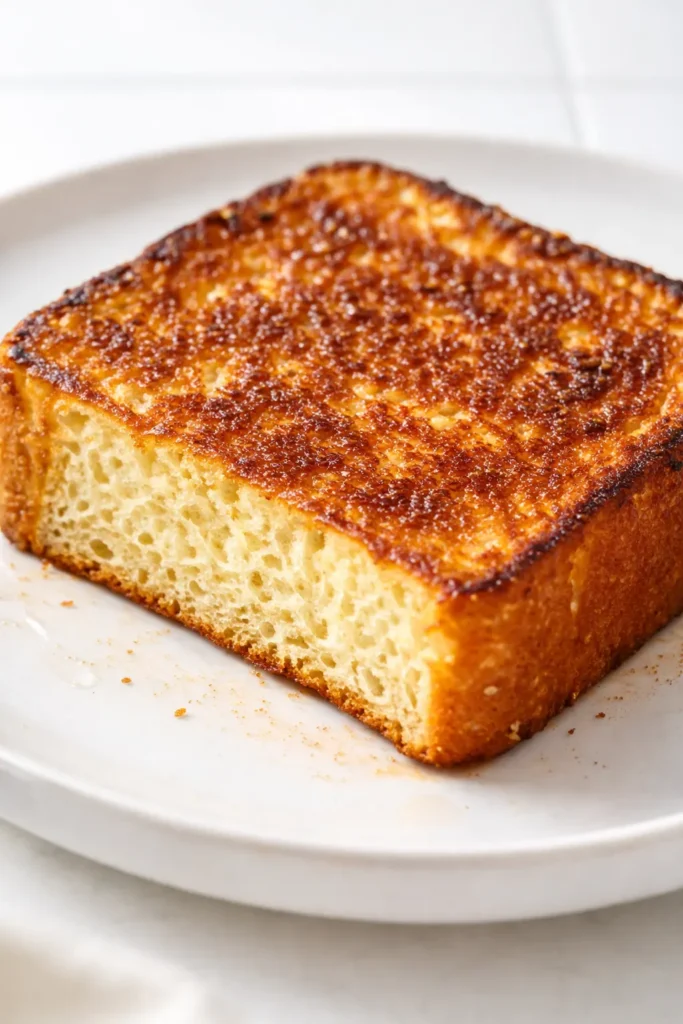
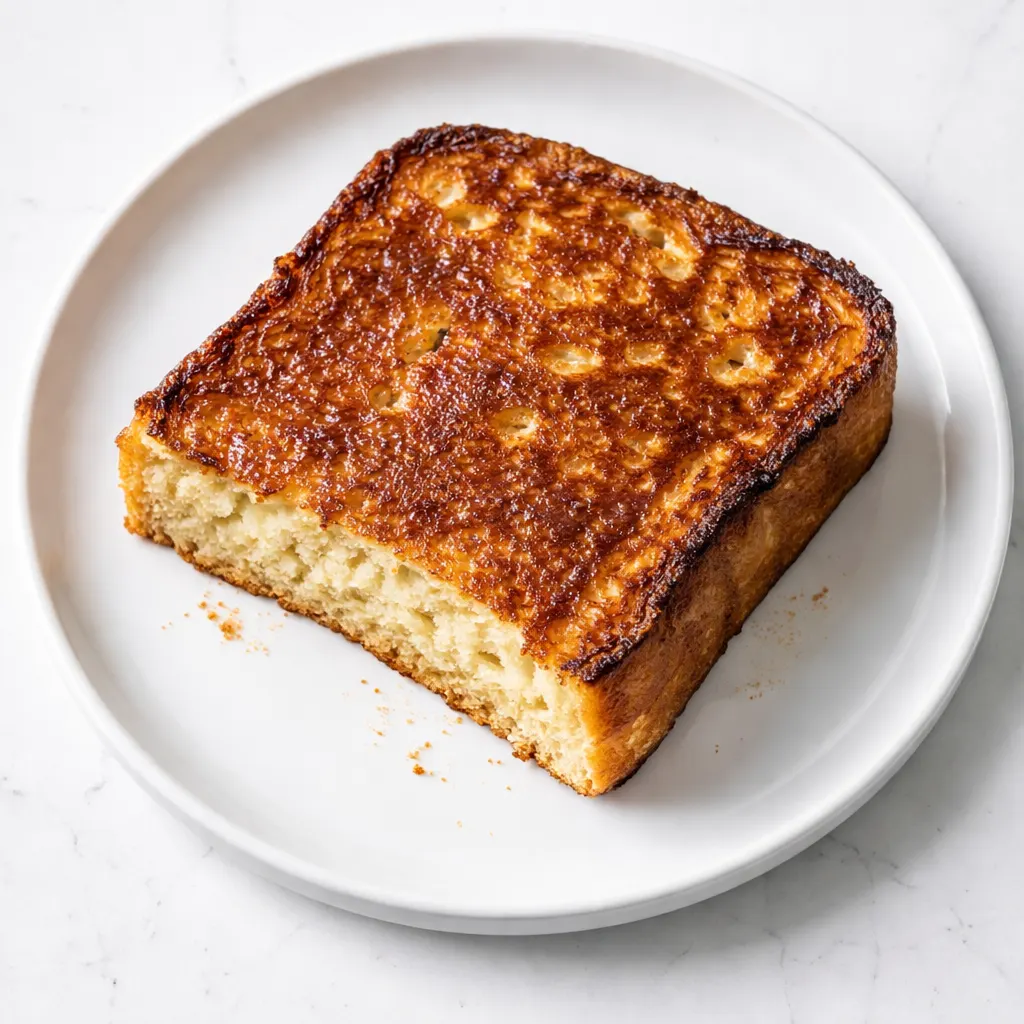
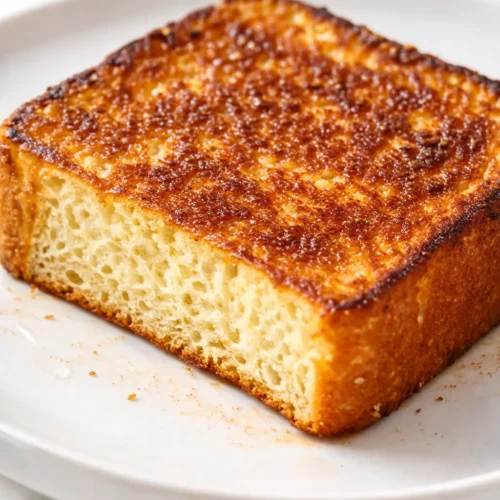
First, the flour. It stabilizes the custard, giving it enough structure to form a thin, crispy shell as it cooks. That shell is what keeps the syrup out of the bread’s interior and locks the creamy custard inside. It’s not a thick batter — it’s thin enough to soak in lightly but strong enough to hold its shape on the griddle. The result is French toast that actually stays crisp while you eat it. No soggy center. No eggy puddles.
Second, the blender. I know it seems like an extra step, but it makes a real difference. Blending the flour into the milk and eggs ensures there are no lumps and the sugar and cinnamon are fully dissolved. You get a completely smooth, consistent custard that coats every slice evenly. No whisking until your arm hurts, no stray pockets of dry flour hiding in the bottom of the bowl.
Simone doesn’t know about the flour. She just knows it’s the good kind. I’ll tell her when she’s older and has her own kitchen.
Everything You Need — Plus My Honest Notes
- 4 large eggs: The base of the custard. Farm-fresh if you can get them, but standard carton eggs work fine. I’ve made this with both, and the difference is subtle.
- 2/3 cup milk: Whole milk gives the richest custard, but 2% works perfectly. I’ve also used oat milk when we were out of dairy and it held up surprisingly well. Just don’t use skim — it’s too thin and the texture suffers.
- 1/4 cup all-purpose flour: This is the secret. Don’t skip it. Don’t substitute with almond flour or cornstarch unless you’ve tested it, because I have and the results aren’t the same. AP flour is what gives that delicate crispy shell.
- 1/4 cup granulated sugar: Just enough sweetness to balance the richness of the eggs and milk. Not so much that it burns on the griddle, but enough that you don’t need a ton of syrup on top.
- 1/4 teaspoon salt: You think you can skip it, but you’d be wrong. Salt sharpens all the sweet flavors and keeps the custard from tasting flat.
- 1 teaspoon ground cinnamon: Warm, aromatic, non-negotiable. I buy whole cinnamon sticks and grind them in a spice grinder every few months. The pre-ground stuff loses its punch after a few weeks. If you’re using pantry cinnamon, double the amount.
- 1 teaspoon vanilla extract: Pure vanilla extract is something Celestine always kept in her pantry, and I’ve kept the habit. It rounds out the custard and makes the whole kitchen smell like a special occasion.
- 8 thick slices bread: This is where the recipe lives or dies. You need stale, thick-cut bread. Brioche, challah, or Texas toast are my top choices. A one-inch slice, at least a day old, preferably two. Fresh bread turns to mush. If all you have is fresh bread, spread the slices on a baking sheet and put them in a 300°F oven for 10 minutes to dry them out.
What to Pull Out Before You Start
- Griddle or large skillet: A 12-inch cast iron skillet is my go-to. It holds heat evenly and that’s what you need for even browning. A nonstick pan works in a pinch but won’t give you the same golden crust.
- Blender: For that smooth, lump-free custard. A whisk and a bowl work if you don’t have a blender — just make sure to whisk the flour and eggs together first before adding the milk to avoid clumps.
- Spatula: A thin, flat spatula for flipping. Nothing fancy.
- Baking sheet or plate: To hold the dipped slices while you cook the rest.
Let’s Make It — My Exact Process
This goes fast once you start, so read through the steps once and then get everything set up. I promise it’s easy — just a few small details that make the difference between good French toast and “Simone-approved” French toast.
Preheat and prep: Set your griddle to 350°F or heat your skillet over medium heat. Let it get fully hot before you add any butter or oil — about 5 minutes.
- Blend the custard: In a blender, combine the eggs, milk, flour, sugar, salt, cinnamon, and vanilla. Blend on low speed until the mixture is completely smooth, about 20 seconds. No lumps, no streaks. Scrape down the sides if you need to. Let the batter rest for 5 minutes. The flour needs a minute to hydrate, and that short rest makes the texture noticeably better. (📸 Photo tip: The blended batter should look like thin pancake batter — pourable, pale brown, and completely smooth.)
- Dip the bread: Take one slice of bread and dip it into the custard. Let it sit for about 15 seconds on each side — no longer. If the bread is fresh, give it just a quick dip on each side and move on. The goal is custard inside the bread, not a soaking wet mess that falls apart on the griddle. (📸 Photo tip: The bread should be fully coated but still hold its shape when you lift it. It should feel heavy but not soggy.)
- Griddle the first side: Grease the hot griddle with a thin layer of butter or neutral oil. I use a mix — butter for flavor, oil to keep it from burning. Place the dipped bread slices onto the hot surface. Don’t crowd the pan; leave space between each slice so the steam can escape. Cook for 3-4 minutes, until the bottom is deep golden brown with dark caramelized spots. You’ll see the edges start to look dry and crispy. That’s the flour doing its job.
- Flip and finish: Flip each slice carefully and cook for another 2-3 minutes on the second side. The second side cooks faster because the griddle is already hot. Look for the same deep golden color and a slight puff in the center — that’s the custard setting perfectly.
- Serve immediately: Transfer the cooked French toast to a plate. Serve warm with butter, maple syrup, and a dusting of powdered sugar if you’re feeling fancy. Or just syrup, which is what we do 90% of the time at our house.
How I Meal Prep These for the Week
This recipe is dangerous because it’s so easy to make a double batch. I do it on purpose and freeze the extras. It’s the best weekday breakfast shortcut I have — better than anything from the freezer aisle.
- Fridge: Cooked French toast keeps in an airtight container in the fridge for up to 3 days. The texture softens slightly, but a quick toast in the air fryer brings the crisp right back.
- Freezer: Yes, it freezes beautifully. Arrange the cooked and cooled slices in a single layer on a baking sheet and freeze until solid, about 1 hour. Then transfer them to a zip-top bag. They’ll keep for up to 2 months. I label the bag with the date because I have absolutely forgotten and found mystery French toast three months later.
- Reheat: The toaster is your best friend here. Pop a frozen slice straight into the toaster on medium-high and toast until hot and the edges are crispy again — about 2 cycles. The air fryer at 350°F for 3 minutes works beautifully too. The microwave will make it sad. Don’t do it.
Things I Wish I’d Known the First Time
- Stale bread is non-negotiable: I cannot stress this enough. Fresh bread soaks up the custard like a sponge and turns into a heavy, wet mess that never crisps. I’ve made this mistake more times than I want to admit. If your bread is fresh, dry it out in the oven first. It’s a 10-minute step that changes everything.
- Let the batter rest: The 5-minute rest after blending isn’t optional. The flour needs time to fully absorb the liquid. If you cook it right away, the flour hasn’t had time to hydrate and the texture will be slightly grainy. I know it feels like waiting forever, but it’s really just 5 minutes. Go pour yourself a coffee, then come back to it.
- Don’t soak too long: A quick dunk on each side is all you need. If you let the bread sit in the batter, it will become too heavy and won’t cook through properly. The custard should be inside the bread, not just surrounding it. The exception is very thick, very dry bread — that can handle a 20-second soak per side.
- Medium heat is better than high heat: High heat burns the sugar and cinnamon before the custard inside is set. Medium heat gives you time to develop that deep golden crust without scorching. I use 350°F on my griddle. If you’re using a skillet, keep it at medium. Actually medium, not “medium-high because I’m hungry” which is a lie I’ve told myself many times.
- Even if you mess up a little, it’s still good: I’ve had my share of batches where the bread was too fresh or the heat was too high. The center was a little soft or the outside was a little dark. And you know what? My family still ate every single piece. This is not a fragile recipe. It forgives mistakes.
Make It Yours — Easy Variations
- Dairy-Free: Swap the milk for oat milk or full-fat almond milk. Add 1 tablespoon of melted coconut oil or a neutral oil like avocado oil to the batter to replace the fat. It works beautifully. I make this version for my sister-in-law and she always asks for the recipe.
- Gluten-Free: Use your favorite gluten-free bread — the sturdy, sliced kind, not the flimsy stuff that falls apart. The batter itself is naturally gluten-free (no wheat in the custard), so you just need a bread that can hold up to a dip. Canyon Bakehouse or Schar are my go-tos for Simone’s gluten-sensitive friends.
- Stuffed French Toast (Simone’s Birthday Request): Take two slices of bread, spread a thick layer of cream cheese and a spoonful of strawberry jam between them, then dip the whole sandwich in the custard and cook as directed. It’s decadent and ridiculous and completely worth it. I serve it with whipped cream and extra berries. It’s the only breakfast that gets a “Happy birthday to me” song before she even takes a bite.
- Spiced French Toast: Add a pinch of nutmeg, a pinch of cardamom, and a pinch of black pepper to the batter. The pepper is not a mistake — it adds warmth without any heat. This is my version for fall mornings when the weather finally turns cool.
- Bacon-Fat French Toast: Reserve a tablespoon of bacon fat and use it to grease the griddle instead of butter. It adds a subtle smoky flavor that pairs incredibly with the sweet custard. I do this on Sundays when I’m already cooking bacon on the side.
Questions I Get About This Recipe All the Time
Q: Why did my French toast come out soggy?
A: Ugh, I hate when that happens and it’s almost always the bread. Fresh bread soaks up too much custard and doesn’t have a chance to crisp up. Use bread that’s at least a day old — two days old is even better. If you have fresh bread, spread the slices on a baking sheet and bake at 300°F for 10 minutes to dry them out. Also check your heat — if the griddle isn’t hot enough, the bread will absorb the butter and steam instead of sear. Medium heat is the sweet spot. You’ve got this next time.
Q: Can I use almond milk or oat milk instead of regular milk?
A: Yes, and I do it all the time. Oat milk is my favorite non-dairy substitute because it’s thicker and creamier. Just add a tablespoon of neutral oil or melted coconut oil to the batter to make up for the missing fat. Almond milk works but is thinner, so the custard will be slightly less rich. The flour still does its job, so you’ll still get that crispy shell.
Q: How long does this last? Can I freeze it?
A: It keeps in the fridge for up to 3 days in an airtight container. But the real winner is the freezer. Flash freeze the cooked slices on a sheet pan, then transfer to a zip-top bag. They’ll keep for 2 months. To reheat, pop a frozen slice directly into the toaster or air fryer at 350°F for 3 minutes. It comes out crispier than the original batch. I always make a double batch for exactly this reason.
Q: What bread do you recommend?
A: Brioche is my number one choice because it’s rich, slightly sweet, and sturdy enough to hold the custard. Challah is a close second. If neither is available, Texas toast or a good thick white bread from the bakery works just fine. The key is thick slices — at least 1 inch — and day-old texture. I don’t recommend whole wheat or multigrain for this recipe; the flavor competes with the custard. Save those for avocado toast.
Q: What do you serve with this French toast?
A: At our house, it’s a full breakfast spread. I usually serve it with crispy bacon (the bacon fat goes on the griddle if I’m making the grown-up version), fresh fruit — berries or sliced bananas — and a side of scrambled eggs if we’re really hungry. My personal favorite pairing is a cup of strong black coffee and a quiet 10 minutes before the chaos of the day starts. My kids love it with a side of sausage links and extra syrup for dipping.
More Recipes My Family Makes on Repeat
If this French toast has become a regular in your rotation, here are a few other breakfast recipes that get the same kind of welcome at my table. They’re all forgiving, crowd-pleasing, and just special enough for a weekend morning.
- [INTERNAL LINK PLACEHOLDER: Fluffy Buttermilk Pancakes] — These are the pancakes Simone asks for when French toast is “too fancy” and she just wants a stack of buttermilk pancakes with butter melting on top.
- [INTERNAL LINK PLACEHOLDER: Savory Breakfast Bread Pudding] — The savory cousin of French toast, perfect for when you want to feed a crowd and impress everyone without a lot of work.
- [INTERNAL LINK PLACEHOLDER: Celestine’s Famous Praline Syrup] — A New Orleans-style praline syrup that tastes like a warm hug over pancakes or French toast. I always keep a jar in the fridge.
This is the French toast that Simone calls “the good kind,” and I haven’t changed the recipe since she gave it that review. It’s the flour, it’s the rest, it’s the low and slow heat — but really it’s just paying attention to the details that matter and skipping the ones that don’t. If you try it, come back and let me know how it went. I love hearing about the breakfasts that make a Saturday morning feel special.
📌 This French toast recipe with flour in the batter stays perfectly crispy on the outside and custardy on the inside — save it for your next lazy Saturday morning when you want to make something that feels like a hug on a plate.
French Toast That Stays Crispy on the Outside and Custardy on the Inside — Every Time
Equipment
- Griddle or large skillet
- Blender
- Spatula
- Baking sheet or plate
Ingredients
Custard
- 4 large eggs
- 2/3 cup whole milk (or 2%)
- 1/4 cup all-purpose flour
- 1/4 cup granulated sugar
- 1/4 teaspoon salt
- 1 teaspoon ground cinnamon
- 1 teaspoon vanilla extract
Bread
- 8 slices stale thick-cut bread (brioche, challah, or Texas toast)
- as needed butter or neutral oil, for the griddle
Instructions
- Preheat your griddle to 350°F (or heat a large skillet over medium heat). Let it get fully hot before adding any fat — about 5 minutes.
- In a blender, combine the eggs, milk, flour, sugar, salt, cinnamon, and vanilla. Blend on low until completely smooth, about 20 seconds. Let the batter rest for 5 minutes — this allows the flour to hydrate and improves texture.
- Dip each slice of bread into the custard, about 15 seconds per side. Do not over-soak; the bread should feel heavy but not soggy.
- Grease the hot griddle with butter or oil. Place the dipped bread slices onto the hot surface without crowding. Cook for 3-4 minutes until the bottom is deep golden brown with caramelized spots.
- Flip each slice and cook for another 2-3 minutes until golden on the second side. The second side cooks faster because the griddle is already hot.
- Transfer to plates and serve immediately with butter, maple syrup, and a dusting of powdered sugar if desired.