
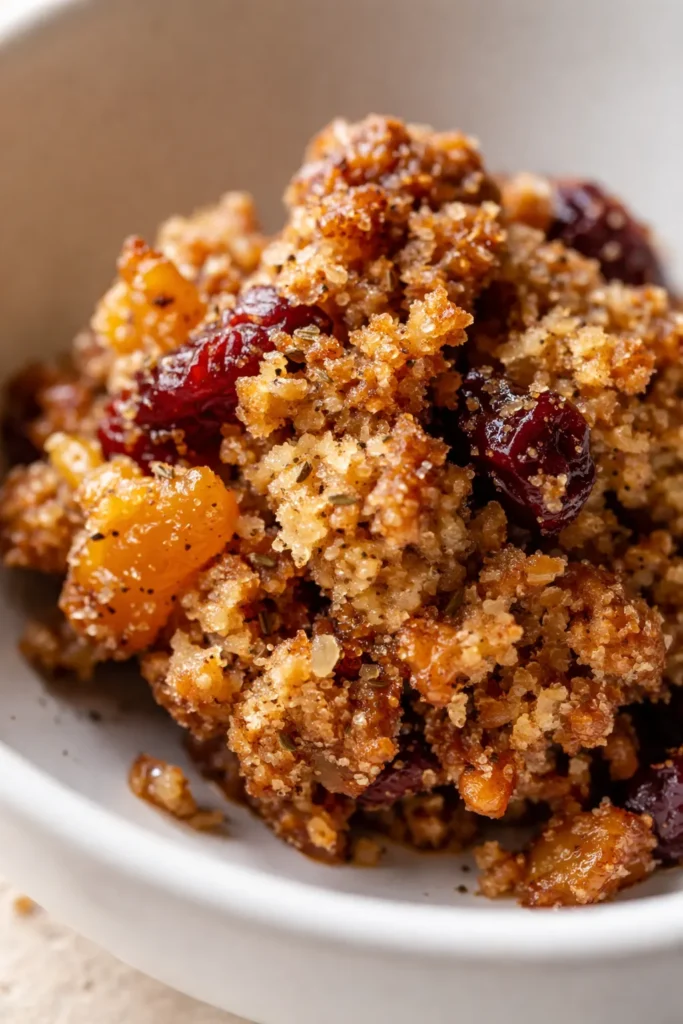
TLDR: This almond flour granola bakes low and slow at 300°F for 25-30 minutes to achieve a deep golden color and crispy clusters without burning. The key is stirring once halfway through and letting it cool completely on the baking sheet before breaking it apart. Expect craggy, buttery, cardamom-kissed clusters that stay fresh at room temperature for up to a week.
That first loud, satisfying crunch — the one that echoes just a little in the quiet morning kitchen — is exactly why I stopped buying boxed granola a few years ago. This almond flour version turned out even better than I originally hoped: craggy and buttery, kissed with warm cardamom and a gentle ribbon of honey. I make a double batch almost every Sunday now, and it barely lasts until Wednesday. My partner eats it by the handful straight from the container, and I’ve caught my neighbor sneaking a scoop when she drops by for coffee. It’s that kind of recipe — the one you text your sister about before you’ve even finished cleaning up the kitchen.
The first batch I made came out pale and disappointingly soft — I hadn’t spread the mixture thin enough, and the almond flour steamed instead of toasting. Batch two was better (thinner layer, higher oven rack), but it was batch three that finally got the loudest reaction from my family: deeply golden, shatteringly crisp, and those perfect little clusters we fought over at breakfast. Now I watch for that nutty browning smell around the 20-minute mark, and I never, ever skip the cooling step. That patience is what takes it from good to absolutely irresistible.
- Serves: 8 as a breakfast or snack topper
- Hands-On Time: 10 min | Total Time: 40 min
- Difficulty: Easy enough for a lazy Sunday reset
- Cost per serving: ~$0.85
- Nutrition Estimate: 220 Calories, 6g Protein, 18g Carbs, 15g Fat, 3.5g Saturated Fat, 5g Fiber, 95mg Sodium per serving
- Dietary Notes: Naturally Gluten-Free & Low-Carb Friendly
(Photo above: overhead shot of golden-brown almond flour granola scattered across a light marble surface, with a spoon nestled in the center, warm morning sunlight hitting the clustered pieces, fresh berries and a bowl of yogurt in the soft-focus background.)
Why 300°F and a Single Stir Make All the Difference
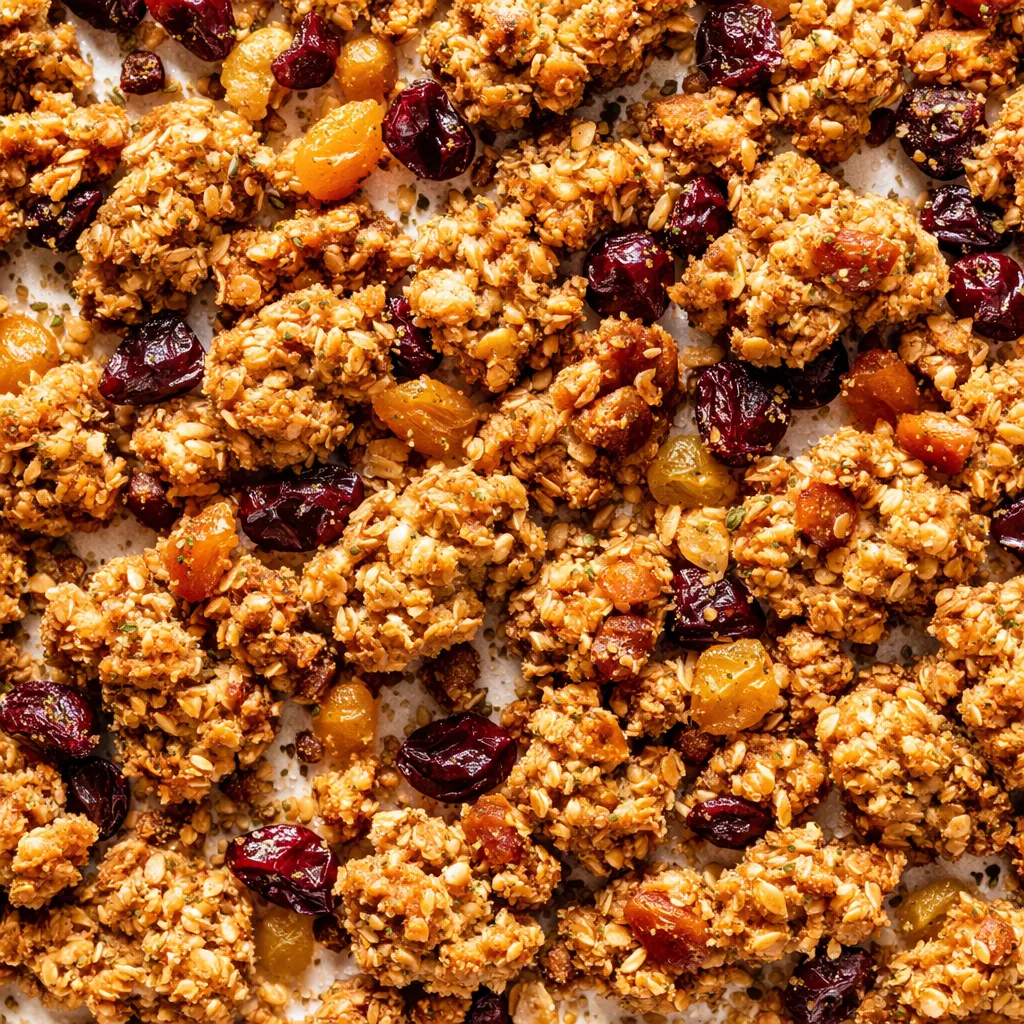
Most homemade granola fails in one of two ways: it burns on the edges before the center is done, or it turns out pale and chewy instead of crisp and golden. Almond flour is more delicate than oats — it has a higher fat content and toasts much faster — so it needs steady, gentle heat to caramelize evenly without scorching. That’s exactly what 300°F delivers. It gives the honey and ghee time to coat every tiny particle of almond flour and slowly coax out the natural oils, resulting in a deep, nutty flavor you just can’t get from a rushed baking process.
That single stir at the 15-minute mark is the other non-negotiable step. It redistributes the wet ingredients so every cluster gets an equal chance to brown. Skip it, and you’ll end up with uneven browning — pale spots alongside overdone edges. I learned that the hard way my first time. Now I set a timer and make sure I’m standing by the oven with my spatula ready. According to USDA nutritional data, almond flour provides a solid source of healthy fats and protein, making this granola far more satiating than traditional oat-based versions.
What all this produces is a batch of granola that’s uniformly golden, impossibly crunchy, and full of those craggy, bite-sized clusters everyone fights over. It stays that way for a full week — if it lasts that long.
How This Recipe Came Together: Three Batches, One Perfect Result
I don’t land on a recipe I love without putting it through real kitchen stress. This granola went through three distinct rounds of testing before it hit my weekly rotation. The first batch taught me that almond flour steams rather than toasts if the layer is too thick — the center came out pale and soft while the edges looked promising. For the second batch, I spread the mixture as thin as I dared and moved the rack to the upper third of the oven. That helped with even browning, but the clusters still fell apart too easily when I broke them. The breakthrough came in batch three: I stirred once at the halfway point to redistribute the honey-ghee coating, then let the pan cool completely on the counter without touching it for a full 30 minutes. The result was the craggy, shatteringly crisp texture I’d been chasing. I tested the final version twice more — once with a friend’s oven that runs hot, and once with a swap of coconut oil for ghee — to make sure the method holds up across different kitchens. It does. Every single time.
Everything You Need (Plus My Honest Notes)
- 2 cups almond flour: Buy super-fine blanched almond flour for the best texture and color. If you use almond meal (with the skins still on), expect a denser, slightly coarser result that won’t be quite as golden.
- 1 cup dried fruit (chopped if needed): I love unsweetened dried tart cherries or chopped dried apricots here. Their tartness cuts through the honey beautifully. If your dried fruit is large (like dates or figs), give it a rough chop so it distributes evenly.
- 1 teaspoon ground cardamom: This is the sleeper hit of the recipe. Don’t skip it — it makes the whole kitchen smell like a cozy chai shop while it bakes. If you’re not a cardamom fan, you can swap in cinnamon, but I urge you to try cardamom first.
- ¼ teaspoon salt: Balances the sweetness and makes everything else taste more like itself. I use fine sea salt here.
- 3 tablespoons ghee or melted butter: Ghee gives a cleaner, nuttier flavor that pairs beautifully with the almond flour. Butter adds a little more richness and a slight creaminess. Both work; just let whichever you choose cool slightly before mixing.
- 3 tablespoons honey: This is the perfect amount for mild sweetness without making the granola sticky or heavy. If you use a thicker honey, warm it gently so it mixes evenly with the ghee.
What to Pull Out Before You Start
- Medium bowl — for combining the dry ingredients.
- Separate bowl — for whisking the wet ingredients together.
- Whisk — to make sure the honey and ghee emulsify properly before they hit the dry mix.
- Baking sheet — a standard half-sheet size works perfectly. Line it with parchment paper if you want easier cleanup.
- Oven — preheated to 300°F. An oven thermometer is worth keeping around if yours runs hot or cool.
- Airtight container — for storing the finished granola and keeping it crunchy.
Let’s Make It (Step by Step)
Alright, here’s how I do it every single time. It’s almost too easy — you’ll memorize it after one batch.
Preheat and prep: Crank your oven to 300°F. This low-and-slow approach is what gives almond flour granola its signature crunch without any risk of burning.
- Mix the dry ingredients: In a medium bowl, stir together the almond flour, chopped dried fruit, ground cardamom, and salt. Make sure there are no clumps of flour hiding at the bottom — I use my fingers to break up any I find.
- Whisk the wet ingredients: In a separate bowl, whisk together the ghee (or melted butter) and honey until they look smooth and fully combined. It should resemble a thin, glossy syrup.
- Combine everything: Pour the wet mixture over the dry ingredients. Stir with a spatula until every bit of almond flour looks coated and the mixture forms small, craggy clumps. It will feel a little like damp sand — that is exactly what you want for clusters.
- Spread and bake: Spread the mixture in a thin, even layer on your baking sheet. Don’t press it down too hard, but pat it gently into an even thickness. Bake for 25 to 30 minutes, stirring once around the 15-minute mark. You want a deep golden color and that toasty, nutty aroma filling your kitchen.
- Cool completely (do not skip this): This is honestly the hardest step. Let it sit undisturbed on the baking sheet until it is fully cool — about 30 minutes. The granola will crisp up as it cools. If you touch it while it’s still warm, it will feel soft and bendy. Do not panic; that is completely normal. Let the cooling process work its magic.
- Break and store: Once cool, break the granola into clusters of your preferred size. Transfer it to an airtight container. It stays fresh at room temperature for up to a week — though in my house, it’s lucky to last four days.
How I Stock My Pantry with This Granola
Since this granola keeps beautifully for a full week, I always make a double batch during my Sunday meal prep session. It’s become my go-to for quick breakfasts, afternoon snack attacks, and even a crunchy topping for baked fruit desserts. My partner has started packing little bags of it for his work snacks, which I take as the highest compliment.
- Fridge: Not strictly necessary, but if your kitchen runs warm and humid, store it in the fridge. Just let it sit at room temperature for five minutes before eating so the clusters soften slightly.
- Freezer: Yes! This granola freezes beautifully. Transfer it to a freezer-safe zip-top bag and store for up to 3 months. Scoop it straight onto yogurt or oatmeal — no thawing needed.
- Reheat: If the granola loses its crunch after a few days (it happens in humid weather), spread a thin layer on a baking sheet and pop it in a 300°F oven for 3-4 minutes. Let it cool again, and it crisps right back up like new.
Things I Wish I’d Known the First Time
- Don’t skip the cooling step: I know it’s tempting to dig in the second it comes out of the oven, but the granola is actually soft and pliable when it’s hot. It only gets crunchy as it cools. Leave it alone for a full 30 minutes — set a timer if you have to.
- Check your almond flour freshness before you start: Almond flour can go rancid quietly, especially if it’s been sitting in your pantry for a while. Give it a good sniff before you mix anything. If it smells even slightly stale or sour, the entire batch will taste that way.
- Go easy on the mix-ins: If you want to add nuts, seeds, or coconut flakes, keep the total mix-ins to ½ cup. Any more than that, and the almond flour won’t be able to form proper clusters — you’ll end up with a loose, sandy texture.
- Trust the visual and smell cues: At 15 minutes, the edges should look golden. That’s your signal to stir. At 25-30 minutes, the whole pan should be an even, warm golden-brown, and your kitchen should smell intensely nutty and sweet.
Make It Yours — Easy Swaps That Actually Work
- Spiced Chai Version: Add ½ teaspoon ground cinnamon and ¼ teaspoon ground ginger along with the cardamom. It tastes like a cozy morning with your favorite tea and pairs beautifully with chai or coffee.
- Citrus & Cranberry: Add 1 tablespoon of finely grated orange zest to the wet ingredients before whisking. Swap the dried fruit for dried cranberries. The orange brightens the whole batch and makes it feel extra special.
- Nut-Free Alternative: This recipe is built on almond flour, so it doesn’t work for a completely nut-free diet. However, you can experiment with sunflower seed flour — just know the color will turn greenish as it bakes (that’s a natural reaction, and it’s still safe to eat).
- Low-Sugar: Swap the honey for 2 tablespoons of allulose syrup or monk fruit syrup. The texture will be slightly less clustered and a bit more crumbly, but the crunch factor is still outstanding.
Troubleshooting: Why Did My Almond Flour Granola Turn Out Soggy?
Q: Why did my granola turn out pale and chewy instead of golden and crunchy?
A: This usually means your oven runs a little cool, or your layer was too thick. Next time, make absolutely sure the granola is spread in a single, even layer — no deep spots. If it’s still pale after 25 minutes, bake it for 5 more minutes and watch it closely. The color should be an even, deep golden brown.
Q: Can I use coconut oil instead of ghee or butter?
A: Yes, you absolutely can. Use 3 tablespoons of melted coconut oil. It will change the flavor slightly — adding a subtle coconut note — and the granola might be a touch less rich, but the texture will still be beautifully crisp and clustered.
Q: How do I know when the granola is truly done?
A: Look for a deep golden color across the entire pan and a strong, nutty aroma coming from your oven. The granola will still feel slightly soft and flexible when you take it out — that is completely normal. It only becomes crunchy during the cooling phase, so trust the color and the smell.
Q: Can I make this completely sugar-free?
A: Yes! You can replace the honey with a sugar-free syrup like allulose or chicory root syrup. The texture will be slightly more crumbly (sugar helps bind the clusters), but the flavor will still be delicious and satisfying.
How to Store Your Almond Flour Granola
Q: How long does this granola last, and how should I store it?
A: It stays perfectly crunchy for up to 1 week in an airtight container at room temperature. If you live in a humid climate, keep it in the pantry or even the fridge so it doesn’t absorb moisture from the air.
Q: Can I make a big batch and freeze it?
A: Absolutely! This granola freezes like a dream. Transfer it to a zip-top freezer bag and store it for up to 3 months. It thaws very quickly, so you can sprinkle it directly onto yogurt or eat it by the handful straight from the freezer.
Q: What’s the best way to reheat this granola to restore crunch?
A: If it’s lost its crunch at any point, spread it on a baking sheet and pop it into a 300°F oven for 3-4 minutes. Let it cool completely again on the sheet, and it will be just as shatteringly crisp as the day you made it.
Q: What do you serve with this almond flour granola?
A: It’s incredible on thick Greek yogurt with fresh berries and an extra drizzle of honey. I also love it over baked apples or poached pears, on top of a green smoothie bowl, or even as a crunchy topping for vanilla ice cream. My latest obsession is sprinkling it over a ricotta and fig toast for a quick breakfast.
This almond flour granola has genuinely become my most-requested breakfast item — even from friends who swore they didn’t like granola. I hope it becomes a staple in your kitchen too, bringing a little warmth and crunch to your mornings.
If you make a batch, tag me on Pinterest so I can see your beautiful clusters — I love cheering you on from my screen!
📌 Crispy, golden almond flour granola recipe that stays perfectly clustered and crunchy — save it for your next Sunday meal prep session.
Almond Flour Granola That’s Perfectly Clustered (Not Soggy) — Finally
Equipment
- Medium Bowl
- Small Bowl
- Whisk
- Baking Sheet
- Oven
- Airtight container
Ingredients
Granola Base
- 2 cups almond flour Use super-fine blanched almond flour. If using almond meal, expect a denser result.
- 1 cup dried fruit Chopped if needed. Tart cherries or apricots work well. Chop large fruit like dates or figs.
- 1 teaspoon ground cardamom Don’t skip; it adds a chai-like aroma. Can substitute cinnamon if desired.
- 0.25 teaspoon salt Fine sea salt recommended.
- 3 tablespoons ghee Ghee or melted butter. Ghee gives a nuttier flavor; butter adds richness. Cool slightly before mixing.
- 3 tablespoons honey Mild sweetness. Warm thicker honey for easier mixing.
Instructions
- Preheat your oven to 300°F.
- In a medium bowl, stir together the almond flour, chopped dried fruit, ground cardamom, and salt. Use your fingers to break up any clumps of flour.
- In a separate bowl, whisk together the ghee (or melted butter) and honey until smooth and glossy, resembling a thin syrup.
- Pour the wet mixture over the dry ingredients. Stir with a spatula until every bit of almond flour is coated and the mixture forms small, craggy clumps (like damp sand).
- Spread the mixture in a thin, even layer on a baking sheet. Pat gently—do not press hard. Bake for 25 to 30 minutes, stirring once around the 15-minute mark, until deep golden and fragrant.
- Let the granola cool completely on the baking sheet, undisturbed, for about 30 minutes. It will crisp up as it cools—do not touch while warm.
- Once cool, break into clusters of your preferred size. Transfer to an airtight container. Store at room temperature for up to 1 week.
Notes
- Don’t skip the cooling step—granola is only crunchy after it cools completely (30 minutes).
- Check almond flour freshness before starting—rancid flour will ruin the batch.
- Keep any optional mix-ins (nuts, seeds, coconut) to ½ cup total to maintain proper clustering.
- Trust visual and smell cues: at 15 minutes edges should be golden; at 25-30 minutes the whole pan should be deep golden and smell nutty.
Related posts:
 Strawberry Cream Tea Party Sandwiches for Baby Showers & Spring Gatherings (Tastes Like a Cloud)
 Frozen Chocolate Covered Strawberry Bites That Taste Like Pure Summer (3 Ingredients, No Oven)
 Apple Pie Rice Krispie Treats for Last-Minute Fall Desserts: 5 Minutes, No Oven, All the Flavor
 Cherry Rice Krispie Treats That Taste Like a Chocolate-Covered Cherry — in 20 Minutes Flat