
The first time my daughter Simone asked me to make galaxy cupcakes, she was six and convinced she was going to be an astronaut. She’s eight now and the astronaut phase has passed, but the demand for these cupcakes? That’s still going strong. They look like something from a fancy bakery window—deep purple, electric blue, swirling with pink nebulas and silver stars—but they start with the same vanilla buttermilk base I’ve been making since before she was born. The first batch I made looked like a bruise. The second batch looked like Saturn’s rings. The third batch? Simone’s exact words were: “Mama, these look like Hubble took a picture of them.” That’s the batch I’m giving you here.
The short version: These look like a million bucks but come together with a simple piping trick that hides every mistake. My secret is layering the gel colors directly in the piping bag so the swirl does all the work for you.
I’ve made these for birthday parties, school bake sales, and random Tuesday afternoons when Simone asks if we can “make something purple.” Every single time, someone asks me if I bought them from a specialty bakery. I just smile and say, “Nope. Just butter, sugar, and a little patience.”
- Serves: 24 cupcakes
- Hands-On Time: 45 min | Total Time: 1 hr 30 min
- Difficulty: Medium (the swirl makes you look like a professional)
- Cost per serving: ~$1.50 per cupcake
- Calories: ~380 per cupcake (frosting included, zero regrets)
- Dietary Notes: Adaptable for dairy-free milk and butter
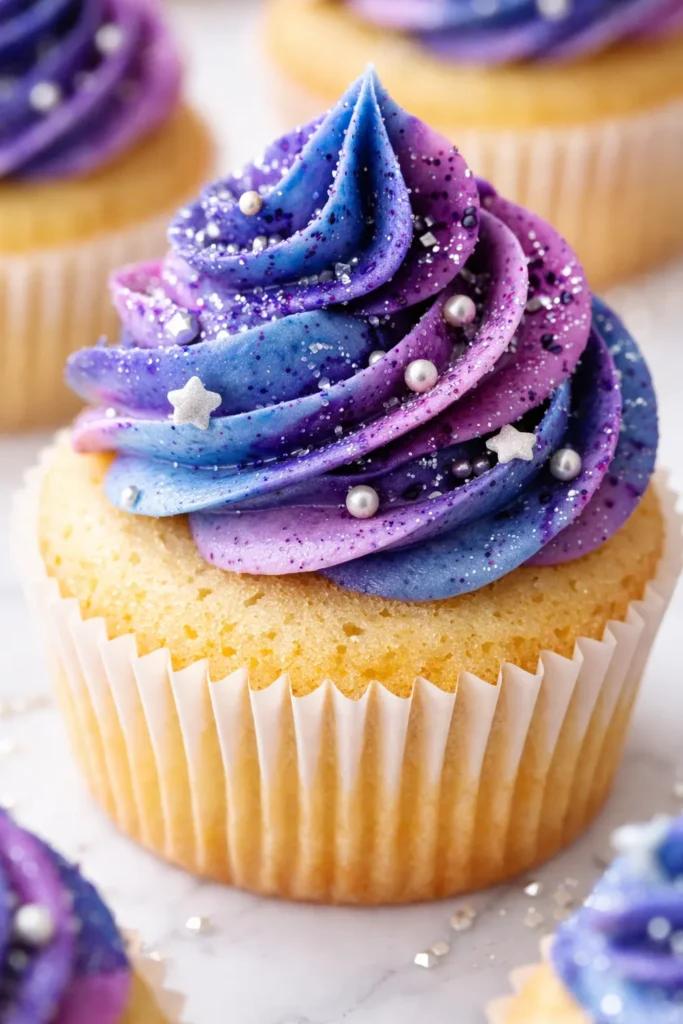
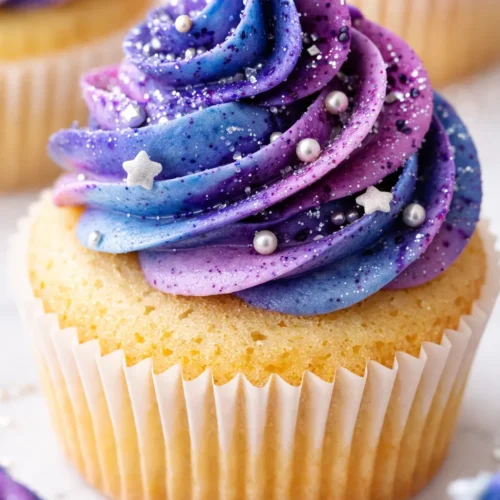
(Photo above: Overhead shot of a single galaxy cupcake on a dark slate board, natural side light catching the edible glitter and star sprinkles, deep purple and blue buttercream swirl topped with a silver star.)
Why Layering Colors in the Bag Beats Every Other Method
I have tried every galaxy frosting trick in the book. I’ve painted the inside of the piping bag with a brush. I’ve dipped the tips in melted candy melts. I’ve even tried using a kitchen sponge to dab color on the inside of the bag (don’t ask). None of those methods worked as consistently as just layering the colored buttercream directly into the bag. It sounds almost too simple, but that’s what makes it work.
Here’s why: when you spoon your colored buttercream into the bag in horizontal rows—purple on one side, blue on the other, pink in the middle, a stripe of dark grey along the edge—every swirl you pipe comes out with a different pattern. The colors mix naturally as they move through the tip, creating that marbled, nebula effect that looks like it took hours of painstaking work. It didn’t. It took about four minutes of spooning.
The second thing that makes this method so reliable is that it gives you control without requiring precision. You don’t need a steady hand. You don’t need artistic talent. You just need to layer the colors in the right order and trust that the physics of the piping bag will do the rest. Every single cupcake will look different, and that’s the whole point. Galaxies are chaotic. Your frosting should be too.
Everything You Need to Reach Outer Space
The cupcake base here is my go-to vanilla buttermilk recipe. It’s tender, it’s sturdy enough to hold a mountain of frosting, and it has just the right amount of sweetness to balance the rich buttercream. I’ve tested this base at least thirty times, and it never lets me down. The buttermilk is not optional—it’s what gives the crumb that soft, almost velvety texture.
- 2 1/4 cups cake flour (or all-purpose in a pinch): Cake flour gives you that light, airy crumb that makes people ask what your secret is. If you use all-purpose, swap 2 tablespoons of flour for cornstarch.
My kids can’t tell the difference between cake flour and all-purpose, but I can. If you want the texture of a bakery cupcake, use cake flour. - 1 1/2 cups granulated sugar: Not too much, not too little. This is the sweet spot.
Simone once tried to add an extra half cup when I wasn’t looking. We don’t talk about that batch. - 1/2 cup unsalted butter, room temperature: Let it sit out for at least an hour. Cold butter does not cream properly.
I’ve microwaved butter in a pinch. It’s not the same. Plan ahead. - 2 large eggs, room temperature: Same deal as the butter. Room temperature eggs emulsify into the batter instead of fighting it.
- 1 cup buttermilk: This is non-negotiable. The acidity tenderizes the gluten and gives the cupcake its signature softness.
No buttermilk? Add a tablespoon of lemon juice or vinegar to regular milk and let it sit for 5 minutes. It works. - 2 teaspoons vanilla extract: Pure vanilla, not imitation. You’ll taste the difference.
- 1 1/2 teaspoons baking powder, 1/2 teaspoon baking soda, 1/2 teaspoon salt: The leavening team. They all have jobs.
- For the frosting: 1 1/2 cups unsalted butter, 5 cups powdered sugar, 3-4 tablespoons heavy cream, 1 teaspoon vanilla.
- Gel food coloring: Americolor in Violet, Electric Blue, Deep Pink, and Super Black. These are the colors that give you that deep, cosmic look. Liquid food coloring will give you pastel. Pastel is not a galaxy.
I buy these once a year and they last forever. Worth every penny. - Decorations: Star sprinkles, edible glitter (silver and gold), silver dragées. The more sparkle, the more convincing the galaxy effect.
Simone’s rule: “If it doesn’t sparkle, it’s not a real galaxy.”
What to Pull Out Before You Start
This recipe doesn’t require any fancy equipment, but a few specific tools make the process much smoother. You don’t need a stand mixer, but it helps. I’ve made these with a hand mixer plenty of times, and they turn out just as good.
- A 12-cup muffin pan (you’ll need two, or bake in batches)
- Paper cupcake liners (I prefer the foil-lined ones for stability)
- A stand mixer or hand mixer for the frosting
- A piping bag (I use disposable 18-inch bags)
- A Wilton 1M or 2A piping tip (the large open star tip is the key to the tall swirl)
If you only have a round tip, it will still look good, just less textured. - Gel food coloring and toothpicks for applying it
Let’s Make Some Galaxies (No Spaceship Required)
This process moves fast once you start, so read through the whole thing before you begin. The actual hands-on time is shorter than you think. Most of it is waiting for the cupcakes to cool, which is a good time to make your frosting.
Prep: Preheat your oven to 350°F. Line your muffin pans with cupcake liners.
- Cream the butter and sugar: In a stand mixer fitted with the paddle attachment, beat the butter and sugar together on medium speed for 3-4 minutes, until light and fluffy. Scrape the bowl halfway through. This step is important—it creates air pockets that help the cupcakes rise.
(📸 Photo tip: the mixture should look pale and almost sandy, with a noticeably lighter color than when you started.) - Add the eggs and vanilla: Add the eggs one at a time, beating well after each addition. Add the vanilla. The mixture might look slightly curdled at this point, and that’s totally fine.
- Mix the dry ingredients: In a separate bowl, whisk together the cake flour, baking powder, baking soda, and salt.
- Alternate the dry and wet: Add half the dry ingredients to the butter mixture, mix on low, then add the buttermilk, then the remaining dry ingredients. Mix just until combined. Overmixing at this stage will make the cupcakes tough.
I know it’s tempting to let the mixer run, but stop as soon as the flour disappears. I’ve made tough cupcakes before, and you will too if you walk away. - Fill the liners: Use a cookie scoop or a measuring cup to fill each liner about 2/3 full. Not 3/4. Not all the way. 2/3. This gives you a flat top instead of a mushroom.
(📸 Photo tip: the batter should be thick and smooth, just below the top of the liner.) - Bake: Bake for 15-18 minutes, or until a toothpick inserted in the center comes out clean. Let them cool in the pan for 5 minutes, then transfer to a wire rack to cool completely. This is the hardest part of the recipe: waiting for them to cool.
Warm cupcakes + buttercream = a sad, melty mess. I learned this the hard way. - Make the buttercream: While the cupcakes cool, beat the butter for the frosting on medium-high for 5 minutes until it’s pale, fluffy, and almost white. This is the texture that holds the swirl. Add the powdered sugar one cup at a time, then the cream and vanilla. Beat for another 2 minutes until light and airy.
If your buttercream looks curdled, keep mixing. It will come back together. I promise. - Color the frosting: Divide the buttercream into 4 bowls. Tint one deep purple (use Violet + a tiny dot of Electric Blue), one bright blue, one deep pink, and one dark grey (start with white frosting and add a tiny bit of Super Black—go slow, it’s potent).
- Layer the piping bag: Take a disposable piping bag fitted with a 1M tip. Using a toothpick or a small spatula, smear vertical stripes of each gel color inside the bag. Then carefully spoon the colored buttercream into the bag: purple on one side, blue on the other, pink in the middle, grey along the edge. Don’t mix it—just layer it.
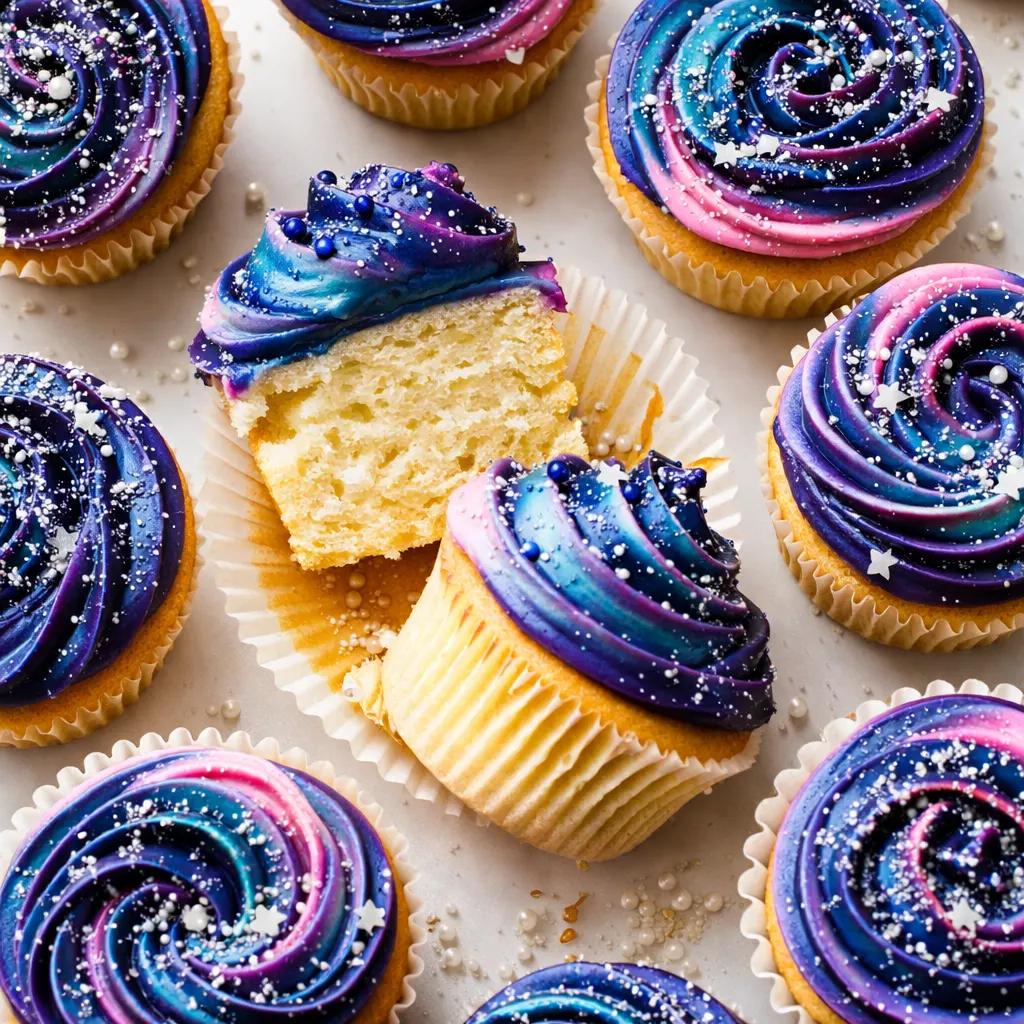
This is the part that feels like magic. Trust the layering. - Pipe the swirl: Starting from the outside edge of the cupcake, pipe a ring of frosting. Then pipe a second ring inside that one, slightly higher. Continue spiraling inward and upward, lifting the bag straight up at the end to create a tall peak.
(📸 Photo tip: the moment you see the stripes appear on the edge of the frosting as you pipe—that’s the money shot. Take a picture.) - Decorate: Immediately add star sprinkles, edible glitter, and silver dragées. Press them gently into the frosting so they stick. Work fast before the buttercream crusts over.
How I Make These for Simone’s Class Parties
I have a system for this now, because I learned the hard way that doing everything in one day is a recipe for a stressed-out mama and a messy kitchen. Here’s my method for making these ahead of time without losing quality.
I bake the cupcakes on Thursday evening and freeze them uncovered on a baking sheet. Once they’re frozen solid, I wrap them individually in plastic wrap and store them in a freezer bag. They stay fresh for up to two weeks this way. On Friday night, I make the frosting and store it in the fridge. On Saturday morning, I let the frosting come to room temperature, rewhip it for a minute to bring back the fluffiness, layer the colors, and pipe. The whole assembly takes about 20 minutes, and the cupcakes taste like they were baked that morning.
- Fridge: Unfrosted cupcakes in an airtight container for up to 3 days. Frosting in the fridge for up to 1 week.
- Freezer: Unfrosted cupcakes freeze beautifully for up to 2 months. Frosting can be frozen for up to 3 months. Thaw overnight in the fridge.
- Reheat: For frosted cupcakes, let them sit at room temperature for 20 minutes before serving. If they’ve been in the fridge, the buttercream will be firm, but it softens quickly.
Things I Wish I’d Known the First Time
I made about four batches of these before I got them exactly right. Here are the lessons I learned so you can skip the frustrating part.
- Don’t overfill the liners: I know it’s tempting to fill them higher so you get a domed top, but a dome is actually the enemy of a good swirl. You want a flat, even surface to pipe onto. 2/3 full is the rule.
- Chill the frosted cupcakes for 10 minutes: After you pipe the swirl and add the sprinkles, pop them in the fridge for 10 minutes. This sets the buttercream so the decorations stay exactly where you put them. If you skip this step, the sprinkles might slide off or sink into the frosting.
- Go easy on the black food coloring: Super Black gel is incredibly potent. A tiny toothpick dab is enough to turn a whole cup of frosting dark grey. If you add too much, it will taste bitter and turn your teeth gray. I’ve done it. It’s not cute.
- Use a tall glass to hold your piping bag: When you’re spooning the colored buttercream into the bag, fold the top of the bag over the rim of a tall glass. This keeps the bag upright and your hands free. It’s the single most useful piping trick I know.
Ways to Make These Your Own
The galaxy theme is flexible, and I’ve tried several variations depending on what I have on hand or who I’m serving. Here are the versions that work best.
- Chocolate base: Swap 1/3 cup of the cake flour for unsweetened cocoa powder. The dark chocolate crumb actually looks even more cosmic against the bright frosting. This is Marcus’s favorite version.
My husband says the chocolate base tastes “more like a real dessert.” I think he just likes chocolate. - Dairy-free version: Use vegan butter (I like Country Crock Plant Butter) and oat milk with a tablespoon of lemon juice for the buttermilk. The texture is slightly denser but still delicious.
I made this for Simone’s friend who has a dairy allergy, and she asked for seconds. - Cosmic brownie bites: Use a fudge brownie base instead of the vanilla cupcake. Bake in mini muffin tins for 12-14 minutes. Top with a smaller swirl of galaxy frosting. These are perfect for parties where you want a bite-sized option.
- Nebula drip: After piping the swirl, drizzle a little white chocolate ganache (mixed with a drop of pink or blue gel) over the top. It looks like a nebula exploding. It’s extra sugar, but sometimes that’s exactly what you want.
The Galaxy Cupcake Questions I Get All the Time
Q: Why did my buttercream turn grey when I mixed the colors?
A: Ugh, I’ve been there. That happens when you mix too many colors together in the bowl instead of keeping them separate in the piping bag. The purple, blue, and pink combine into a muddy grey-brown. The fix is simple: keep the colors in distinct layers in the bag, and don’t overmix. If you want a grey base, make it intentionally with a tiny bit of black gel, not by mixing all the other colors together.
Q: Can I use a box mix for the cupcakes?
A: Absolutely. The galaxy magic is in the frosting, not the cake. Use your favorite vanilla box mix, follow the instructions, and save your energy for the swirl. I’ve done this plenty of times when I was short on time. Just add an extra teaspoon of vanilla to the box mix to make it taste more homemade.
Q: How do I store these, and how long do they last?
A: Store them in an airtight container at room temperature for up to 2 days. If it’s hot in your kitchen, the buttercream might get soft, so pop them in the fridge for 30 minutes before serving. They’ll last up to 4 days in the fridge, but the cupcake will start to dry out after day 2. I recommend making them the day before or the morning of.
Q: What’s the best piping tip for the swirl?
A: A Wilton 1M or 2A tip. The 1M gives you those nice deep ridges that catch the light and show off the colors. The 2A is a round tip that gives a smoother, more modern look. I prefer the 1M for galaxy cupcakes because it looks more textured and cosmic. If you don’t have either, a star tip of any size will work—just adjust your expectations for the final look.
More Recipes My Family Makes on Repeat
If you liked these galaxy cupcakes, here are a few others that get the same reaction at our table:
- The Best Vanilla Cupcake Base (My Go-To Recipe) — The exact recipe I use for everything from birthday parties to last-minute school treats.
- Chocolate Buttercream That Tastes Like Bakery Frosting — Rich, smooth, and perfect for when you need a chocolate fix instead of a galaxy swirl.
- Easy Funfetti Cupcakes for Birthdays — Rainbow sprinkles in every bite, and the frosting comes together in under 10 minutes.
These galaxy cupcakes are the recipe I’m proudest of, not because they’re complicated, but because they prove that you don’t need fancy tools or a culinary degree to make something that looks truly extraordinary. If Simone can help me pipe them on a school night, you can absolutely make them for your next celebration.
If you try them, drop a comment below and let me know how they turned out—I love seeing the color combinations you come up with. And if you hang out on Pinterest, tag me so I can see your galaxy swirls in action!
📌 These galaxy cupcakes look like a work of art but come together with a simple piping trick—save this recipe for your next birthday party, school bake sale, or rainy Saturday baking with the kids.
Galaxy Cupcakes That Look Like Outer Space (But Taste Like a Vanilla Cloud)
Equipment
- Muffin Pan (two 12-cup or bake in batches)
- Paper Cupcake Liners (foil-lined preferred)
- Stand mixer or hand mixer
- Piping Bag (disposable 18-inch)
- Piping Tip (Wilton 1M or 2A)
- Gel Food Coloring (Americolor Violet, Electric Blue, Deep Pink, Super Black)
- Toothpicks
- Wire rack
Ingredients
- 2 1/4 cups cake flour (or all-purpose: swap 2 tbsp flour for cornstarch)
For the Cupcakes
- 1 1/2 cups granulated sugar
- 1/2 cup unsalted butter, room temperature
- 2 large eggs, room temperature
- 1 cup buttermilk (or milk + 1 tbsp lemon juice)
- 2 teaspoons pure vanilla extract
- 1 1/2 teaspoons baking powder
- 1/2 teaspoon baking soda
- 1/2 teaspoon salt
For the Frosting
- 1 1/2 cups unsalted butter, room temperature
- 5 cups powdered sugar
- 3-4 tablespoons heavy cream
- 1 teaspoon pure vanilla extract
- Gel food coloring: Violet, Electric Blue, Deep Pink, Super Black
For Decoration
- Star sprinkles
- Edible glitter (silver and gold)
- Silver dragées
Instructions
- Preheat oven to 350°F. Line two 12-cup muffin pans with cupcake liners.
- In a stand mixer with paddle attachment, beat 1/2 cup butter and 1 1/2 cups sugar on medium speed for 3-4 minutes until light and fluffy. Scrape bowl halfway.
- Add eggs one at a time, beating well after each. Add vanilla. Mixture may look slightly curdled; that’s fine.
- In a separate bowl, whisk together cake flour, baking powder, baking soda, and salt.
- Add half the dry ingredients to butter mixture on low, then buttermilk, then remaining dry ingredients. Mix just until combined—do not overmix.
- Fill liners 2/3 full (a cookie scoop helps). Bake 15-18 minutes until toothpick inserted in center comes out clean. Cool in pan 5 minutes, then transfer to wire rack to cool completely.
- While cupcakes cool, make frosting: Beat 1 1/2 cups butter on medium-high for 5 minutes until pale and fluffy. Add powdered sugar one cup at a time, then 3-4 tbsp cream and vanilla. Beat 2 more minutes until light and airy.
- Divide frosting into 4 bowls. Tint one deep purple (Violet + tiny dot Electric Blue), one bright blue, one deep pink, and one dark grey (white frosting with a tiny dab of Super Black).
- Fit a piping bag with a Wilton 1M tip. Using a toothpick, smear vertical stripes of each gel color inside the bag. Then spoon colored frosting into bag: purple one side, blue other, pink middle, grey along edge. Don’t mix—just layer.
- Pipe swirl: start from outer edge of cupcake, pipe a ring, then a second ring inside and slightly higher. Continue spiraling inward and upward, lifting bag straight up at the peak.
- Immediately add star sprinkles, edible glitter, and silver dragées, pressing gently. Chill frosted cupcakes 10 minutes to set decorations.
Notes
Related posts:
 Baked Protein Pancake Bowls That Don’t Taste Like Cardboard — Finally
 Low Calorie Banana Bread That Doesn’t Taste Like a Compromise — Finally
 Coconut Flour Banana Bread Muffins That Stay Moist for Days (Not Crumbly)
 This Raspberry Lemon Cake With White Chocolate Is the Only Layer Cake You Need for Spring Celebrations