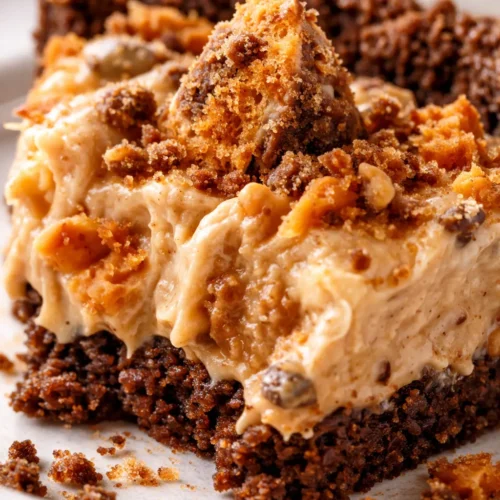
No-Bake Butterfinger Pie That's Creamy, Crunchy, and Ready in 20 Minutes
I'll be honest — I didn't think a no-bake pie could compete with the real thing. Then I made this one for a friend's birthday, and she texted me the next morning asking for the recipe before I'd even had coffee.
Equipment
- 9-inch pie dish
- Hand mixer or stand mixer
- Spatula
- Medium Bowl
- Small Bowl
- Measuring Cups and Spoons
Ingredients
Crust
- 1 1/2 cups graham cracker crumbs about 10 full-sheet graham crackers
- 1/4 cup cocoa powder
- 1/4 cup light brown sugar
- 5 tbsp unsalted butter melted
Filling
- 1 cup heavy cream chilled
- 1/4 cup powdered sugar for the whipped cream
- 8 oz cream cheese softened
- 1 cup creamy peanut butter
- 1 tsp vanilla extract
- 3/4 cup powdered sugar for the peanut butter base
- 4 oz Butterfinger bars crushed or chopped (2 full-sized bars)
Topping
- 6 oz Butterfinger bars for topping (3 full-sized bars)
- 2 tbsp creamy peanut butter melted, for drizzling (optional)
- 1 tbsp cocoa powder optional, for chocolate-peanut butter drizzle
Instructions
- Prep the pan: Spray a 9-inch pie dish with nonstick spray or grease lightly with butter. Set it aside while you make the crust. This step takes 10 seconds and guarantees the crust won't stick.
- Make the crust: In a medium bowl, whisk together the graham cracker crumbs, cocoa powder, and light brown sugar until evenly combined — the brown sugar should be broken up, no clumps. The cocoa will smell deeply chocolatey. Stir in the melted butter with a fork until every crumb is moistened; the mixture should clump together when squeezed. Press the mixture firmly and evenly into the bottom and up the sides of the prepared dish. I use the bottom of a measuring cup to really pack it down — spend a full 2 minutes on this. Chill the crust in the freezer while you make the filling — at least 15 minutes, but it can hang out longer if you need.
- Whip the cream: Using a hand mixer or a stand mixer fitted with the whisk attachment, beat the heavy cream and ¼ cup of the powdered sugar on medium-high speed until stiff peaks form — about 4-5 minutes. You'll hear the sound change as the cream thickens, from a slosh to a soft whoosh. When you lift the whisk, the cream should hold a peak that doesn't droop. Spoon the whipped cream into a small bowl and set it aside in the fridge. Do NOT wash the mixing bowl — you'll use it next.
- Make the peanut butter base: Using the same mixing bowl (no need to clean it!), beat the cream cheese, peanut butter, vanilla, and remaining ¾ cup powdered sugar together on medium-high speed until well combined and completely smooth. Stop and scrape down the sides with a spatula once or twice. The mixture will be thick and look almost like frosting. This step takes about 2-3 minutes — don't rush it, because lumps of cream cheese are not pleasant. The aroma of peanut butter and vanilla will fill your kitchen.
- Fold it together: Fold in the crushed Butterfinger pieces and the reserved whipped cream until smooth and combined. Use a gentle folding motion — start from the bottom, lift, and turn the bowl. Don't stir; you don't want to deflate all that air you just whipped into the cream. The mixture will be light, fluffy, and full of crunchy bits. You'll see tiny flecks of Butterfinger throughout.
- Fill and chill: Pour the filling into the prepared pie shell and spread it evenly with a spatula. Smooth the top. Freeze for 3 hours or chill in the fridge at least 5 hours or overnight. I usually do freezer if I'm in a hurry — the texture is firmer, almost like an icebox pie. Fridge gives you a softer, mousse-like texture. The pie will look glossy and set.
- Top and serve: Once thoroughly chilled, top with the remaining Butterfinger pieces and drizzle with melted peanut butter (optional plain or mixed with cocoa powder). The drizzle looks fancy and adds another layer of flavor, but it's completely optional. Serve frozen (slice with a warm knife) or refrigerated. When you cut, listen for the slight crackle of the candy topping.
- Store leftovers: Store in the fridge, covered, for up to 3 days, or in the freezer for up to 1 month. If frozen, let it sit at room temperature for 10 minutes before slicing.
Notes
Things I Wish I'd Known the First Time:
- Cold cream is non-negotiable: If your heavy cream isn't thoroughly chilled, it won't whip properly. I keep my cream in the coldest part of the fridge, and I chill the bowl and beaters in the freezer for 10 minutes before starting. This shaves a full minute off whipping time and gives you stiffer peaks.
- Press the crust firmly: A loose crust means a crumbly mess when you slice. Use the bottom of a measuring cup and really compact it — the edges too. I spend about 2 minutes on pressing, not 30 seconds. It makes the difference between a crust that stays together and one that falls apart on the plate.
- Don't over-fold: When you combine the peanut butter base and the whipped cream, fold gently and stop as soon as you don't see white streaks. Over-folding deflates the air and makes the filling dense. Even if you mess this up a little, it'll still taste good — I've done it.
- Warm knife for clean slices: Run your knife under hot water, dry it, then slice. Wipe the blade clean between cuts. This gives you those clean, Instagram-worthy slices with no dragging through the filling.
- Gluten-Free: Use certified gluten-free graham crackers or gluten-free digestive biscuits. The recipe works exactly the same — no other changes needed.
- Dairy-Free: Use dairy-free cream cheese (like Tofutti or Kite Hill), a plant-based heavy cream alternative that whips (like Country Crock Plant Cream or coconut cream), and dairy-free butter. The texture will be slightly less rich but still delicious. I've made it with oat-based cream and it worked surprisingly well, though the flavor is a bit different.
- Nut-Free (sort of): Swap peanut butter for sunflower seed butter (like SunButter) or WowButter. The filling will be slightly less thick and the flavor will change, but it's still good. Be aware that the Butterfinger bars themselves contain peanuts — for fully nut-free, omit the candy and use a nut-free crunch element like chopped pretzels or mini chocolate chips.
- Fancier Version: Drizzle with melted dark chocolate and flaky sea salt instead of the peanut butter drizzle. A little extra salt really makes the peanut butter and candy pop.
- Kid-Friendly: Leave off the optional peanut butter drizzle and let the kids add their own sprinkles or mini chocolate chips on top.