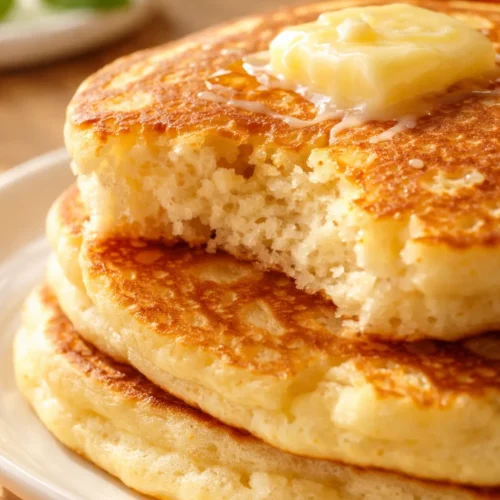
Fluffy Japanese Soufflé Pancakes That Rise 2 Inches Tall — in 25 Minutes
These Japanese soufflé pancakes get their signature height from a stabilized meringue folded into a yolk batter and cooked low and slow under a lid. The two-step batter addition and covered cooking are the non-negotiable techniques. Expect pancakes that are jiggly, cloud-soft, and nearly 2 inches tall straight off the pan.
Equipment
- Non-stick frying pan with lid
- Medium Bowl
- Clean bowl for egg whites
- Balloon whisk
- Thin flexible silicone spatula
- Ice cream scoop or 1/3 cup measuring cup
- Paper towel
- Sieve or sifter
- Plate
Ingredients
- 1 large egg yolk Use the freshest eggs you've got — they whip better.
- 1 tbsp sugar
- 2 tbsp milk Whole milk gives the richest result, but 2% works too.
- 3 tbsp all-purpose flour Cake flour makes them even more tender. If you're gluten-free, a 1:1 blend with xanthan gum works.
- 1/4 tsp baking powder Make sure it's fresh — old baking powder is the #1 reason pancakes don't rise.
- 2 large egg whites Room temperature whites whip to a higher, more stable volume than cold ones. Separate your eggs while cold, then let the whites sit on the counter for 10 minutes.
- 1/8 tsp cream of tartar Don't skip this unless you have some other acid — a squeeze of lemon works in a pinch.
- 1.5 tbsp sugar Adding it gradually is what gives you a glossy, resilient meringue.
- powdered sugar for serving
- butter for serving
- whipped cream for serving
- maple syrup for serving
Instructions
- Prep your bowls and pan: Separate your eggs while they're still cold — the yolks are less likely to break that way. Let the whites sit at room temperature for 10 minutes while you gather everything else. Line up your whisk, spatula, and scoop so you're not scrambling mid-recipe.
- Whisk the yolk and sugar: In a medium bowl, whisk the egg yolk and 1 tablespoon (12g) sugar together until the mixture turns pale and frothy, about 1 minute of steady whisking. You're looking for a color change — it should go from bright yellow to a lighter, creamy shade.
- Add the milk in batches: Pour in the 2 tablespoons (30g) milk a little at a time, whisking after each addition. This prevents the batter from getting watery all at once. Whisk until smooth and fully combined.
- Sift and whisk the dry ingredients: Sift the 3 tablespoons (30g) flour and 1/4 teaspoon (1g) baking powder directly over the yolk mixture. Whisk until everything is incorporated and no dry patches remain. Set this bowl aside.
- Whip the meringue: In a clean, dry bowl, whip the 2 large egg whites (60g) with the 1/8 teaspoon (0.4g) cream of tartar until frothy and pale. Start adding the 1.5 tablespoons (18g) sugar gradually, about a teaspoon at a time, while continuing to whip. Keep going until the whites form glossy, stiff peaks that hold their shape when you lift the whisk. This takes about 3–4 minutes of steady whisking. Avoid over-whipping — once the peaks look dry and start to separate, you've gone too far.
- Combine the batters — first stage: Take about one third of the whipped egg whites and whisk it into the yolk mixture until completely incorporated. This lightens the yolk base so the remaining whites can fold in more easily.
- Combine — second stage: Add half of the remaining whites to the yolk mixture and whisk gently until just combined. You want to see a few streaks of white still visible.
- Fold in the final whites: Transfer the yolk mixture to the bowl with the remaining egg whites. Whisk gently, then switch to a spatula and fold until no white streaks remain. Be careful not to over-mix — you want a thick, fluffy batter that holds air.
- Heat the pan: Set your non-stick frying pan over low heat (the lowest setting your stove can maintain, about 250°F/120°C if you have an infrared thermometer). Lightly brush the surface with oil, then use a paper towel to rub it into a very thin, even film. You don't want excess oil — just enough to prevent sticking.
- Cook the first layer: Using an ice cream scoop or 1/3 cup measuring cup, scoop the batter onto the pan (make two pancakes at a time unless you have a large pan). Cover with the lid and cook for 4–5 minutes. The batter should start to puff and set at the edges.
- Add the second layer: Remove the lid and add another scoop of batter directly on top of each pancake. Cover and cook for another 4–5 minutes. The second layer should blend into the first, giving you a tall, even pancake.
- Check and flip: Lift the lid and gently peek under one pancake with a spatula. It should release easily and be golden brown on the bottom. Don't force it — if it's not releasing, give it another 30 seconds. If you have any remaining batter, pile it on top of the pancakes now, then gently flip them over. Cover and cook for 5–6 more minutes. The pancakes will puff even taller during this stage.
- Serve immediately: Gently remove the pancakes to a warm plate. Dust with powdered sugar, add a pat of butter, a dollop of whipped cream, and a drizzle of maple syrup. Eat right away — these don't hold, and they shouldn't. The magic is in that first warm, jiggly bite.
Notes
1. Low heat is the whole secret: I know it's tempting to turn the pan up to medium and save a few minutes, but here's what happens: the bottom burns before the top sets, and when you try to flip, you get a flat, dark mess. Low heat, covered, is non-negotiable. I set a timer and walk away.
2. Don't skip the cream of tartar: The first time I made these, I thought "it's just 1/8 teaspoon, surely it's fine without it." It was not fine. The whites deflated as soon as I added the sugar, and the batter was runny. Cream of tartar is not optional in this recipe. Even if you've never used it before, buy it for this.
3. Warm your serving plates: This sounds fussy, but it's the one thing that keeps the pancakes hot while you finish the batch. Pop the plates in the microwave for 15 seconds or in a 200°F oven for 5 minutes. The butter melts properly, and the first bite tastes like it just came off the pan.
4. If the first pancake sticks, don't panic: Your pan might need a second application of oil. Use the paper towel method — a thin film, not a pool. If the first pancake isn't releasing after 5 minutes, remove the pan from heat, let it sit for 30 seconds, and try again. The cooling helps release it.