
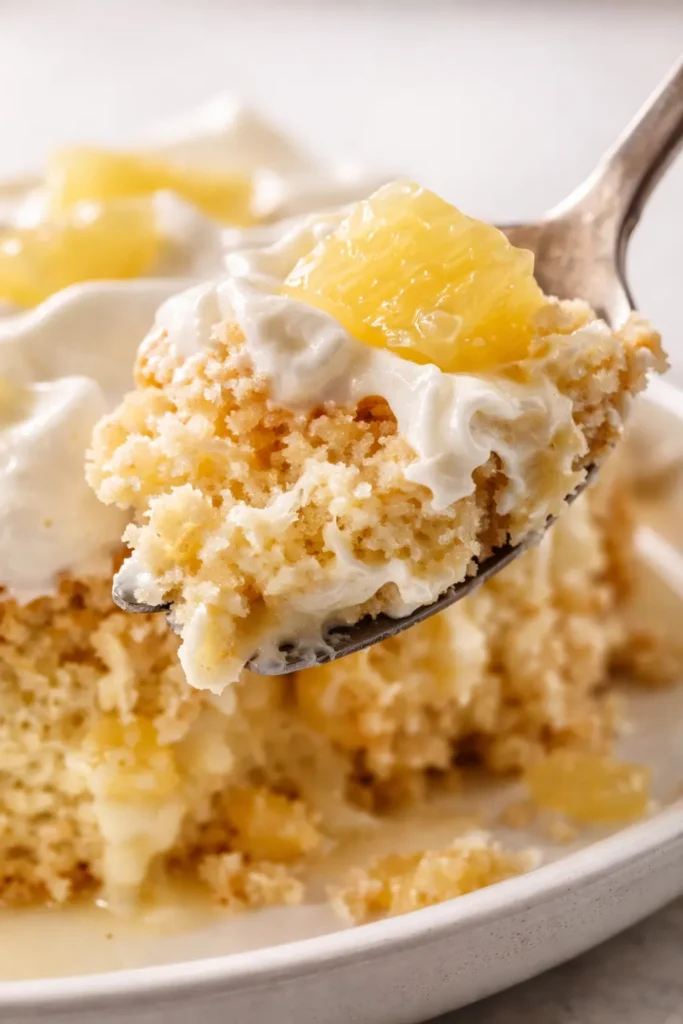
The first time I pulled this pineapple tres leches cake out of the fridge, the cold milk mixture had soaked all the way up through the crumb, leaving the top perfectly set and ready for a cloud of whipped topping. The smell of pineapple and vanilla had filled the kitchen as it baked, and now that first forkful — cold, creamy, sweet, and tangy from the pineapple — tasted exactly like summer. My neighbor asked for the recipe before she’d even finished her slice, and I knew I’d finally cracked the code on a dessert that feels both nostalgic and brand new.
The first two times I made a pineapple version of tres leches, the cake came out dense and almost wet in a sad, heavy way. The problem was adding too much pineapple juice to the soak and not balancing the acid. Once I swapped the juice into the cake batter instead of the milk mixture, and added sour cream to that milk blend, the texture turned silky and light. Now the crumb stays fluffy even after a long soak, and every bite tastes like sunshine.
- Serves: 12 as a dessert
- Hands-On Time: 20 min | Total Time: 1 hr 40 min (includes 1 hr chilling)
- Difficulty: Easy — even a beginner baker can nail this one, thanks to the boxed mix shortcut
- Cost per serving: ~$1.50
- Nutrition Estimate: 385 Calories, 6g Protein, 56g Carbs, 15g Fat, 9g Saturated Fat, 0g Fiber, 380mg Sodium per serving
- Dietary Notes: Vegetarian. Contains dairy and gluten.
(Photo above: overhead shot of a slice of tres leches cake on a white plate, showing the fluffy yellow crumb soaked through with milk, a thick layer of whipped topping peaked in the center, and a cluster of golden pineapple tidbits on top. Natural light hits the plate from the left, casting a soft shadow.)
The magic of a great tres leches cake is contrast — a light, airy crumb that somehow holds up to a flood of liquid. Standard recipes often rely on the cake soaking up a heavy mixture, which can turn the texture mushy if you’re not careful. By swapping the water in the cake mix for the reserved pineapple juice, I’m infusing every single crumb with fruit flavor from the start. Pineapple is a great source of vitamin C and manganese, according to USDA nutritional data, and using its juice here means the pineapple taste isn’t just a topping — it’s built into the cake itself.
The real game-changer is the sour cream. Adding it to the milk blend does two things: it adds a soft tang that cuts through the sweetness, and it prevents the condensed milk mixture from curdling or separating when it hits the cake. The result is a soak that’s rich but not heavy, and a cake that’s fluffy even after sitting in the fridge overnight.
Everything You Need (Plus My Notes on Sour Cream)
- 1 pkg (2-layer size) white cake mix: Any standard brand works. You’re basically using it as a shortcut to a tender crumb — no shame in that game. Make sure it’s the 2-layer size, not a 1-layer mix. You’ll also need the eggs and oil called for on the box.
- 1 can (20 oz) pineapple tidbits, drained with liquid reserved: Don’t throw away that juice — it’s liquid gold for this cake. You’ll use the fruit for the topping and the juice in the batter. Drain the tidbits really well; pat them dry with paper towels so they don’t water down the frosting.
- 1 can (14 oz) sweetened condensed milk: This is the backbone of the tres leches soak. It adds sweetness and body. There’s no substitute here — it’s what gives the cake its signature richness.
- 1 can (12 oz) evaporated milk: Don’t swap this for regular milk. Evaporated milk has a concentrated, slightly caramelized flavor that adds depth without making the cake soggy. Keep a can in the pantry for emergencies — it’s shelf-stable.
- 1/2 cup sour cream: This is my secret weapon. It prevents the milk mixture from curdling and adds a slight tang that brightens the whole cake. Full-fat sour cream works best; low-fat has too much water and can thin out the soak.
- 1 cup thawed COOL WHIP Whipped Topping: Keeps the topping light and airy. You can use homemade whipped cream if you prefer, but Cool Whip holds its shape better for leftovers. Make sure it’s fully thawed in the fridge before you try to spread it.
What to Pull Out Before You Start
- 13×9-inch pan: Glass or ceramic works best because it holds the cold temperature well. Metal works too, but it chills faster.
- Blender: You need this to blend the milks and sour cream until smooth. If you don’t have a blender, a whisk will work — just whisk thoroughly until the sour cream is completely incorporated.
- Large fork: This is your piercing tool. You need it to poke holes all over the cake so the milk mixture can soak in.
- Refrigerator: The cake needs at least 1 hour of chill time to set. Plan ahead!
Let’s Make Fluffy Pineapple Tres Leches Cake (Step by Step)
I know boxed mixes can feel like cheating, but with this method, no one will ever guess. Here’s how I do it.
Preheat and Prep: Preheat your oven to 350°F. Grease your 13×9-inch pan lightly with non-stick spray or butter.
- Bake the cake with pineapple juice: Prepare the white cake mix batter according to the directions on the box, but substitute the reserved pineapple liquid for the water called for. (Add the eggs and oil as directed.) Mix until just combined — overmixing will make the cake dense. Pour the batter into the prepared pan and bake at 350°F for 25–30 minutes, until a toothpick inserted in the center comes out clean. The kitchen will fill with a sweet, fruity aroma.
- Cool and pierce: Let the cake cool in the pan for exactly 10 minutes. While it’s still warm, use a large fork to pierce the cake all over at 1/2-inch intervals. Get the corners and the edges — every hole is a channel for the milk mixture. You’ll hear a soft hiss as the warm crumb releases steam.
- Blend the milk mixture: In a blender, combine the sweetened condensed milk, evaporated milk, and sour cream. Blend on low until completely smooth — about 15 seconds. You’ll see it thicken slightly as the sour cream emulsifies. That’s the sour cream working its magic.
- Pour the soak: Slowly pour the milk mixture over the entire surface of the cake. Go slowly so it has time to seep in. If you see pools forming on top, use your fork to re-pierce those areas. Keep pouring and piercing until all the milk mixture is absorbed. The cake will glisten and look almost wet, but the crumb will hold.
- Refrigerate: Cover the pan with plastic wrap or foil and refrigerate for at least 1 hour. The cold temperature is non-negotiable — it allows the milk mixture to fully absorb into the crumb without breaking it down. Most bakers find that 1 hour is the minimum, but 3 to 4 hours yields an even better texture. The cake will transform from warm and tender to cold and creamy.
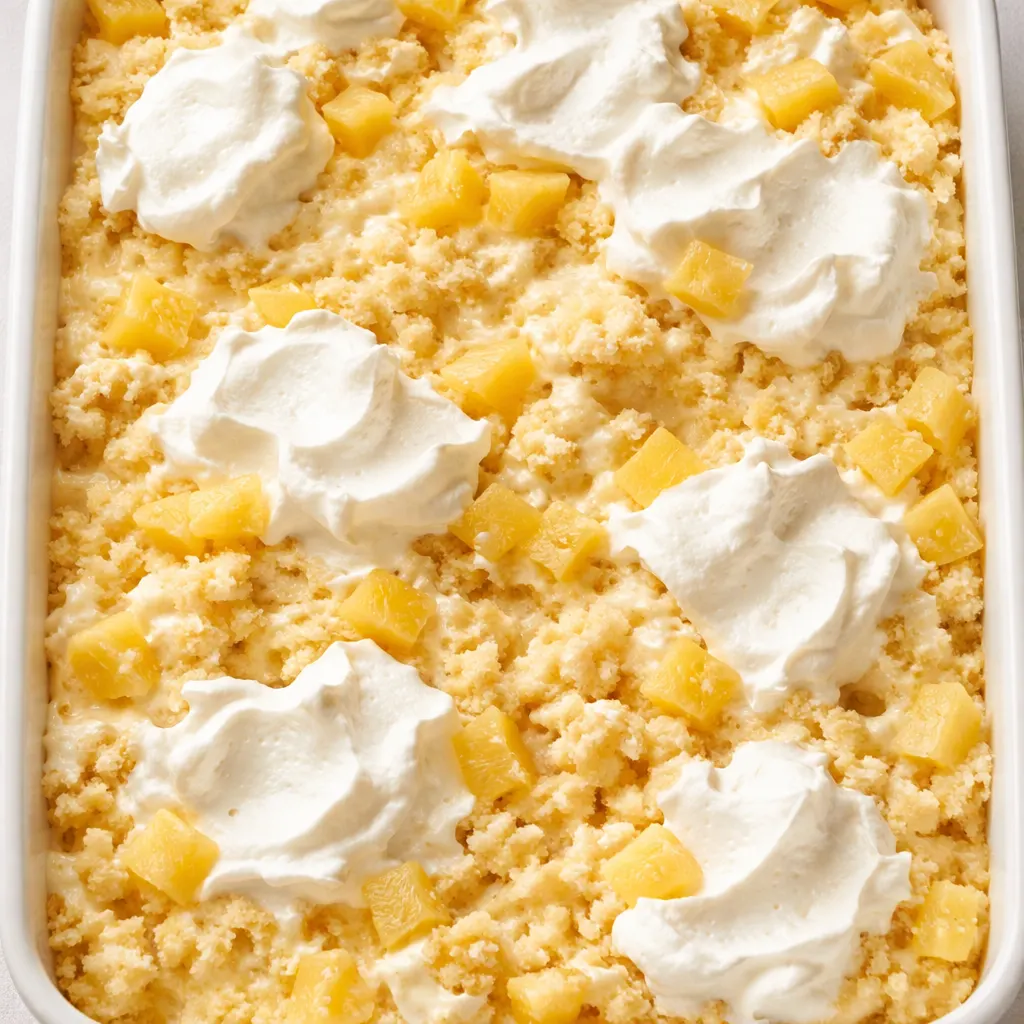
- Frost and top: Once the cake is fully chilled and the milk mixture is absorbed, spread the thawed Cool Whip evenly over the top. Scatter the drained pineapple tidbits over the whipped topping. Press them in gently so they stick.
- Slice and serve: Cut into squares and serve cold. Use a sharp knife and wipe it clean between cuts for neat edges. Store any leftovers in the fridge.
Make It a Day Ahead (It Actually Gets Better)
This is the kind of dessert that improves overnight. The flavors meld together, and the crumb fully absorbs the milk mixture, creating a texture that’s almost like a cold custard. I often make this on Saturday morning for a Sunday dinner, and it’s always the first thing to disappear.
- Fridge: Store the finished cake in the original 13×9 pan, covered tightly with plastic wrap. It will keep for up to 3 days. The cake will continue to absorb the milk mixture, so it gets even more tender over time.
- Freezer: I don’t recommend freezing this cake after it’s assembled. The dairy-based soak and whipped topping separate and become watery when thawed, leaving you with a sad, soggy mess. If you want to prep ahead, bake and soak the cake, then add the topping and pineapple the day you serve it.
- Reheat: Don’t. Tres leches is meant to be served cold. If you absolutely want a warm dessert, skip the soak and just serve the plain cake with warm pineapple compote.
Pro Tips for Perfect Pineapple Tres Leches Cake
- Pierce thoroughly: I know it sounds tedious, but hitting every half-inch with a fork is the only way to ensure the milk mixture soaks in evenly. If you’re lazy about this step, you’ll end up with dry pockets of cake surrounded by soggy ones. Trust me — it makes all the difference.
- Use a glass pan: Glass and ceramic pans hold the cold temperature much longer than metal pans, which helps the cake stay chilled and set. If you only have a metal pan, start checking the cake after 45 minutes of chilling — it might be ready sooner.
- Drain the pineapple really well: The pineapple tidbits go on top of the whipped topping. If they’re too wet, they’ll release juice that makes the topping watery. Pat them dry with a paper towel before scattering them on the cake.
- Go easy on the Cool Whip: One cup is the perfect amount. It’s enough to cover the cake with a thin, even layer that feels light and airy. Piling on too much makes the cake feel heavy, and it competes with the milky soak underneath.
Easy Swaps for Any Situation
- Gluten-Free: Use a 1:1 gluten-free all-purpose flour baking mix (like King Arthur or Bob’s Red Mill) in place of the white cake mix. Follow the package instructions for substitutions. The texture will be slightly more tender, but the flavor is still fantastic.
- Homemade whipped cream: If you’re not a Cool Whip fan, beat 1 cup of heavy cream with 2 tablespoons of powdered sugar and 1/2 teaspoon of vanilla extract until stiff peaks form. Spread it over the chilled cake just before serving.
- Toasted coconut topping: For extra texture, toast 1/2 cup of sweetened shredded coconut in a dry skillet over medium heat until golden brown, then sprinkle it over the pineapple tidbits. It adds a nutty crunch that pairs beautifully with the creamy cake.
- Spiced version: Add 1 teaspoon of cinnamon and 1/4 teaspoon of nutmeg to the cake mix batter along with the pineapple juice. It gives the cake a warm coziness that makes it perfect for fall.
Why Did My Pineapple Tres Leches Cake Turn Out Soggy?
Q: Why did my cake turn out soggy in the middle?
A: This usually happens when the cake is over-soaked or when the milk mixture is too thin. The fix is to make sure your cake is fully baked — a toothpick inserted in the center should come out completely clean before you add the soak. Also, measure your sour cream carefully. If you accidentally add too much, the mixture becomes too thin and gets absorbed too quickly, breaking down the crumb.
Q: Can I use heavy cream instead of evaporated milk?
A: You can, but the texture will be much richer and heavier. Evaporated milk is ideal because it has a concentrated dairy flavor without the high fat content of heavy cream. If you swap in heavy cream, the cake may feel greasy rather than light and milky.
Q: How do I know when the cake is done soaking?
A: The milk mixture should be completely absorbed into the cake. You shouldn’t see any puddles of liquid pooling on the surface. If you press gently on the top of the cake, it should feel firm but tender, and a small amount of milk might bubble up around your finger — that’s normal. The cake should also look slightly glossy and wet, but not swimming.
Q: Can I make this dairy-free?
A: It’s tricky, but possible. Use a dairy-free cake mix and substitute the milk mixture with full-fat canned coconut milk (not cream of coconut), condensed coconut milk, and a dairy-free sour cream alternative. The texture won’t be as rich, but it will still be delicious. Keep in mind that the Cool Whip is dairy-free, which helps keep the topping light.
Can You Freeze Pineapple Tres Leches Cake? And Other Questions
Q: How long does pineapple tres leches cake last, and how should I store it?
A: Store it covered in the refrigerator for up to 3 days. The cake continues to absorb the milk mixture over time, so it gets even more tender. After day 3, the crumb starts to break down and the topping may become watery.
Q: Can I make this cake ahead of time?
A: Yes! This is a perfect make-ahead dessert. Assemble the cake (including the soak and the topping) up to 24 hours in advance. The flavors meld beautifully overnight, and the texture becomes even creamier. Just add the pineapple tidbits right before serving to keep them fresh and bright.
Q: What’s the best way to serve pineapple tres leches cake?
A: Serve it cold, straight from the fridge. Use a sharp knife to slice clean squares, and wipe the knife between cuts for neat edges. If you want to dress it up, add a sprig of mint or a few fresh berries on the side.
Q: What do you serve with this cake?
A: A cup of strong black coffee or espresso is my favorite pairing — it cuts through the sweetness. A dollop of additional whipped cream on the side is never a bad idea. And if you’re serving a crowd, a platter of fresh berries adds a pop of color and acidity that balances the richness.
I’ve brought this cake to backyard barbecues, Easter dinners, and quiet Sunday suppers, and it’s never failed to get the “who made this?” reaction. It’s one of those rare recipes that feels both special and completely unfussy. If you make it, I’d love to know how it turns out — drop a comment below and let me know if your family fought over the last slice the way mine does.
This fluffy pineapple tres leches cake recipe stays moist for days and feeds a crowd — save it for your next summer potluck or Sunday dinner dessert.
Fluffy Pineapple Tres Leches Cake That’s Impossible to Over-Soak
Equipment
- 13×9-inch pan
- Blender
- Large fork
- Refrigerator
Ingredients
Cake
- 1 package white cake mix (2-layer size)
- 3 large eggs as required by cake mix
- 1/3 cup vegetable oil as required by cake mix
- 1 can (20 oz) pineapple tidbits, drained with liquid reserved juice used in cake, fruit used for topping
Milk Soak
- 1 can (14 oz) sweetened condensed milk
- 1 can (12 oz) evaporated milk
- 1/2 cup sour cream full-fat
Topping
- 1 cup thawed COOL WHIP Whipped Topping
Instructions
- Preheat your oven to 350°F. Grease your 13×9-inch pan lightly with non-stick spray or butter.
- Bake the cake with pineapple juice: Prepare the white cake mix batter according to the directions on the box, but substitute the reserved pineapple liquid for the water called for. (Add the eggs and oil as directed.) Mix until just combined — overmixing will make the cake dense. Pour the batter into the prepared pan and bake at 350°F for 25–30 minutes, until a toothpick inserted in the center comes out clean. The kitchen will fill with a sweet, fruity aroma.
- Cool and pierce: Let the cake cool in the pan for exactly 10 minutes. While it’s still warm, use a large fork to pierce the cake all over at 1/2-inch intervals. Get the corners and the edges — every hole is a channel for the milk mixture. You’ll hear a soft hiss as the warm crumb releases steam.
- Blend the milk mixture: In a blender, combine the sweetened condensed milk, evaporated milk, and sour cream. Blend on low until completely smooth — about 15 seconds. You’ll see it thicken slightly as the sour cream emulsifies. That’s the sour cream working its magic.
- Pour the soak: Slowly pour the milk mixture over the entire surface of the cake. Go slowly so it has time to seep in. If you see pools forming on top, use your fork to re-pierce those areas. Keep pouring and piercing until all the milk mixture is absorbed. The cake will glisten and look almost wet, but the crumb will hold.
- Refrigerate: Cover the pan with plastic wrap or foil and refrigerate for at least 1 hour. The cold temperature is non-negotiable — it allows the milk mixture to fully absorb into the crumb without breaking it down. Most bakers find that 1 hour is the minimum, but 3 to 4 hours yields an even better texture. The cake will transform from warm and tender to cold and creamy.
- Frost and top: Once the cake is fully chilled and the milk mixture is absorbed, spread the thawed Cool Whip evenly over the top. Scatter the drained pineapple tidbits over the whipped topping. Press them in gently so they stick.
- Slice and serve: Cut into squares and serve cold. Use a sharp knife and wipe it clean between cuts for neat edges. Store any leftovers in the fridge.
Notes
- Pierce thoroughly: I know it sounds tedious, but hitting every half-inch with a fork is the only way to ensure the milk mixture soaks in evenly. If you’re lazy about this step, you’ll end up with dry pockets of cake surrounded by soggy ones. Trust me — it makes all the difference.
- Use a glass pan: Glass and ceramic pans hold the cold temperature much longer than metal pans, which helps the cake stay chilled and set. If you only have a metal pan, start checking the cake after 45 minutes of chilling — it might be ready sooner.
- Drain the pineapple really well: The pineapple tidbits go on top of the whipped topping. If they’re too wet, they’ll release juice that makes the topping watery. Pat them dry with a paper towel before scattering them on the cake.
- Go easy on the Cool Whip: One cup is the perfect amount. It’s enough to cover the cake with a thin, even layer that feels light and airy. Piling on too much makes the cake feel heavy, and it competes with the milky soak underneath.
Related posts:
 This Raspberry Lemon Cake With White Chocolate Is the Only Layer Cake You Need for Spring Celebrations
 Peach Cobbler That Bakes Its Own Crust (Golden, Juicy, 40 Minutes)
 The Gluten-Free Chocolate Zucchini Bread You’d Never Guess Is Gluten-Free (It’s Rich, Moist & Impossible to Stop Eating)
 Pumpkin Cupcakes with Brown Sugar Cream Cheese Frosting That Taste Like Fall in Every Bite — Ready in 55 Minutes