
That first batch I made was too loose — the mousse hadn’t set long enough and the layers bled into each other like a bad watercolor. I was trying to rush the process because guests were coming in an hour. Lesson learned. Now I give the mousse a solid hour in the fridge before I pipe it, and the parfaits get at least three hours (overnight is even better) to set fully. That patience makes the difference between a pretty parfait and a gloopy mess. These days, I make the mousse the night before and assemble the jars right before serving.
What Testing Taught Me About These Parfaits
The first time I tested this recipe for the blog, I made three batches in one weekend. Batch one: I skipped chilling the mousse entirely. Bad idea — the layers bled together into something that looked like a science experiment gone wrong. Batch two: I used cold cream cheese straight from the fridge. Lumpy, sad, and not worth the sugar. Batch three: softened cream cheese, a full 90-minute chill on the mousse before piping, and an overnight set in the fridge. That batch? Perfection. The layers stayed sharp, the texture turned creamy like a custard, and each bite had that clean pop of key lime.
I also learned the hard way that not all piping bags are created equal. The first time, I used a cheap disposable bag that split at the seam when I squeezed — mousse everywhere, including my hair. Now I double-bag or use a zip-top bag with a corner snipped off. It works every time and saves the cleanup headache.
Why the Fridge Time Makes These Parfaits Actually Work
The filling is technically a mousse, not a fully baked cheesecake. That means it needs time for the cream cheese and condensed milk to firm up into something sliceable — or in this case, scoopable without turning into soup. Most home cooks, myself included in that first test batch, underestimate how long a no-bake dessert needs to set. The fat in the cream cheese needs to chill completely to hold structure.
Another thing: piping the mousse instead of spooning it gives you those clean, photogenic layers. I fought this for a while because washing a piping bag feels like a hassle. But here’s what I learned — you can spoon it carefully if you must, but the layers will look rustic instead of sharp. If you’re serving these for company, pipe it. For a Tuesday night treat, spoon it and call it a win.
What you get after that fridge time is a parfait that tastes just like a slice of key lime pie but requires zero oven time and about the same effort as making a sandwich. That’s the kind of math I can get behind.
Everything You Need (And a Few Notes From Me)
- 1 & 2/3 cups finely crushed graham cracker crumbs: You can crush them by hand in a bag or use a food processor. I’ve done both — the processor makes it faster, but the bag method is oddly therapeutic. The sound of the rolling pin smashing the crackers is part of the experience.
- 8 tablespoons unsalted butter, melted: Salted butter works in a pinch, just skip adding extra salt elsewhere. I use salted sometimes and honestly don’t notice a difference.
- 16 ounces cream cheese, softened: This is non-negotiable — cold cream cheese will give you lumpy mousse no matter how long you beat it. Leave it on the counter for about 30 minutes before you start. You’ll feel the difference when you press a finger into it — it should give easily.
- 3 tablespoons powdered sugar: Helps the cream cheese whip up silky smooth. Granulated sugar would leave a gritty texture.
- 1 cup sweetened condensed milk: This is what gives the mousse its richness and sweetness. Don’t swap in evaporated milk — it’s not the same thing. One reader tried it and said the filling turned out thin.
- 1/3 cup key lime juice: Bottled key lime juice works fine — I use it all the time. Fresh-squeezed is lovely if you have access to key limes, but don’t let perfect be the enemy of good here. The aroma of fresh zest is intoxicating.
- 1/4 cup granulated sugar: Balances the tart lime juice so the filling isn’t mouth-puckering.
- 1 tablespoon key lime zest: This is where most of the lime flavor actually lives. Don’t skip it. A microplane zester makes quick work of this. The bright green flecks are gorgeous.
- Whipped cream (for topping): Store-bought or homemade — both work. I usually use canned whipped cream because I’m not trying to impress anyone. But homemade is a dream if you have the time.
What to Pull Out Before You Start
- Bowl: A medium mixing bowl for the crust and a separate large bowl for the filling.
- Handheld electric mixer: You can whisk by hand, but your arm will hurt and the texture won’t be as creamy. Trust me on this one. The motor sound is part of the rhythm.
- Refrigerator: You’ll need space for 8 jars to sit flat.
- Piping bag: A large one with a 1/2-inch tip works best. If you don’t have a piping bag, use a zip-top bag with the corner snipped off.
- 8, 8-ounce canning jars with lids: Wide-mouth Mason jars are perfect. You can also use any 8-ounce glass or plastic cup with a lid.
Making Key Lime Cheesecake Parfaits: My Exact Process
This goes fast once you get going, so have everything measured and ready. The smell of lime zest and butter will fill your kitchen — it’s a preview of the magic to come.
Prep the crust: Get your graham cracker crumbs and butter ready.
- Mix the crust: In a bowl, combine the graham cracker crumbs and melted butter. Stir until every crumb is coated and the mixture feels like wet sand. Set aside. The mixture should hold together when pressed.
- Make the mousse: Using a handheld electric mixer, beat the softened cream cheese and powdered sugar together until smooth and creamy — about 2 minutes. Beat in the sweetened condensed milk, key lime juice, granulated sugar, and lime zest until creamy and well incorporated. The mixture should be thick and smooth, with no lumps. Taste it here — you should get a bright, tart pop followed by creamy sweetness.
- Chill the mousse (essential for clean layers): Place the mixture in the fridge for at least 1 hour, ideally 2, to firm up. This makes it much easier to pipe without the layers bleeding together. I never skip this anymore — it’s the difference between a pristine parfait and a muddy one.
- Prep your piping bag: Transfer the chilled mousse to a piping bag fitted with a 1/2-inch tip. If you don’t have a piping bag, a sturdy zip-top bag with one corner snipped off works like a charm — just don’t overfill it. The mousse should feel dense and creamy, not runny.
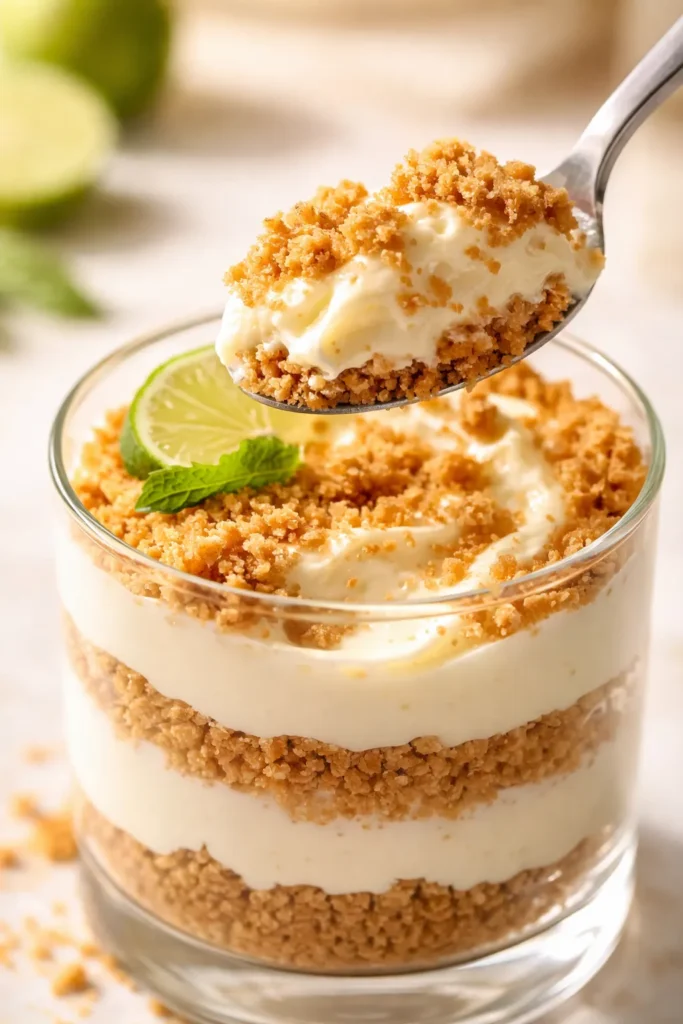
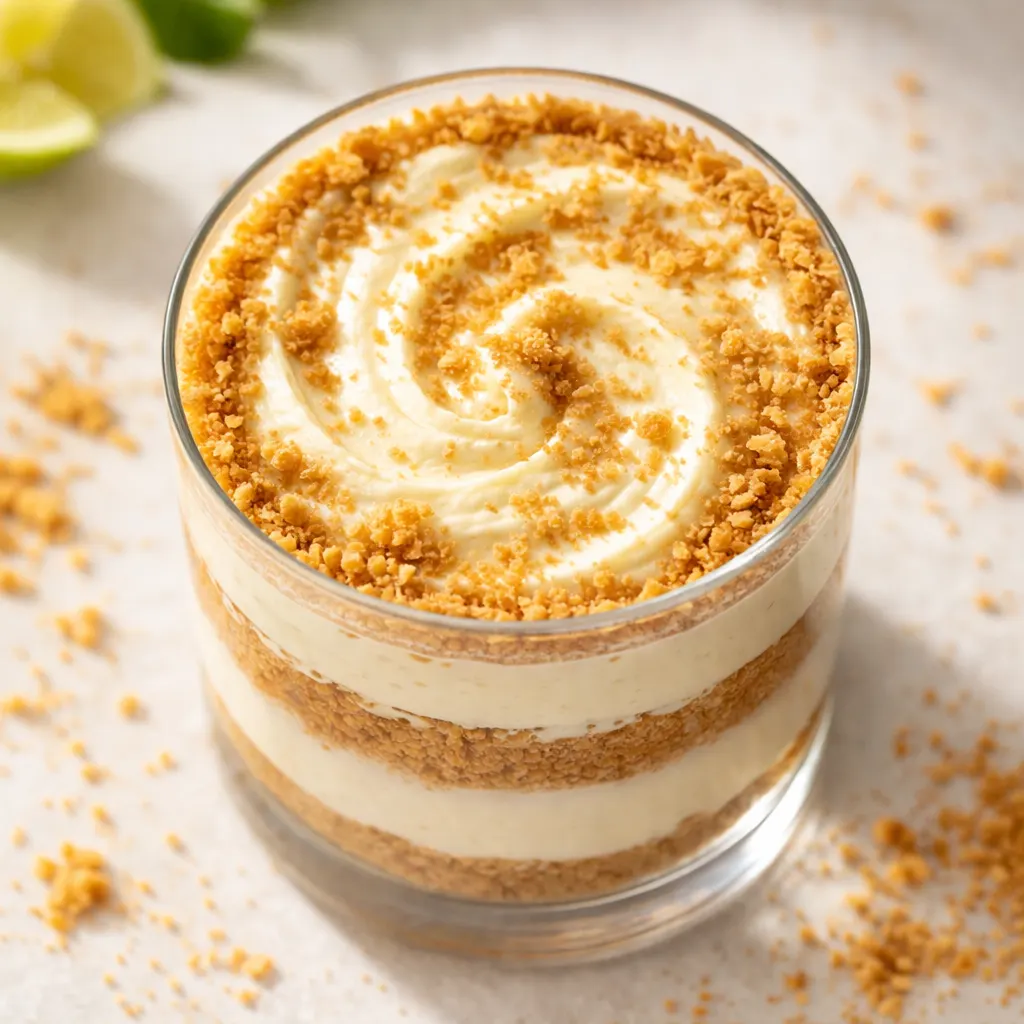
- Layer the parfaits: Alternate the graham cracker crumbs and the cheesecake mousse into the 8 jars, starting with the crackers and ending with the mousse. I do about 2 tablespoons of crumbs, then a generous layer of mousse, then repeat. Each jar gets about 1/4 cup of crumbs total and about 1/2 cup of mousse. Tap the jar gently after each layer to settle it.
- Secure lids and chill: Put the lids on the jars and place them in the fridge for at least 3 hours to set completely. Overnight is even better — the flavors meld and the texture firms up beautifully. The wait is torture, but worth it.
- Top and serve: Unfasten the lids, pipe some whipped cream on top, and garnish with a sprinkle of key lime zest. Serve cold and watch them disappear. The first spoonful should be a contrast of crumbly crust and silky mousse.
Sunday Prep = Stress-Free Dessert All Week
These parfaits are basically made for meal prepping. I make a double batch on Sunday and we have dessert ready for the whole week — or until my husband finds them in the fridge, whichever comes first.
- Fridge: Keep the jars sealed in the fridge for up to 5 days. The graham cracker layer will soften slightly over time, which I actually prefer. It becomes almost cake-like.
- Freezer: Don’t freeze these parfaits as-is — the cream cheese filling gets grainy when thawed. You can freeze the mousse alone in a sealed container for up to a month, then thaw it in the fridge and assemble fresh jars with new crumbs.
- Reheat: These are served cold — no reheating needed. If they’ve been in the fridge for a day or two, let them sit at room temperature for 5 minutes before serving to take the chill off. The flavors brighten as they warm slightly.
Things I Wish I’d Known the First Time
- Softening cream cheese properly: Don’t microwave it to soften it quickly — you’ll end up with hot spots that make the mousse lumpy. I leave mine on the counter for 30 minutes, and if I forgot, I cut it into small cubes and they soften in about 15 minutes.
- Taste your filling before piping: This sounds obvious, but I’ve messed it up more than once. Give the mousse a quick taste before you chill it — you want a balance of sweet and tart. If it’s too tangy, add another tablespoon of condensed milk. Too sweet? A squeeze more lime juice fixes it.
- Let the parfaits sit overnight: I know three hours is the minimum, but overnight is where the magic happens. The lime flavor becomes more pronounced and the texture gets this incredible creamy-custardy thing going on.
- Crush graham crackers finely: Big chunks don’t stick together well and look messy in the jar. I pulse mine in the food processor until they look like sand — about 15 short pulses. Even if you mess this part up a little, it’ll still taste good — I’ve done it.
Swaps That Actually Work
- Gluten-Free: Use gluten-free graham crackers or crushed gluten-free shortbread cookies. The filling itself is naturally gluten-free.
- Regular limes instead of key limes: Use the same amount of regular lime juice and zest. You’ll lose the floral note of key limes, but it still tastes like a fantastic lime cheesecake.
- Make it a bit lighter: Use Neufchâtel cheese (the light cream cheese brick) instead of full-fat cream cheese. The texture will be slightly less rich but still delicious.
- Dairy-free version: Use dairy-free cream cheese (I like the one from Trader Joe’s) and a can of coconut condensed milk. The coconut flavor adds a nice tropical twist that works beautifully with the lime.
- Boozy twist for guests: Add 1 tablespoon of white rum or limoncello to the mousse. It adds a lovely depth without overpowering the lime.
Troubleshooting: Why Did My Parfaits Turn Out Runny?
Q: Why is my mousse too runny to pipe?
A: The cream cheese wasn’t soft enough when you started mixing, or you didn’t chill the mousse long enough before piping. Soften that cream cheese completely — if it’s still cold, it creates lumps that melt later and make the filling thin. Next time, give the mousse a full 2 hours in the fridge before you even think about piping. If you’re in a rush, 45 minutes in the freezer works but watch it closely.
Q: Can I use bottled key lime juice instead of fresh?
A: Absolutely. I use bottled key lime juice from the grocery store all the time. It’s actually more consistent in acidity than fresh limes, which can vary. A typical 8-ounce bottle will be enough for this recipe with some left over. Just check the label to make sure it’s 100% juice, not a lime-flavored cocktail.
Q: How do I know when the parfaits are fully set?
A: Give the jar a gentle jiggle — the mousse should wobble slightly but not look liquid. Another test: tilt the jar a little. If the mousse holds its shape without sliding, it’s ready. Three hours is usually enough, but if you’re unsure, give it another hour. I’ve left jars in the fridge for two days and they were still perfect.
Q: Can I make this with vegan cream cheese?
A: Yes, but you need to be careful about brands. Some vegan cream cheeses don’t firm up well and will leave you with a runny mousse. I’ve had good luck with Kite Hill and Miyoko’s brands — they both set up nicely. Avoid the tub-style vegan cream cheese spreads, which are too soft. Also use a vegan condensed milk alternative like Nature’s Charm.
How to Store Key Lime Cheesecake Parfaits
Q: How long do these parfaits last, and how should I store them?
A: They’ll keep in the fridge for up to 5 days if the jars are sealed tightly. The graham cracker layer will soften after day two, but the filling stays creamy and delicious. Don’t leave them at room temperature for more than 30 minutes — the cream cheese needs to stay cold.
Q: Can I make these parfaits ahead of time / freeze them?
A: Yes to making ahead — they actually get better after a day in the fridge. Freezing is trickier. I don’t recommend freezing the assembled parfaits because the cream cheese gets grainy. But you can freeze the mousse alone in a sealed container for up to a month, then thaw it overnight in the fridge and assemble fresh jars with new crumbs when you’re ready.
Q: What’s the best way to reheat these parfaits?
A: These are served cold, so no reheating needed. If they’ve been in the fridge for a day or two, let them sit at room temperature for about 5 minutes before serving to take the chill off. The flavors actually come through more when they’re not straight-from-the-fridge cold.
Q: What do you serve with these parfaits?
A: They’re great on their own as a light dessert, but I love serving them with shortbread cookies for dipping. For a fancier presentation, add a slice of grilled pineapple or a handful of fresh berries on top. My favorite pairing is a cup of strong black coffee — the bitterness balances the sweet-tart lime beautifully.
These little jars have become my signature dessert — the one people ask me to bring to parties, the one I make when I need a sure thing. They taste like sunshine and summer in the middle of winter, and they only take twenty minutes of actual work. If you’ve been looking for a no-bake key lime cheesecake parfait recipe that actually delivers on texture and flavor, this is it. I’d love to hear how yours turn out — drop a comment below and let me know!
Save this key lime cheesecake parfait recipe for your next summer party or when you need a quick, impressive dessert. It comes together in 20 minutes with no baking.

Key Lime Cheesecake Parfaits That Taste Like a Florida Vacation — in 20 Minutes
Equipment
- Mixing Bowl
- Handheld electric mixer
- Refrigerator
- Piping bag
- 8-ounce canning jars
Ingredients
Crust
- 1 2/3 cups graham cracker crumbs finely crushed
- 8 tablespoons unsalted butter melted
Filling
- 16 ounces cream cheese softened
- 3 tablespoons powdered sugar
- 1 cup sweetened condensed milk
- 1/3 cup key lime juice
- 1/4 cup granulated sugar
- 1 tablespoon key lime zest
Topping
- whipped cream for topping
Instructions
- Mix the crust: In a bowl, combine the graham cracker crumbs and melted butter. Stir until every crumb is coated and the mixture feels like wet sand. Set aside. The mixture should hold together when pressed.
- Make the mousse: Using a handheld electric mixer, beat the softened cream cheese and powdered sugar together until smooth and creamy — about 2 minutes. Beat in the sweetened condensed milk, key lime juice, granulated sugar, and lime zest until creamy and well incorporated. The mixture should be thick and smooth, with no lumps. Taste it here — you should get a bright, tart pop followed by creamy sweetness.
- Chill the mousse (essential for clean layers): Place the mixture in the fridge for at least 1 hour, ideally 2, to firm up. This makes it much easier to pipe without the layers bleeding together. I never skip this anymore — it’s the difference between a pristine parfait and a muddy one.
- Prep your piping bag: Transfer the chilled mousse to a piping bag fitted with a 1/2-inch tip. If you don’t have a piping bag, a sturdy zip-top bag with one corner snipped off works like a charm — just don’t overfill it. The mousse should feel dense and creamy, not runny.
- Layer the parfaits: Alternate the graham cracker crumbs and the cheesecake mousse into the 8 jars, starting with the crackers and ending with the mousse. I do about 2 tablespoons of crumbs, then a generous layer of mousse, then repeat. Each jar gets about 1/4 cup of crumbs total and about 1/2 cup of mousse. Tap the jar gently after each layer to settle it.
- Secure lids and chill: Put the lids on the jars and place them in the fridge for at least 3 hours to set completely. Overnight is even better — the flavors meld and the texture firms up beautifully. The wait is torture, but worth it.
- Top and serve: Unfasten the lids, pipe some whipped cream on top, and garnish with a sprinkle of key lime zest. Serve cold and watch them disappear. The first spoonful should be a contrast of crumbly crust and silky mousse.
Related posts:
 Low Calorie Banana Bread That Doesn’t Taste Like a Compromise — Finally
 Coconut Flour Banana Bread Muffins That Stay Moist for Days (Not Crumbly)
 This Raspberry Lemon Cake With White Chocolate Is the Only Layer Cake You Need for Spring Celebrations
 Soft, Pillowy White Chocolate Pumpkin Snickerdoodles with a Cinnamon-Sugar Crunch