
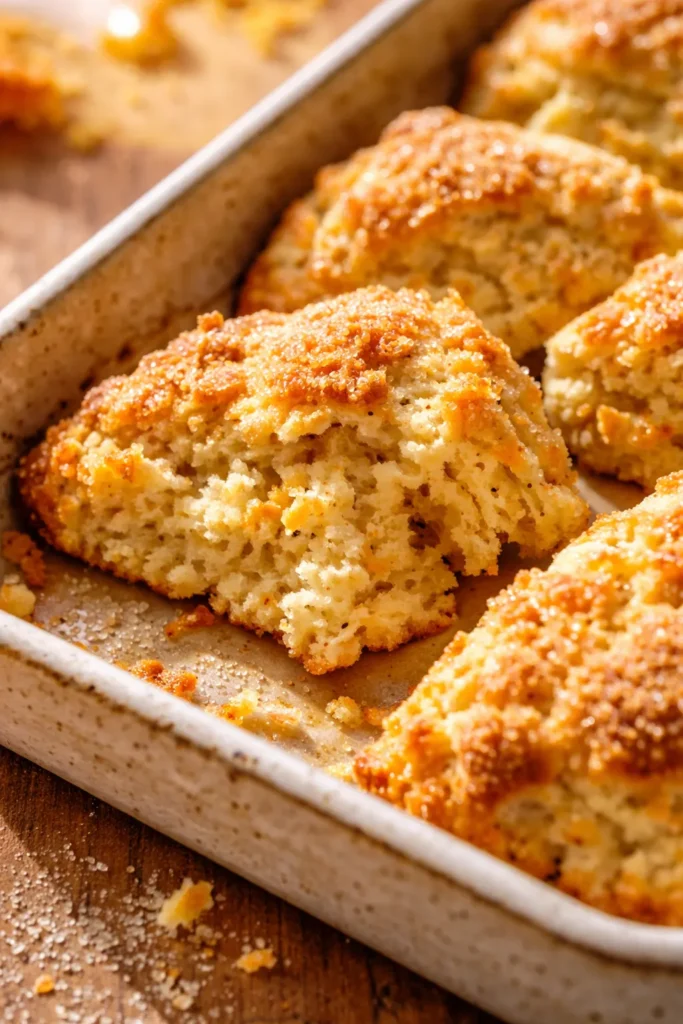
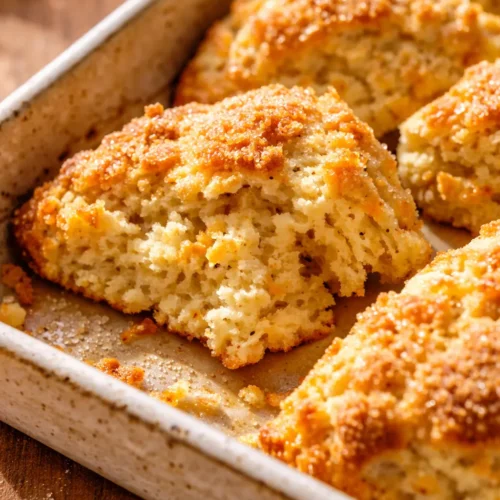
In a nutshell: These drop scones use cold heavy cream and fresh orange juice for a tender, almost creamy interior with crisp, golden edges. There’s no cutting in cold butter, no rolling out the dough, and no special equipment required. The fresh orange glaze seeps into the craggy nooks of the scone for a double hit of citrus in every single bite.
I used to think scones were a lost cause outside of a professional bakery. My grandmother’s were dry as dust. My aunt’s were little bricks that could probably stop a door. I thought I just wasn’t a scone person until I spent a long weekend in a tiny bed-and-breakfast in Vermont where the owner made them fresh every morning. Hers were tender, rich, and absolutely bursting with flavor. The secret, she told me over coffee one morning, was using heavy cream instead of cold butter. I scribbled her ratios on a napkin and I’ve never looked back since. These zesty orange cream scones are my adaptation of that legendary B&B recipe, and they’ve converted more than a few hardened scone skeptics in my own house.
If you’ve ever struggled with dry, hockey-puck scones or found the process of cutting in cold butter to be a messy chore, this recipe is for you. The dough comes together in one bowl with a fork, you drop it onto a baking sheet in shaggy mounds, and the oven does all the heavy lifting. The result is a scone that’s shatteringly crisp on the outside, impossibly tender on the inside, and humming with bright, fresh orange flavor in every layer. The glaze isn’t just a pretty drizzle either — it soaks into the cracks and creates a crackly shell that makes these feel fancy without any of the fuss.
The first batch I made with this exact ingredient list came out flat as pancakes. Not tough, not dry — just disappointingly flat. It took me two more tries to figure out I was over-mixing the dough, which melted the fat globules in the cream before they could create those essential steam pockets. For batch four, I stirred just until the flour disappeared — barely twelve stirs — and dropped them onto the sheet in tall, craggy mounds. The difference was immediate: they baked up thick, with a shattering golden crust and a soft, almost creamy center that tasted like a warm orange blossom. Now I set a timer for my mixing. That’s the kind of specific, slightly obsessive fix this recipe needs, and I promise it’s worth the extra attention.
- Serves: 8 generous scones
- Hands-On Time: 15 min | Total Time: 30 min
- Difficulty: Easy — even for a beginner baker who’s never made scones before
- Cost per serving: ~$0.75
- Nutrition Estimate: 320 Calories, 4g Protein, 45g Carbs, 14g Fat, 8g Saturated Fat, 1g Fiber, 280mg Sodium per serving
- Dietary Notes: Vegetarian. Easily adaptable for gluten-free or dairy-free diets.

How I Tested These Zesty Orange Cream Scones Until They Were Perfect

Let me walk you through exactly how I landed on this version — because it wasn’t my first attempt, and I want you to skip the mistakes I made.
Batch one: I followed a standard cream scone ratio but used room-temperature ingredients. The dough was sticky, the scones spread into flat discs, and the texture was dense rather than tender. The orange flavor was there, but muted — like an echo of citrus rather than the real thing.
Batch two: I chilled everything — the cream, the juice, even the mixing bowl — and used twice the zest. The scones rose higher, but the crumb was still tighter than I wanted. I realized I was over-mixing, activating too much gluten.
Batch three: I used a light hand, stirring only twelve strokes, and dropped the dough in tall, shaggy mounds without smoothing them. These came out with a shattering golden crust and a soft, almost creamy interior. The orange zest in the dough plus another tablespoon in the glaze created that double hit of citrus that makes these unforgettable.
Batch four (the winner): I added a teaspoon of vanilla extract to round out the sharp citrus notes, used exactly 2 tablespoons of zest in the dough, and baked at 400°F for the full 16 minutes. The result was perfect: tall, craggy, deeply golden, and absolutely humming with bright orange flavor in every layer. That’s the version you’ll find below.
If you want to make your own zesty orange cream scones without going through four test batches, just follow my exact method and watch your mixing time. That one detail makes all the difference.
Why Heavy Cream Makes Better Scones Than Cold Butter Ever Could
Using cold butter in scones is the classic move, but it’s also the easiest place to mess up. If the butter warms up even slightly while you’re cutting it in, you get a dense, greasy mess that tastes more like a shortbread cookie than a light scone. Heavy cream eliminates the guesswork entirely. The high fat content in cream — over 30% milk fat according to USDA nutritional data — coats the flour proteins beautifully, which naturally limits gluten development. Less gluten means a more tender, delicate scone that practically melts in your mouth.
Beyond the chemistry, there’s the convenience factor. You don’t need a pastry cutter, two knives, or frozen butter. Just pour and stir. When you pour cold cream into the flour, you’ll hear a soft sizzle as the liquid hits — that’s the fat beginning to coat the gluten. The liquid sugars in the cream also caramelize faster in the oven than solid butter does, giving you that beautiful golden-brown crust without needing an egg wash or extra sugar on top. Baking the scones at 400°F — rather than 350°F or 375°F — creates rapid steam, which is the single most important factor for lift. The cold cream hits the hot oven, immediately creates a burst of steam, and pushes the scone up before the structure sets. You get tall, lofty scones with a tender crumb every single time.
Ingredients Worth Talking About (Plus My Honest Notes)
- 2 cups all-purpose flour: This is the structure of the scone. Spoon it into your measuring cup and level it off with a knife — scooping directly packs in up to 25% more flour, which leads to dry, dense scones. I use King Arthur Flour, but any standard brand works perfectly.
- 2 teaspoons baking powder: This is the lift. Make sure it’s fresh by testing a teaspoon in a small bowl of hot water. If it fizzes vigorously, you’re good to go. If it barely bubbles, buy a new can. Old baking powder is the number one reason scones don’t rise.
- 1/2 teaspoon kosher salt: Salt isn’t just for flavor here — it strengthens the gluten network just enough to give the scones structure without making them tough. If you use fine table salt, use only 1/4 teaspoon.
- 1/4 cup granulated sugar: Just enough sweetness to balance the tart orange juice. It also helps with browning. Stick with standard white sugar here — coarse sugar won’t dissolve as readily into the dough.
- 2 tablespoons orange zest: This is where the intense orange flavor lives. Zest the oranges first, then juice them. A microplane gives you the finest zest that dissolves into the dough. Avoid the white pith at all costs — it’s bitter and will ruin the bright flavor you’re after.
- 1/2 cup fresh orange juice: Use a juicy navel or Valencia orange. Bottled orange juice has a flat, cooked flavor and often contains added sugars that throw off the texture. Fresh juice is absolutely non-negotiable here for that bright, aromatic taste.
- 1 cup heavy cream: The absolute MVP of this recipe. Cold heavy cream adds richness, tenderness, and browning. Do not substitute milk, half-and-half, or any lighter cream — the fat content is crucial for the tender texture and golden crust.
- 2 teaspoons vanilla extract: Rounds out the sharp citrus notes beautifully. I use pure vanilla extract when I have it, but imitation vanilla works perfectly fine in a baked good like this. Don’t skip it — it makes the orange flavor taste more rounded and complex.
For the Glaze:
- 1 cup powdered sugar: Sifted if it’s lumpy. This is the base of the glaze that creates that beautiful crackly shell.
- 1 tablespoon orange zest: Another layer of fresh orange flavor in the glaze. This is the second hit of citrus that makes these scones unforgettable.
- 1/4 teaspoon vanilla extract: Just a whisper of vanilla to tie the glaze to the scone base.
- 1 tablespoon cream or milk: The liquid that brings the glaze together. Cream makes it richer, milk makes it lighter. Both work perfectly.
- 1 tablespoon fresh orange juice, plus more as needed: The final burst of orange. Use the same juicy oranges you used for the scone dough. Add more juice a teaspoon at a time if the glaze is too thick to drizzle.
What to Pull Out Before You Start
- Baking sheet: A standard half-sheet pan works perfectly. Line it with parchment paper for easy cleanup — the glaze can get sticky. If you don’t have parchment, a lightly greased sheet will work, just watch the bottoms to make sure they don’t over-brown.
- Large mixing bowl and a fork or wooden spoon: For mixing the dough. No electric mixer is needed — this is a true one-bowl, one-fork situation.
- Microplane or fine grater: For zesting the oranges. A microplane gives you that fine, fluffy zest that dissolves into the dough and glaze. A box grater works too, but the zest will be coarser.
- Cooling rack: Essential for getting air circulation underneath the scones so they don’t steam and get soggy while they cool.
Let’s Make It (Step by Step)
The whole process takes about 15 minutes of active work, and you won’t believe how easy it is. Here’s exactly how I do it in my own kitchen.
- Preheat and Prep: Preheat your oven to 400°F. Line your baking sheet with parchment paper. This high temperature is critical — it creates the steam that gives the scones their lift and helps the cream caramelize into that gorgeous golden crust.
- Mix the Dry Ingredients: In a large bowl, whisk together the 2 cups of flour, 2 teaspoons of baking powder, 1/2 teaspoon of salt, and 1/4 cup of sugar. Make sure there are no lumps, especially from the baking powder. Whisking also aerates the flour, which helps make the scones lighter.
- Add the Orange Zest: Stir the 2 tablespoons of orange zest into the dry ingredients. This coats the zest in flour and prevents it from clumping together later. You’ll smell the orange oils immediately — that’s exactly what you want.
- Add the Wet Ingredients: Make a well in the center of the dry ingredients. Pour in the 1/2 cup of cold orange juice, 1 cup of cold heavy cream, and 2 teaspoons of vanilla extract. Stir with a fork just until a shaggy, slightly sticky dough forms. Stop the moment the flour streaks disappear — over-mixing develops gluten and makes them tough. I count to twelve stirs and stop. The dough will look rough and lumpy — that’s perfect.
- Drop onto the Sheet: Use two spoons or a large cookie scoop to drop 8 equal mounds of dough onto the prepared baking sheet. Space them about 2 inches apart. Don’t flatten them — the craggier and taller they are going into the oven, the more texture and height they’ll have coming out. Rough edges get extra crispy, which is the best part.
- Bake Until Golden: Bake for 14–16 minutes, or until the bottoms are deep golden brown and the tops are lightly browned. A toothpick inserted into the center of a scone should come out clean or with a few moist crumbs. If you want to be precise, an instant-read thermometer inserted into the center should read around 200°F. Your kitchen will smell like a citrus grove.
- Cool Completely: Transfer the scones to a cooling rack and let them cool completely, about 15 minutes. I know it’s hard to wait, but glazing warm scones will result in a thin, runny mess that slides right off into a puddle on your plate.
- Make the Glaze: While the scones cool, make the glaze. In a small bowl, whisk together the 1 cup of powdered sugar, 1 tablespoon of orange zest, 1/4 teaspoon of vanilla extract, 1 tablespoon of cream or milk, and 1 tablespoon of fresh orange juice. Whisk vigorously until smooth and completely lump-free. The glaze should be thick enough to coat the back of a spoon but still flow slowly. If it’s too thick to drizzle, add more orange juice a teaspoon at a time. If it’s too thin, add more powdered sugar.
- Drizzle and Serve: Drizzle the glaze over the cooled scones using a spoon or a whisk, letting it drip naturally down the sides. Watch it pool in the craggy cracks. Let it set for about 5 minutes before serving. The glaze will harden slightly, creating a beautiful, crackly, white shell that shatters when you bite into it.
How I Prep These for the Week
Scones are actually one of the best things to prep ahead, and I rely on this trick constantly during busy weeks. I often make a double batch on Sunday so we have quick, grab-and-go breakfasts ready to go. The unbaked dough freezes like a dream, and baking from frozen adds almost no extra time.
- Fridge: Baked, unglazed scones will keep in an airtight container at room temperature for up to 3 days. If you’ve already glazed them, store them in a single layer in the fridge to prevent the glaze from getting sticky or smearing. I like to put a piece of parchment paper between layers.
- Freezer: This is my favorite method. Drop the spoonfuls of dough onto a parchment-lined baking sheet and freeze until solid, about 1 hour. Transfer the frozen dough balls to a zip-top bag and freeze for up to 3 months. Bake from frozen, adding 2–3 minutes to the baking time. No need to thaw — just drop them on a sheet and bake.
- Reheat: Pop a scone in a 300°F oven for 5 minutes. It will taste almost fresh-baked, with crispy edges and a warm, tender center. The microwave works in a pinch, but it softens the crisp edges and makes the texture a bit rubbery.
Things I Wish I’d Known the First Time
- Chill the Cream (and Your Bowl): Cold ingredients are non-negotiable for flaky scones. I pop my mixing bowl, the carton of cream, and even the orange juice in the fridge for 10 minutes before I start. Every single degree of temperature matters when it comes to creating that steam lift in the oven.
- Use a Light Hand — Seriously: When mixing, use a fork or your fingertips. Stir just until the dough comes together. A few dry bits at the bottom of the bowl are okay — you can gently press them in with your hands at the very end. Over-mixing is the single most common mistake home bakers make with scones, and it’s the easiest one to fix.
- Don’t Skip the Zest in the Glaze: The glaze is where the second wave of orange flavor hits you. The fresh zest in the glaze gives it that bright, almost perfumed aromatic quality that tastes like you used some fancy orange extract from a specialty shop. It makes the scones taste exponentially more orange than they actually are.
- Make Taller Scones for a Bakery Look: If you want those beautiful, towering bakery-style scones, use a large ice cream scoop with a trigger to drop the dough. The taller the mound going in, the taller the scone will be coming out. Drop them straight down onto the sheet — don’t drag the spoon or scoop through the dough.
- Let the Glaze Set Completely: I know it’s tempting to dig in right away, but letting the glaze set for a full 5–10 minutes makes a huge difference. It transforms from a glossy, wet drizzle into a matte, crackly shell that contrasts perfectly with the soft scone underneath. It’s worth the wait.
Make It Yours: Easy Variations
- Gluten-Free: Substitute a 1:1 gluten-free flour blend that contains xanthan gum. I’ve used King Arthur Measure for Measure with great success. The texture will be slightly more tender and delicate, so handle the dough gently and don’t over-mix.
- Dairy-Free: Use a full-fat canned coconut cream instead of heavy cream — chill the can first and scoop only the solid white cream from the top. The glaze can be made with coconut cream or a plain plant-based milk like oat or soy. The scones will be slightly less rich but still deliciously tender and flavorful.
- Lemon Cream Scones: Swap the orange juice and zest for an equal amount of fresh lemon juice and zest. The glaze becomes incredibly tart and bright — perfect for spring or summer brunches. Add a tablespoon of poppy seeds to the dough for classic lemon-poppy seed scones.
- Add-Ins for Extra Texture: Fold in 1/2 cup of fresh or frozen blueberries, 1/2 cup of white chocolate chips, or 1/3 cup of dried cranberries after the dough comes together. Frozen blueberries will bleed a little into the dough, turning it a pretty lavender color that looks gorgeous under the white glaze.
Why Did My Orange Cream Scones Turn Out Flat?
Q: Why did my scones spread flat instead of rising tall?
A: This usually means one of two things: your oven wasn’t hot enough, or your dough was too warm. Make sure your oven is fully preheated to 400°F for at least 15 minutes before baking. If your kitchen is particularly warm, chill the shaped dough on the baking sheet for 10 minutes before it goes in the oven. Flat scones can also happen if your baking powder is old — always test it in hot water before you start.
Q: Can I use bottled orange juice instead of fresh?
A: You can, but I genuinely don’t recommend it. Fresh orange juice has bright, volatile aromatic oils that bottled juice completely lacks after pasteurization. Bottled juice can also have added sugars and preservatives that affect the texture of the dough. If you only have bottled on hand, add an extra teaspoon of fresh orange zest to the dough to try to compensate for the loss of flavor.
Q: How do I know when the scones are done?
A: Look for three clear signs: the bottoms should be deep golden brown, the edges should be lightly browned, and the tops should look dry and set, not wet or shiny. If you gently press the side of a scone, it should feel firm, not squishy. For the most accurate test, an instant-read thermometer inserted into the center of a scone should read around 200°F.
Q: Can I make these vegan?
A: Yes, with a few adjustments. Use full-fat canned coconut cream in place of the heavy cream, and use a plain plant-based milk like oat or soy for the glaze. The texture will be slightly less flaky and more dense, but the flavor will still be fantastic. Make sure your sugar is certified vegan-friendly, as some white sugars are processed with bone char.
Can I Freeze Orange Cream Scones?
Q: How long do these scones last, and how should I store them?
A: Baked and unglazed scones will stay fresh in an airtight container at room temperature for up to 3 days. If you glaze them, they’re truly best the day they’re made. Store glazed scones in the fridge in a single layer to keep the glaze from getting sticky or melting.
Q: Can I freeze these scones?
A: Absolutely, and it’s one of my favorite things about this recipe. The best way is to freeze the unbaked dough. Drop the scones onto a parchment-lined baking sheet and freeze until solid, then transfer to a zip-top bag. Bake from frozen at 400°F for 16–18 minutes — no thawing needed. You can also freeze baked, unglazed scones for up to 3 months. Thaw at room temperature and glaze fresh before serving.
Q: What’s the best way to reheat them?
A: The oven is your best friend here. Reheat an unglazed scone in a 300°F oven for 5 minutes. It will crisp up the outside and warm the inside perfectly, making it taste almost fresh from the oven. The microwave works if you’re in a rush, but it will make the texture softer and the edges slightly rubbery, so avoid it if you can.
Q: What do you serve with these scones?
A: These are perfect for brunch or a coffee break. I love serving them with a dollop of clotted cream and a side of fresh berries for a truly decadent treat. For a savory pairing, try them alongside scrambled eggs and crispy bacon. A hot cup of Earl Grey tea or a flat white coffee is the perfect drink companion to balance the sweet citrus.
These zesty orange cream scones have honestly changed my breakfast game completely. They’re the kind of recipe you make once, commit to memory almost immediately, and then find yourself craving on a random Tuesday morning for no particular reason. I hope they become a staple in your kitchen too, the way they have in mine.
If you try them, let me know in the comments or tag me on Pinterest so I can see your beautiful bakes. I absolutely love seeing these come out of ovens all over the place!
📌 This easy orange cream scone recipe uses heavy cream for a tender, flaky crumb and a fresh orange glaze — save it for your next lazy Sunday brunch.
The Zesty Orange Cream Scones: The Drop-Scone Version That Actually Works
Equipment
- Baking Sheet
- Large Mixing Bowl
- Fork or wooden spoon
- Microplane or fine grater
- Cooling rack
Ingredients
For the Dough
- 2 cups all-purpose flour
- 2 teaspoons baking powder
- 1/2 teaspoon kosher salt
- 1/4 cup granulated sugar
- 2 tablespoons orange zest
- 1/2 cup fresh orange juice
- 1 cup heavy cream
- 2 teaspoons vanilla extract
For the Glaze
- 1 cup powdered sugar
- 1 tablespoon orange zest
- 1/4 teaspoon vanilla extract
- 1 tablespoon cream or milk
- 1 tablespoon fresh orange juice
Instructions
- Preheat your oven to 400°F. Line your baking sheet with parchment paper. This high temperature is critical — it creates the steam that gives the scones their lift and helps the cream caramelize into that gorgeous golden crust.
- In a large bowl, whisk together the 2 cups of flour, 2 teaspoons of baking powder, 1/2 teaspoon of salt, and 1/4 cup of sugar. Make sure there are no lumps, especially from the baking powder. Whisking also aerates the flour, which helps make the scones lighter.
- Stir the 2 tablespoons of orange zest into the dry ingredients. This coats the zest in flour and prevents it from clumping together later. You’ll smell the orange oils immediately — that’s exactly what you want.
- Make a well in the center of the dry ingredients. Pour in the 1/2 cup of cold orange juice, 1 cup of cold heavy cream, and 2 teaspoons of vanilla extract. Stir with a fork just until a shaggy, slightly sticky dough forms. Stop the moment the flour streaks disappear — over-mixing develops gluten and makes them tough. I count to twelve stirs and stop. The dough will look rough and lumpy — that’s perfect.
- Use two spoons or a large cookie scoop to drop 8 equal mounds of dough onto the prepared baking sheet. Space them about 2 inches apart. Don’t flatten them — the craggier and taller they are going into the oven, the more texture and height they’ll have coming out. Rough edges get extra crispy, which is the best part.
- Bake for 14–16 minutes, or until the bottoms are deep golden brown and the tops are lightly browned. A toothpick inserted into the center of a scone should come out clean or with a few moist crumbs. If you want to be precise, an instant-read thermometer inserted into the center should read around 200°F. Your kitchen will smell like a citrus grove.
- Transfer the scones to a cooling rack and let them cool completely, about 15 minutes. I know it’s hard to wait, but glazing warm scones will result in a thin, runny mess that slides right off into a puddle on your plate.
- While the scones cool, make the glaze. In a small bowl, whisk together the 1 cup of powdered sugar, 1 tablespoon of orange zest, 1/4 teaspoon of vanilla extract, 1 tablespoon of cream or milk, and 1 tablespoon of fresh orange juice. Whisk vigorously until smooth and completely lump-free. The glaze should be thick enough to coat the back of a spoon but still flow slowly. If it’s too thick to drizzle, add more orange juice a teaspoon at a time. If it’s too thin, add more powdered sugar.
- Drizzle the glaze over the cooled scones using a spoon or a whisk, letting it drip naturally down the sides. Watch it pool in the craggy cracks. Let it set for about 5 minutes before serving. The glaze will harden slightly, creating a beautiful, crackly, white shell that shatters when you bite into it.
Notes
- Chill the Cream (and Your Bowl): Cold ingredients are non-negotiable for flaky scones. I pop my mixing bowl, the carton of cream, and even the orange juice in the fridge for 10 minutes before I start.
- Use a Light Hand — Seriously: When mixing, use a fork or your fingertips. Stir just until the dough comes together. Over-mixing is the single most common mistake home bakers make with scones.
- Don’t Skip the Zest in the Glaze: The fresh zest in the glaze gives it that bright, almost perfumed aromatic quality.
- Make Taller Scones for a Bakery Look: Use a large ice cream scoop with a trigger to drop the dough. The taller the mound going in, the taller the scone will be coming out.
- Let the Glaze Set Completely: Let the glaze set for a full 5–10 minutes. It transforms from a glossy, wet drizzle into a matte, crackly shell.
Related posts:
 Creamy Pasta Salad That Doesn’t Get Soggy on Day Two — Finally
 Low Calorie Banana Bread That Doesn’t Taste Like a Compromise — Finally
 Homemade Soft Pretzel Bites: The One-Bowl Recipe That Stays Soft for Days (If They Last That Long)
 Italian Zucchini Scarpaccia That’s Crispy and Golden — With Only 15 Minutes Hands-On