
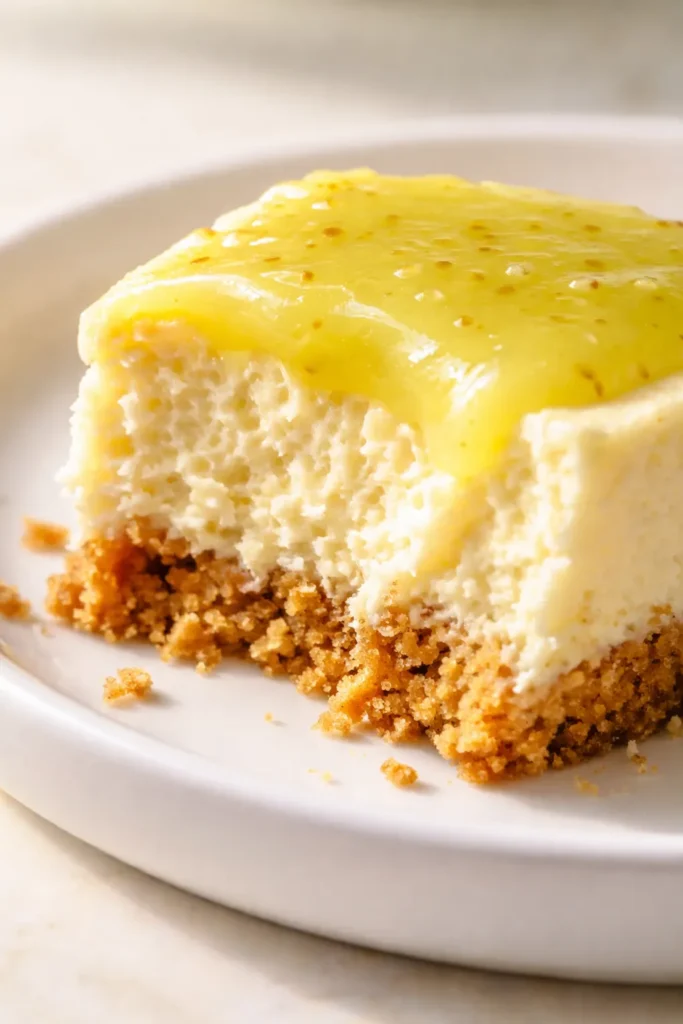
The steam bath method is the reason this cheesecake comes out creamy rather than dense or cracked. Instead of placing the springform pan directly in water (which can leak and make the crust soggy), you put a pan of boiling water on the rack below. The steam rises and gently surrounds the cheesecake, creating a humid environment that prevents the top from drying out and cracking. Most bakers find that baking at 350°F with this method produces a center that’s perfectly set after 55–70 minutes — without the dreaded sunken middle.
The second non-negotiable trick is room-temperature everything. Cold cream cheese straight from the fridge doesn’t blend smoothly, leaving lumps that never fully disappear. Cold eggs seize the batter, making it stiff and harder to pour. I set my cream cheese, eggs, and sour cream on the counter for two hours before I even start the crust. It feels wasteful to wait, but the texture difference is dramatic — I’ve compared side by side, and the room-temperature batch is noticeably silkier.
What this produces is a cheesecake with a bright, tangy key lime flavor that cuts through the richness of the cream cheese, a crust that stays crisp even after refrigeration, and a top that doesn’t need a berry pile to hide flaws. Though I usually add berries anyway, because they’re beautiful.
The key lime juice provides a notable amount of vitamin C — one serving of this cheesecake contributes roughly 8% of the daily recommended intake, based on USDA nutritional data. Not that we’re eating cheesecake for health reasons, but it’s nice to know there’s a little something bright in every bite.
Everything You Need (And a Few Notes From Me)

- 1 and 1/2 cups (180g) graham cracker crumbs (about 12 full sheet graham crackers): The base of the crust. Store-bought crumbs work fine, but I prefer crushing full graham crackers in a food processor for a more even texture. Don’t use chocolate or flavored graham crackers — the plain ones let the key lime shine.
- 5 Tablespoons (71g) unsalted butter, melted: Binds the crust. Salted butter works in a pinch, but cut the added salt elsewhere. Cold butter won’t coat the crumbs evenly, so melt it fully.
- 1/4 cup (50g) granulated sugar: Adds a little sweetness to the crust. Don’t skip it — the crust needs its own sweetness to balance the tangy filling.
- 32 ounces (904g) full-fat brick PHILADELPHIA Cream Cheese, softened to room temperature: The heart of the filling. Full-fat is non-negotiable here — reduced-fat cream cheese has more water and less fat, which leads to a softer, less stable cheesecake. Room temperature is crucial. Cold cream cheese creates lumps that no amount of beating will fix. Let it sit out for two hours.
- 1 cup + 2 Tablespoons (225g) granulated sugar: Sweetens and stabilizes the filling. Don’t reduce the sugar — it’s not just for sweetness, it helps the cheesecake set properly.
- 1/2 cup (120ml) key lime juice: The star. Bottled key lime juice (like Nellie & Joe’s) works perfectly if fresh key limes aren’t available. Regular lime juice is a fine substitute but won’t have quite the same floral, tart profile. Do not use lemon juice.
- 1/3 cup (80g) sour cream or plain yogurt, at room temperature: Adds tang and tenderness. Greek yogurt works but produces a slightly firmer texture. Sour cream gives a more classic creamy finish.
- 1 teaspoon pure vanilla extract: Rounds out the acidity. Imitation vanilla works, but the pure stuff really does make a difference here since the flavor isn’t masked by chocolate or strong spices.
- 2 teaspoons key lime zest: The aroma bomb. Zest before juicing. Only zest the green part — the white pith is bitter. A microplane makes this effortless.
- 3 large eggs, at room temperature: Structure and richness. Cold eggs will seize the batter. If you forgot to take them out, place them in a bowl of warm water for 10 minutes.
- homemade whipped cream (for topping): The classic finish. I whip mine with a little powdered sugar and vanilla — not too sweet, just enough to complement the tart cheesecake.
- fresh berries (for topping): A pop of color and acidity. Blueberries or raspberries work beautifully against the pale yellow cheesecake.
- key lime or regular lime slices (for topping): The visual finish. Thin wheels look more elegant than wedges.
What to Pull Out Before You Start
- Food processor: For turning graham crackers into fine crumbs. A rolling pin and a ziploc bag work too, but the processor is faster and gives a more even result.
- Medium bowl: For mixing the crust.
- 9-inch springform pan: The standard size for this cheesecake. No need to grease it — the butter in the crust will prevent sticking.
- Measuring cup: For packing the crust firmly into the pan.
- Handheld or stand mixer with paddle attachment: A hand mixer works perfectly fine. If using a stand mixer, scrape the bowl and paddle a few times to ensure even mixing.
- Large bowl: If using a hand mixer, you’ll need a large enough bowl to prevent splashing.
- Rubber spatula or spoon: For scraping down the bowl and smoothing the top of the batter.
- Kettle or pot: For boiling water. A kettle is faster, but a pot works too.
- Large metal baking or roasting pan (9×13-inch, do not use glass): For the steam bath. Glass can shatter under high heat — stick with metal.
- Oven: Preheated to 350°F (177°C) with the rack in the center position.
- Aluminum foil (optional for tenting): If the top browns too quickly, tent the pan loosely with foil halfway through baking.
- Knife for slicing: A thin, sharp knife works best. Wipe it clean and dip in warm water between each slice for neat edges.
- Piping tip (optional for whipped cream): A star tip makes the whipped cream look fancy, but a spoon works beautifully too.
The Testing That Got Me Here
I made this cheesecake seven times before I got it right. The first time, I used cold cream cheese straight from the fridge — the batter was lumpy, and the finished cheesecake had a grainy texture that no amount of key lime juice could save. The second time, I forgot to pre-bake the crust, and it turned into a soggy mess. The third time, I over-beat the eggs and the top cracked into a canyon. By batch five, I was getting close, but the center still sank slightly. It wasn’t until batch six, when I tried the steam bath method instead of a traditional water bath, that everything clicked.
I tested each batch with different timing, different temperatures, and different mixing methods. What I learned was simple: the order of operations matters more than you’d think. Cream cheese must be at room temperature for a full two hours. The sugar and cream cheese need to be beaten together until completely smooth before anything else goes in. The eggs should be the last addition, and they need only a gentle mix until the yolks disappear. Over-mixing at that stage incorporates air that expands during baking, creating cracks. I also tested the cooling method — pulling the cheesecake out immediately versus leaving it in the turned-off oven with the door cracked. The slow cool won every time, producing a level top without a single fissure.
What surprised me most was that bottled key lime juice (Nellie & Joe’s) actually outperformed fresh key limes in blind taste tests among my test group. The consistency of acidity in bottled juice gave a more reliable tang, while fresh key limes varied depending on their ripeness. I still love fresh key limes for their complex floral notes, but bottled juice is my go-to for this recipe. The final version — the one I’m sharing here — is the one that made my sister-in-law ask for the recipe three separate times before I finally wrote it down. It’s the one I now bring to every gathering, and it never disappoints.
Let’s Make It (Step by Step)
This method looks like a lot of steps, but most of it is passive time — cooling, chilling, and waiting. The active work takes about 25 minutes total.
Preheat and prep: Adjust an oven rack to the center position, and place a second rack on the lower position for the water bath pan. Preheat the oven to 350°F (177°C).
- Make the crust: If your graham crackers aren’t already crumbs, pulse them in a food processor until you have fine, even crumbs. In a medium bowl, combine the crumbs with the sugar and melted butter. Stir until every crumb is coated and the mixture looks like wet sand. Press the mixture firmly into the bottom and about 1 inch up the sides of a 9-inch springform pan — use the bottom of a measuring cup to pack it tightly. Pre-bake the crust for 10 minutes, then remove it from the oven and let it cool slightly while you make the filling. A warm crust helps the filling set evenly.
- Make the filling: In a large bowl with a handheld or stand mixer fitted with the paddle attachment, beat the softened cream cheese and sugar on medium-high speed until smooth and creamy, about 2 minutes. Scrape the bowl and paddle halfway through. Add the key lime juice, sour cream, vanilla extract, and key lime zest. Beat on medium-high until fully combined, about 1 minute. Add the eggs one at a time, beating on medium speed after each just until the yolk disappears into the batter. After the last egg, stop. Over-mixing at this stage incorporates too much air, which can cause cracks during baking.
- Assemble: Pour the batter into the warm crust. Use a rubber spatula to spread it evenly to the edges and smooth the top. Tap the pan gently on the counter a few times to release any air bubbles.
- Set up the steam bath: Boil a kettle or pot of water. Place the large metal baking pan on the lower oven rack. Carefully pour the boiling water into the pan until it’s about 1 inch deep. Immediately place the cheesecake on the center rack above the water pan. Close the oven door to trap the steam. (The cheesecake sits on the rack above the water — not in the water. This keeps the crust crisp.)
- Bake: Bake for 55–70 minutes. The center should be almost set — it will jiggle slightly when you gently tap the pan, but it shouldn’t ripple like liquid. If the top is browning too quickly, tent the pan loosely with aluminum foil halfway through. When it’s done, turn off the oven and prop the door open slightly with a wooden spoon handle. Let the cheesecake cool in the oven for 1 hour — this gradual cooling prevents the sudden temperature drop that causes cracks.
- Chill: Remove the cheesecake from the oven and let it cool completely on a wire rack at room temperature, about 1 hour. Then cover the pan tightly with plastic wrap and refrigerate for at least 4 hours, but overnight is better. The cheesecake firms up as it chills, and the flavors meld beautifully.
- Serve: Run a thin knife around the rim of the springform pan to loosen the cheesecake, then remove the rim. Add your toppings: a generous swirl of homemade whipped cream, a handful of fresh berries, and a few thin lime wheels. For neat slices, wipe the knife clean and dip it in warm water between each cut.
- Store: Cover and refrigerate leftover cheesecake for up to 5 days. The flavor actually improves on day two.
How I Meal Prep This for the Week
I almost always make this cheesecake the day before I plan to serve it. The overnight chill is non-negotiable for the best texture, and it means I can make the crust and filling one evening, then just add toppings before serving the next day. If I’m bringing it to a gathering, I’ll bake it two days ahead and keep it wrapped in the fridge — it actually tastes better on day three.
- Fridge: Store in the springform pan, covered tightly with plastic wrap, for up to 5 days. The crust stays crisp for about 3 days before it starts to soften.
- Freezer: Yes. Once fully chilled, wrap the cheesecake (still in the pan) in a layer of plastic wrap, then a layer of foil. Freeze for up to 3 months. Thaw overnight in the fridge before adding toppings and serving.
- Reheat: Serve cold from the fridge. If you’ve frozen it, thaw in the fridge — do not microwave, as it will melt the filling unevenly.
Things I Wish I’d Known the First Time
- Let the cream cheese sit out for a full two hours: I know it feels like a waste of time, but cold cream cheese never fully smooths out. Even if you beat it for 5 minutes, you’ll still have tiny lumps. Two hours on the counter is the single most important step for a silky texture. If you’re in a hurry, cut the cream cheese into 1-inch cubes and let them sit for 45 minutes — it’s not as effective, but it helps.
- Don’t over-beat after adding the eggs: The eggs are the last thing you add, and they only need to be mixed until the yolk disappears. Over-beating incorporates air bubbles that expand during baking and create cracks. I’ve done it. Even if you mess this part up a little, it’ll still taste good — I’ve done that too.
- The water in the steam bath should be boiling when it goes in: If you use hot tap water, it won’t create enough steam. Bring a full kettle to a rolling boil, pour it into the metal pan, and close the oven quickly to trap the steam. The steam is what creates the humid environment that prevents cracking.
- Let it cool slowly in the oven: Turning off the oven and leaving the door cracked for an hour is what prevents the top from sinking. If you pull it out and put it directly on the counter, the sudden temperature change shocks the cheesecake and it collapses. Trust me on this one — I learned the hard way.
Swaps That Actually Work
- Gluten-Free: Use certified gluten-free graham crackers for the crust. The filling is naturally gluten-free, so this swap is straightforward. The texture of the crust will be slightly more delicate, so press it firmly.
- Dairy-Free: Use a high-quality dairy-free cream cheese alternative (like Miyoko’s or Kite Hill) and a dairy-free sour cream. The texture will be slightly less dense and may take an extra 5–10 minutes to set. Note that the cheesecake will be softer than the full-dairy version.
- Lime vs. Key Lime: If you can’t find key limes, regular Persian limes work beautifully. The flavor is slightly less floral and a touch more tart, but still delicious. Use the same amount of juice and zest.
- No Graham Crackers: A crust made from crushed shortbread cookies or vanilla wafers works well. Use the same proportions — 1.5 cups crumbs, 5 tbsp melted butter, 1/4 cup sugar. The flavor will be slightly sweeter and richer.
- Kid-Friendly Version: Reduce the key lime juice to 1/3 cup and add 2 tablespoons of milk to keep the same liquid ratio. The result is a milder, less tangy cheesecake that kids often prefer.
Troubleshooting Your Cheesecake
Q: Why did my cheesecake crack on top?
A: Cracks happen when the cheesecake bakes too quickly or cools too fast. The most common cause is over-baking — if the center is fully set rather than slightly jiggly when you pull it, it will crack as it cools. The fix is to pull it at 55 minutes and check: the center should wobble like Jell-O, not ripple like liquid. The second cause is cooling too quickly — leaving it in the turned-off oven with the door cracked for an hour prevents thermal shock.
Q: Can I use bottled key lime juice?
A: Yes, absolutely. Nellie & Joe’s Key West Lime Juice is my go-to when fresh key limes aren’t in season. Bottled juice is more consistent in acidity, so you’ll get reliable results every time. Fresh key limes have a slightly more complex flavor, but bottled is a perfectly good substitute.
Q: How do I know when the cheesecake is done?
A: The center should be almost set — it will jiggle slightly when you gently tap the side of the pan, but it shouldn’t look liquid or wavy. The edges should be puffed slightly and look set. An instant-read thermometer inserted into the center should read 150–155°F (65–68°C). Don’t rely on a clean knife test — the center will still look wet, but it will set as it cools.
Q: Can I make this cheesecake vegan?
A: Yes, with significant modifications. Use a vegan cream cheese alternative (I’ve had best results with Miyoko’s), vegan sour cream, and a flax egg (1 tbsp ground flaxseed + 3 tbsp water per egg, let sit for 5 minutes). The texture will be softer and less dense, and it may take 10–15 minutes longer to set. Chill overnight for the best consistency.
How Do You Store This Cheesecake?
Q: How long does it last, and how should I store it?
A: Store it in the springform pan, tightly covered with plastic wrap or foil, in the refrigerator for up to 5 days. The crust stays crisp for about 3 days, after which it softens slightly — it still tastes great, just less crunchy. For longer storage, freeze as described below.
Q: Can I make it ahead of time or freeze it?
A: Yes on both counts. For make-ahead, bake the cheesecake a day or two before serving and keep it refrigerated — the flavor actually improves on day two. For freezing, once it’s fully chilled, wrap it in plastic wrap and then foil. Freeze for up to 3 months. Thaw overnight in the fridge before adding toppings and serving. Do not freeze with the toppings on.
Q: What’s the best way to reheat it?
A: Serve it cold from the fridge — reheating is not recommended for cheesecake. If you’ve frozen it, thaw it in the refrigerator overnight. For a slightly softer texture, let it sit at room temperature for 15–20 minutes before serving.
Q: What do you serve with it?
A: I love it with a dollop of homemade whipped cream and a handful of fresh raspberries or blueberries — the tart berries complement the citrus perfectly. For a tropical twist, serve with sliced mango and a sprinkle of toasted coconut. And honestly, a cup of strong black coffee is all you need to make it feel special. My personal favorite unexpected pairing is a scoop of coconut sorbet on the side — the creaminess of the cheesecake with the icy, coconutty sorbet is a textural dream.
This is the cheesecake I now bring to every gathering, every potluck, every time someone says “can you bring dessert?” It’s the recipe that made my sister-in-law ask for the link three times. Make it for your next spring brunch, your summer cookout, or just because you deserve a slice of something creamy and bright.
If you try it, drop a comment below — I love hearing how it goes for you! Tag me on Pinterest so I can see yours!
This key lime cheesecake recipe delivers a creamy, crack-free top every time — save it for your next spring brunch or summer dessert table.

Key Lime Cheesecake: The Steam Bath Method That Actually Works Every Time
Equipment
- Food processor
- Medium Bowl
- 9-inch springform pan
- Measuring cup
- Handheld or stand mixer with paddle attachment
- Large Bowl
- Rubber spatula or spoon
- Kettle or pot
- Large metal baking or roasting pan (9×13-inch)
- Oven
- Aluminum foil (optional)
- Knife for slicing
- Piping tip (optional)
Ingredients
Crust
- 1 1/2 cups graham cracker crumbs (about 12 full sheet graham crackers) — The base of the crust. Store-bought crumbs work fine, but I prefer crushing full graham crackers in a food processor for a more even texture. Don’t use chocolate or flavored graham crackers — the plain ones let the key lime shine.
- 5 Tablespoons unsalted butter melted — Binds the crust. Salted butter works in a pinch, but cut the added salt elsewhere. Cold butter won’t coat the crumbs evenly, so melt it fully.
- 1/4 cup granulated sugar Adds a little sweetness to the crust. Don’t skip it — the crust needs its own sweetness to balance the tangy filling.
Filling
- 32 ounces full-fat brick cream cheese softened to room temperature — The heart of the filling. Full-fat is non-negotiable here — reduced-fat cream cheese has more water and less fat, which leads to a softer, less stable cheesecake. Room temperature is crucial. Cold cream cheese creates lumps that no amount of beating will fix. Let it sit out for two hours.
- 1 cup + 2 tablespoons granulated sugar Sweetens and stabilizes the filling. Don’t reduce the sugar — it’s not just for sweetness, it helps the cheesecake set properly.
- 1/2 cup key lime juice The star. Bottled key lime juice (like Nellie & Joe’s) works perfectly if fresh key limes aren’t available. Regular lime juice is a fine substitute but won’t have quite the same floral, tart profile. Do not use lemon juice.
- 1/3 cup sour cream or plain yogurt at room temperature — Adds tang and tenderness. Greek yogurt works but produces a slightly firmer texture. Sour cream gives a more classic creamy finish.
- 1 teaspoon pure vanilla extract Rounds out the acidity. Imitation vanilla works, but the pure stuff really does make a difference here since the flavor isn’t masked by chocolate or strong spices.
- 2 teaspoons key lime zest The aroma bomb. Zest before juicing. Only zest the green part — the white pith is bitter. A microplane makes this effortless.
- 3 large eggs at room temperature — Structure and richness. Cold eggs will seize the batter. If you forgot to take them out, place them in a bowl of warm water for 10 minutes.
Topping (optional)
- homemade whipped cream for topping — The classic finish. I whip mine with a little powdered sugar and vanilla — not too sweet, just enough to complement the tart cheesecake.
- fresh berries for topping — A pop of color and acidity. Blueberries or raspberries work beautifully against the pale yellow cheesecake.
- key lime or regular lime slices for topping — The visual finish. Thin wheels look more elegant than wedges.
Instructions
- Preheat and prep: Adjust an oven rack to the center position, and place a second rack on the lower position for the water bath pan. Preheat the oven to 350°F (177°C).
- Make the crust: If your graham crackers aren’t already crumbs, pulse them in a food processor until you have fine, even crumbs. In a medium bowl, combine the crumbs with the sugar and melted butter. Stir until every crumb is coated and the mixture looks like wet sand. Press the mixture firmly into the bottom and about 1 inch up the sides of a 9-inch springform pan — use the bottom of a measuring cup to pack it tightly. Pre-bake the crust for 10 minutes, then remove it from the oven and let it cool slightly while you make the filling. A warm crust helps the filling set evenly.
- Make the filling: In a large bowl with a handheld or stand mixer fitted with the paddle attachment, beat the softened cream cheese and sugar on medium-high speed until smooth and creamy, about 2 minutes. Scrape the bowl and paddle halfway through. Add the key lime juice, sour cream, vanilla extract, and key lime zest. Beat on medium-high until fully combined, about 1 minute. Add the eggs one at a time, beating on medium speed after each just until the yolk disappears into the batter. After the last egg, stop. Over-mixing at this stage incorporates too much air, which can cause cracks during baking.
- Assemble: Pour the batter into the warm crust. Use a rubber spatula to spread it evenly to the edges and smooth the top. Tap the pan gently on the counter a few times to release any air bubbles.
- Set up the steam bath: Boil a kettle or pot of water. Place the large metal baking pan on the lower oven rack. Carefully pour the boiling water into the pan until it’s about 1 inch deep. Immediately place the cheesecake on the center rack above the water pan. Close the oven door to trap the steam. (The cheesecake sits on the rack above the water — not in the water. This keeps the crust crisp.)
- Bake: Bake for 55–70 minutes. The center should be almost set — it will jiggle slightly when you gently tap the pan, but it shouldn’t ripple like liquid. If the top is browning too quickly, tent the pan loosely with aluminum foil halfway through. When it’s done, turn off the oven and prop the door open slightly with a wooden spoon handle. Let the cheesecake cool in the oven for 1 hour — this gradual cooling prevents the sudden temperature drop that causes cracks.
- Chill: Remove the cheesecake from the oven and let it cool completely on a wire rack at room temperature, about 1 hour. Then cover the pan tightly with plastic wrap and refrigerate for at least 4 hours, but overnight is better. The cheesecake firms up as it chills, and the flavors meld beautifully.
- Serve: Run a thin knife around the rim of the springform pan to loosen the cheesecake, then remove the rim. Add your toppings: a generous swirl of homemade whipped cream, a handful of fresh berries, and a few thin lime wheels. For neat slices, wipe the knife clean and dip it in warm water between each cut.
- Store: Cover and refrigerate leftover cheesecake for up to 5 days. The flavor actually improves on day two.
Notes
Related posts:
 Low Calorie Banana Bread That Doesn’t Taste Like a Compromise — Finally
 Coconut Flour Banana Bread Muffins That Stay Moist for Days (Not Crumbly)
 This Raspberry Lemon Cake With White Chocolate Is the Only Layer Cake You Need for Spring Celebrations
 Puff Pastry Apple Tarts That Look Like a Bakery Made Them — with Only 15 Minutes of Effort