

I spent three years making a version of these that fell apart in the oil. Three years. Celestine would have just told me to chill the filling longer, but I had to learn it myself. So here’s what I know now: properly chilled, extra-creamy mac and cheese, rolled in a seasoned breading, fried until golden. My daughter Simone, who tells me when the cornbread needs more butter, called these “the best thing you’ve ever made.” That’s the review that matters.
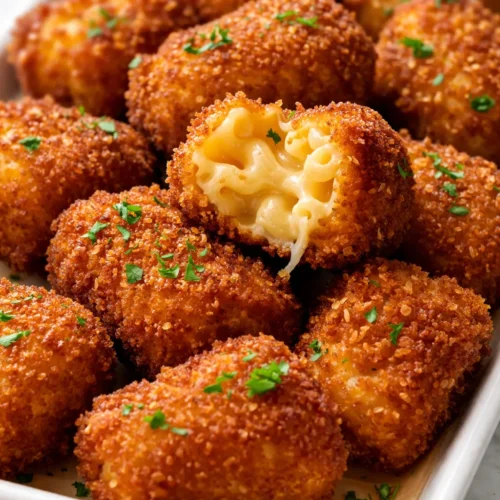
The short version: Creamy, sharp cheddar mac and cheese, chilled solid, breaded and fried until golden — and they stay crispy for way longer than they should.
I’ve made these for game days, school pick-up treats, and even a fancy cocktail party where they disappeared before the shrimp. This recipe comes together in about 45 minutes of active time, plus a mandatory chill that makes all the difference.
- Serves: 6 as an appetizer (about 24 bites)
- Hands-On Time: 45 min | Total Time: 4 hrs 45 min (includes chilling)
- Difficulty: The chilling is the hard part. The frying is easier than you think.
- Cost per serving: ~$3.50
- Calories: ~420 per serving (4 bites)
- Dietary Notes: Vegetarian. Easily adaptable for gluten-free (see swaps).
(Photo above: A rustic wooden board piled high with golden-brown mac and cheese bites, cross-sections visible to show the creamy interior and crispy crust, with a small bowl of spicy ranch for dipping in the corner. Late afternoon sunlight hitting the surface.)
The Trick That Keeps These from Falling Apart

Most fried mac and cheese recipes skip the most important step: a full, uninterrupted chill. Not a quick thirty minutes in the freezer — a proper two- to three-hour set in the fridge. The cold holds the shape when it hits the oil, so the breading sets before the inside starts to melt. First time I skipped the chill, I ended up with a pot of cloudy oil and a sad, cheese-less breading nugget. Never again.
The second trick is in the breading. A double coating — flour, egg, then seasoned panko — gives you that shatteringly crisp shell that doesn’t turn soggy. I season the breading the same way Celestine seasoned everything: paprika, garlic powder, a little cayenne, and plenty of black pepper.
The result is a bite that cracks open to reveal a creamy, sharp cheddar center. No gummy texture. No grease bombs. Just the right ratio of crunch to cream.
Everything You Need (Plus My Notes on What Matters)
- 1 lb elbow macaroni (or cavatappi): The shape matters more than you think. Cavatappi has ridges that hold onto the sauce. Elbow works too, but don’t use spaghetti or something too delicate. Simone pretends to hate elbows but ate three bites before I could get the first batch plated.
- 4 tbsp unsalted butter: The fat base is non-negotiable. If you use salted, just dial back the added salt in the sauce.
- 1/4 cup all-purpose flour: For the roux. You’re making a proper béchamel here — it’s what gives the filling its structure.
- 2 cups whole milk: Low-fat will work in a pinch, but the extra fat helps the filling set firmly. I’ve tested it both ways and the whole milk version is noticeably creamier.
- 8 oz sharp cheddar (shredded yourself): Pre-shredded has anti-caking agents that make the sauce grainy. Buy a block and shred it. It takes three minutes. I know no one wants to hear this, but it’s the truth.
- 4 oz cream cheese, softened: This is the secret to a filling that’s creamy enough to hold its shape. Don’t skip it.
- Seasonings: 1 tsp smoked paprika, 1/2 tsp garlic powder, 1/4 tsp cayenne, 1 tsp kosher salt, 1/2 tsp black pepper. Add to the sauce, not just the breading.
- For the breading: 1 cup all-purpose flour, 3 large eggs (beaten with 1 tbsp water), 2 cups panko breadcrumbs. Season the panko with the same spice mix you used in the sauce.
- Oil for frying: A neutral oil with a high smoke point, like canola, peanut, or avocado.
What You’ll Need (It’s Probably in Your Kitchen)
- Large pot for boiling pasta
- Medium saucepan for the cheese sauce
- 9×13 baking dish (or any shallow dish for chilling)
- Three shallow bowls for the breading station
- Dutch oven or heavy-bottomed pot for frying (a deep skillet works too)
- Sheet pan lined with parchment or wax paper (for the chilled bites)
- Wire rack set over a baking sheet (for draining the fried bites)
How I Make These (Start to Finish)
This is a do-ahead recipe, and I mean that in the best way. The active time is about 45 minutes. The chill time is hands-off. So read through, plan around the chill, and you’re golden.
Make the mac and cheese:
- Cook the pasta: Boil your noodles in salted water until just al dente — about a minute less than the box says. Drain and set aside. (📸 Photo tip: You want them shiny with a little water, not dry or clumping.)
- Start the béchamel: In a medium saucepan, melt the butter over medium heat. Whisk in the flour and cook for 1-2 minutes until it smells toasty and looks pale golden. This is your roux. It’s the base of everything.
- Add the milk: Slowly whisk in the milk, stirring constantly to avoid lumps. Keep stirring until it thickens enough to coat the back of a spoon — about 3-4 minutes.
- Melt the cheese: Drop the heat to low. Add the shredded cheddar and cream cheese a handful at a time, stirring until each addition is fully melted before adding the next. Stir in your seasonings.
- Combine: Pour the cheese sauce over the cooked pasta and stir until every piece is coated. The mixture should look almost too creamy — it’s going to firm up as it chills.
- Chill the filling: Spread everything into your 9×13 dish or a rimmed sheet pan. Press a piece of plastic wrap directly onto the surface (this keeps a skin from forming). Refrigerate for at least 3 hours, or overnight. I know it’s tempting to rush this. Don’t. The chill is what makes these work.
Bread and fry:
- Portion the bites: Once the mac and cheese is fully set, use a spoon or a small cookie scoop to portion out roughly 2-tablespoon balls. Roll them gently between your palms to form smooth rounds. Place them on the parchment-lined sheet pan. (📸 Photo tip: They should look like compact, solid balls — no loose pasta hanging off.)
- Set up the breading station: Bowl 1: flour. Bowl 2: beaten eggs with a splash of water. Bowl 3: panko seasoned with a pinch of salt, paprika, and garlic powder.
- Bread the bites: Roll each ball first in the flour (shake off the excess), then dip it in the egg (let the extra drip off), then roll it in the panko, pressing gently so the crumbs stick. Place back on the sheet pan.
- Chill again (optional but recommended): Pop the breaded bites back in the fridge for 15-20 minutes while you heat the oil. This sets the breading and keeps it from sliding off in the fryer.
- Heat the oil: Pour about 2 inches of oil into your pot. Heat it to 350°F (375°F max). Use a thermometer — guessing here is how you end up with greasy bites.
- Fry in batches: Carefully drop 4-5 bites into the hot oil, making sure not to crowd the pot. Fry for 2-3 minutes, turning once, until deep golden brown on all sides.
- Drain and rest: Transfer the fried bites to the wire rack set over a baking sheet. Sprinkle with a tiny pinch of flaky salt while they’re still hot. Let them rest for 2-3 minutes before serving. This rest is crucial — the inside is lava-hot fresh out of the oil.
How I Prep These for a Crowd (or a Stress-Free Week)
This is one of my favorite make-ahead appetizers. I usually make the mac and cheese the night before, let it chill overnight, then bread and fry right before serving. A friend texted me last week: “Can I freeze these BEFORE frying?” Yes, and it works beautifully.
- Fridge: Breaded, unfried bites keep for up to 24 hours in the fridge on a parchment-lined tray, covered loosely with plastic wrap.
- Freezer: Freeze the breaded bites in a single layer on a sheet pan until solid (about 2 hours), then transfer to a freezer bag. They’ll keep for up to 3 months. Fry straight from frozen, adding 1 extra minute to the fry time.
- Reheat: Already fried? Reheat in a 375°F oven for 5-7 minutes. The microwave works but it’ll soften the crunch. Air fryer at 350°F for 3 minutes is the best way to bring them back to life.
What I’ve Learned (The Hard Way) So You Don’t Have To
- Season the cheese sauce boldly: Mac and cheese filling needs to be flavorful enough to stand on its own, because the breading dilutes it slightly. Taste the sauce before you add the pasta. It should taste a little stronger than you think is reasonable. That’s the right level.
- Don’t oversoften the cream cheese: Cold cream cheese won’t melt smoothly, but room temperature is fine. If your cream cheese is too soft, the sauce can turn greasy. Let it sit on the counter for 20 minutes, no more.
- Use the right oil temperature: If the oil is too hot, the outside burns before the inside warms up. If it’s too low, the bites absorb oil and turn greasy. 350°F is the sweet spot. A clip-on thermometer is cheap and worth every penny.
- Work in small batches: Crowding the pot drops the oil temperature fast. I know it’s tempting to dump in a bunch, but you’ll get better results with patience. Four or five at a time is the limit for a standard Dutch oven.
- Flaky salt at the end: A pinch of flaky salt (like Maldon) right when they come out of the oil makes a bigger difference than you’d think. Trust me on this one.
Make It Yours (Swaps That Actually Work)
- Gluten-Free: Use gluten-free pasta (I like the one made from brown rice and quinoa). Swap the flour in the roux for a 1:1 gluten-free flour blend. Use gluten-free panko. The texture is slightly more delicate, but it works perfectly.
- Spicier: Add an extra 1/4 tsp cayenne to the cheese sauce and another 1/4 tsp to the breading. A dash of hot sauce in the egg wash is also a great move.
- Extra cheesy (the adult version): Replace 2 oz of the sharp cheddar with smoked gouda or gruyère. It adds a complexity that cheddar alone can’t hit.
- Kid-friendly (the no-cayenne version): Leave out the cayenne entirely. Use mild cheddar. Simone likes these with ketchup, which I choose not to comment on.
- Bacon-flecked: Stir 4 oz of cooked, crumbled bacon into the mac and cheese before chilling. This is Marcus’s preferred version and it is objectively excellent.
The Questions I Get About This Recipe Every Single Time
Q: Why did my mac and cheese filling fall apart in the oil?
A: Ugh, I’ve been there and it is so frustrating. Nine times out of ten, the filling wasn’t chilled long enough. It needs at least 3 hours in the fridge — overnight is even better. The other culprit is the breading: make sure you press the panko on firmly and give it a quick 15-minute chill after breading. You’ve got this next time.
Q: Can I make this dairy-free?
A: I’ve tested this with a plant-based butter, unsweetened oat milk, and a dairy-free cheddar shred. It works, but the texture is a little less creamy and the flavor is milder. My best advice is to use a high-quality dairy-free cheddar and add a tablespoon of nutritional yeast to boost the cheesy flavor. Not the same as the original, but solid for a dairy-free version.
Q: How long do the fried bites last? Can I freeze the fried version?
A: Fried bites are best within 2 hours of frying. For freezing: I do not recommend freezing them after frying. The texture declines noticeably. Instead, freeze them breaded and uncooked (see my Meal Prep notes above). That way, you get fresh, crispy bites whenever you want them.
Q: What do you serve with these?
A: I always set out a dipping sauce situation. Spicy ranch is the favorite at our house — just mix ranch dressing with a splash of hot sauce and a pinch of smoked paprika. For a fancier spread, serve with a creole mustard aioli or a simple garlic aioli. On game days, I put out all three and watch people argue about which is best. For the kids, ketchup or plain ranch is the safe bet.
More Recipes My Family Makes on Repeat
If you liked these, here are a few others that get the same reaction at our table:
- Celestine’s Famous Baked Mac and Cheese — The one that started it all. Creamy, custardy, with that golden breadcrumb topping.
- Crispy Fried Chicken Tenders with Honey Butter — The perfect main dish to serve alongside these bites for a game day spread.
- The Only Buttermilk Ranch Dressing You’ll Ever Need — Make this for dipping. You will not regret it.
These fried mac and cheese bites are the thing I make when I want everyone in the room to be happy — the kids, the adults, the friend with the dietary restrictions, the guest who “doesn’t usually like fried food.” They’re a little bit of work, but the kind of work that pays off in the first bite.
If you make them, drop a comment below and tell me how it went — I love hearing about the variations people come up with.
📌 Fried mac and cheese bites recipe that stays perfectly crispy — save this for your next game day, party, or weekend treat.
Crispy Fried Mac and Cheese Bites
Equipment
- Large pot for boiling pasta
- Medium saucepan
- 9×13 baking dish
- Three shallow bowls for breading station
- Dutch oven or heavy-bottomed pot
- Sheet pan lined with parchment
- Wire rack over baking sheet
- Clip-on thermometer
Ingredients
For the mac and cheese
- 1 lb elbow macaroni or cavatappi
- 4 tbsp unsalted butter
- 1/4 cup all-purpose flour
- 2 cups whole milk
- 8 oz sharp cheddar, shredded
- 4 oz cream cheese, softened
- 1 tsp smoked paprika
- 1/2 tsp garlic powder
- 1/4 tsp cayenne pepper
- 1 tsp kosher salt
- 1/2 tsp black pepper
For the breading
- 1 cup all-purpose flour
- 3 large eggs, beaten with 1 tbsp water
- 2 cups panko breadcrumbs
- oil for frying (canola, peanut, or avocado)
Instructions
- Make the mac and cheese: Cook the pasta in salted water until just al dente (about 1 minute less than package directions). Drain and set aside.
- In a medium saucepan, melt the butter over medium heat. Whisk in the flour and cook for 1-2 minutes until it smells toasty and looks pale golden — this is your roux.
- Slowly whisk in the milk, stirring constantly to avoid lumps. Keep stirring until it thickens enough to coat the back of a spoon, about 3-4 minutes.
- Reduce heat to low. Add the shredded cheddar and cream cheese a handful at a time, stirring until each addition is fully melted before adding the next. Stir in smoked paprika, garlic powder, cayenne, salt, and pepper.
- Pour the cheese sauce over the cooked pasta and stir until every piece is coated. The mixture should be very creamy — it will firm up as it chills.
- Chill: Spread the mac and cheese into a 9×13 dish. Press plastic wrap directly onto the surface. Refrigerate for at least 3 hours, or overnight.
- Bread and fry: Once fully set, portion into 2-tablespoon balls and roll gently to form smooth rounds. Place on a parchment-lined sheet pan.
- Set up breading station: Bowl 1 with flour. Bowl 2 with beaten eggs. Bowl 3 with panko seasoned with a pinch of salt, paprika, and garlic powder.
- Roll each ball first in flour (shake off excess), then dip in egg, then roll in panko, pressing gently so the crumbs stick. Return to the sheet pan.
- Chill the breaded bites for 15-20 minutes while you heat the oil. This helps the breading stay on during frying.
- Pour about 2 inches of oil into a Dutch oven or heavy-bottomed pot. Heat to 350°F using a thermometer.
- Fry 4-5 bites at a time for 2-3 minutes, turning once, until deep golden brown on all sides. Transfer to a wire rack over a baking sheet. Sprinkle with flaky salt while hot. Let rest 2-3 minutes before serving.
Notes
Related posts:
 Breakfast Crunchwraps That Stay Golden and Crisp in 30 Minutes — The Only One You’ll Need
 Marry Me Chickpeas: The Creamy, Garlicky Version That’s Actually Worth the Hype – in 30 Minutes
 Tortellini Carbonara That’s Creamier Than Any Restaurant — in 30 Minutes
 Crock Pot Mississippi Beef Noodles That Never Turn Out Watery — Finally