Every French dip slider I ever made before this one was a soggy mess. The bread collapsed, the jus turned the buns into a wet sponge, and by the time I got them to the table they looked like something the dog dragged in. I tried everything—less broth, more patting, different rolls—and nothing worked until I learned the one trick that changes everything: toasting the buns first. These sliders come out golden and crisp on the outside, with a center that’s melty and rich, and they hold up even when you dunk them in au jus. My eight-year-old Simone ate three before I could stop her.
The short version: Hawaiian rolls, roast beef, provolone, and a five-minute toast that keeps everything from falling apart—done in 30 minutes flat.
I’ve made these for game days, school-night dinners, and even book club (they disappeared first). The secret is one small step that takes almost no extra time but makes all the difference.
- Serves: 6 as an appetizer or 4 as a main
- Hands-On Time: 15 min | Total Time: 30 min
- Difficulty: Easy enough for a busy Tuesday
- Cost per serving: ~$2.50 per slider (as a meal)
- Calories: ~350 per slider
- Dietary Notes: Adaptable for dairy-free (use vegan cheese and butter)
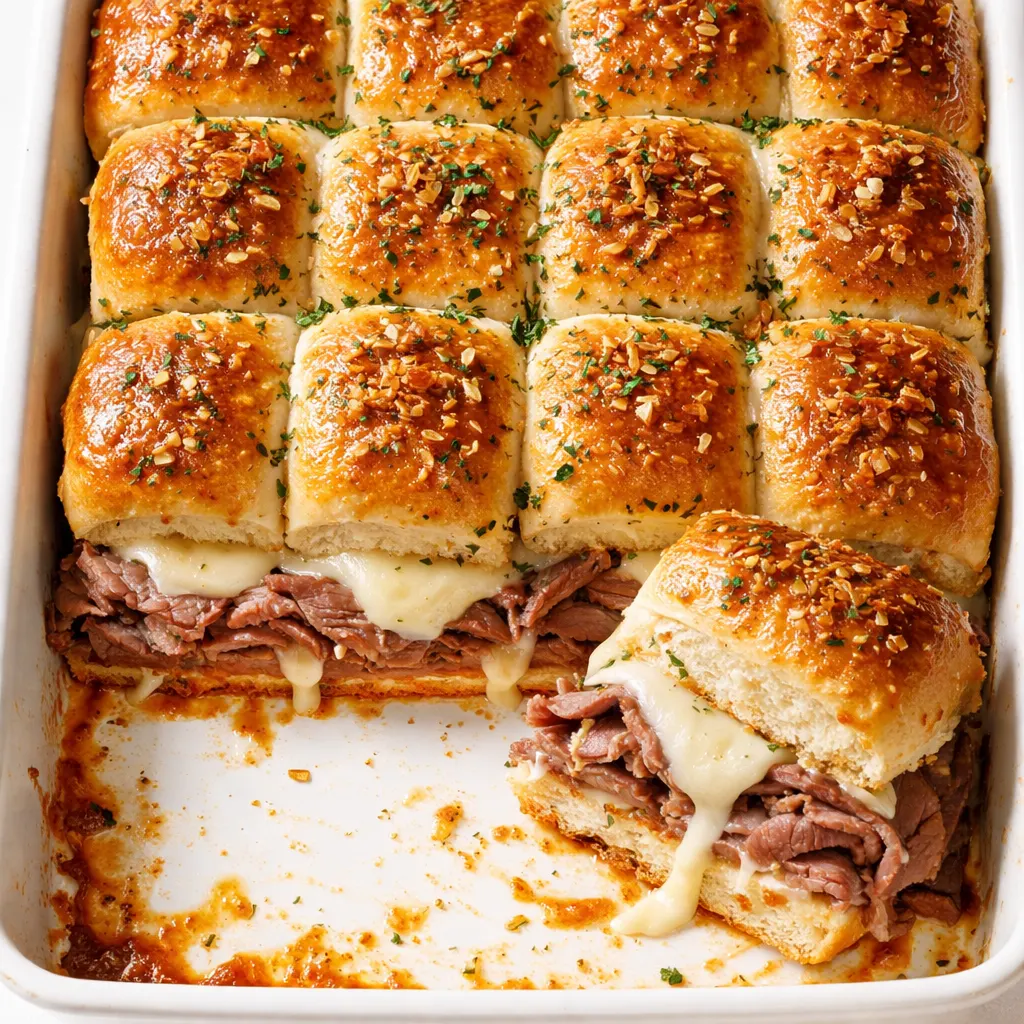
(Photo above: Overhead shot of golden-brown sliders on a wooden cutting board, a small ceramic bowl of deep amber au jus for dipping, melted provolone peeking out from between the buns, warm afternoon light from the left.)
The One Trick That Keeps These Crispy (Not Soggy)
The problem with most slider recipes is that the bread soaks up liquid from the fillings and turns into a sad, wet pancake. My fix is dead simple: toast the bottom half of the rolls for five minutes before you add anything else. That short blast of dry heat creates a barrier that keeps the jus from migrating into the bread. I learned this the hard way after way too many failed paninis and sloppy joes. It’s a 300-second investment that gives you a slider that stays structurally sound even after a generous dunk in the au jus.
The second thing is the butter mixture. I brush the top buns with a seasoned butter that has a little Worcestershire and Creole seasoning—my nod to Nola. It bakes up into a golden crust that adds flavor and a subtle crunch. Don’t skip the butter brush. It’s not just for show; it’s the finishing touch that makes these taste like you spent way more effort than you actually did.
Ingredients With Real Talk
- 1 package (12-count) Hawaiian sweet rolls — The sweetness balances the savory beef and salty cheese. Regular dinner rolls work, but you’ll lose that little pop. My rule: make sure they’re connected in a slab—you’ll slice them all at once.
- ½ pound thinly sliced roast beef (from the deli counter) — I use medium-rare roast beef, about 1/8 inch thick. Too thick and it’s hard to bite through. The lunch meat counter at my grocery store has it pre-sliced so thin it almost falls apart—perfect.
- 6 slices provolone cheese — Covers the whole slab nicely. If you want heat, swap for pepper jack. Simone says provolone is “the official cheese of not-weird sandwiches.”
- 4 tablespoons salted butter, melted — Don’t use unsalted; the salt in the butter matters here because we’re not adding extra salt elsewhere. I’ve used margarine in a pinch—it’s fine but not as rich.
- 1 teaspoon Worcestershire sauce — Adds umami depth. Lea & Perrins is my go-to; avoid the generic stuff that tastes like vinegar.
- ½ teaspoon garlic powder (not garlic salt) — For the butter brush. Garlic salt will make these too salty with the cheese and beef.
- ½ teaspoon onion powder — Adds a subtle sweetness that plays with the Hawaiian rolls.
- ¼ teaspoon Creole seasoning (like Tony Chachere’s) — My personal twist. It adds a tiny kick without being spicy. Celestine always kept a can of this on the counter—I use it way more than I admit.
- 1 cup low-sodium beef broth — Base of the au jus. Low-sodium is key; the broth reduces and concentrates flavor, and full-sodium can become inedibly salty.
- 1 tablespoon Worcestershire sauce (for the jus) — Two separate Worcestershire moments, and they’re both necessary.
- 1 teaspoon soy sauce or tamari — Deepens the savory note. Don’t skip it—I know it’s not traditional French dip, but it works. I use low-sodium soy sauce to keep control.
- ½ teaspoon dried thyme — My secret aromatic for the jus. It’s not in most recipes, but it adds a subtle earthiness that makes the jus taste like it simmered for hours.
What You’ll Need (It’s a Short List)
- A 9×13-inch baking dish or a rimmed baking sheet (I use a 9×13 because the rolls fit snugly)
- A small saucepan for the au jus
- A pastry brush (or just a spoon if you’re in a rush)
- A sharp serrated knife to slice the rolls
That’s it. No special gadgets required.
Let’s Make Them – Step by Step
Preheat your oven to 350°F before you do anything else. This goes fast once you start, so have everything ready.
Prep the rolls: Without separating the 12 rolls, slice the entire slab horizontally through the middle. You’ll have one big top half and one big bottom half. Place the bottom half into your 9×13 dish, cut side up. (📸 Photo tip: The two halves should look like a big sandwich loaf that’s been cut open – a clean, even slice is what you’re after.)
- Toast the bottom half: Put the dish (with just the bottom rolls, no toppings) into the preheated oven for 5 minutes. The rolls should be lightly golden and feel dry to the touch. This is the anti-soggy step. Don’t skip it, even if you’re in a hurry.
- Lay down the cheese: Arrange the provolone slices over the toasted bottom rolls, overlapping slightly to cover the entire surface. I use about 6 slices to get even coverage.
- Add the beef: Drape the roast beef slices over the cheese. Make sure they’re evenly distributed. A little overlapping is fine, but don’t create a giant lump in the center. (📸 Photo tip: You want the beef to look like a thin, even blanket over the cheese – no thick mounds.)
- Top with the other half: Place the top half of the rolls back on, cut side down.
- Make the butter brush: In a small bowl, combine the melted butter, Worcestershire, garlic powder, onion powder, and Creole seasoning. Stir well. Brush this mixture generously over the top of the rolls. Don’t forget the edges – those get the crunchiest. Pro tip: reserve a little butter to brush the insides of the top rolls if you lift them off to add more beef later.
- Bake: Put the whole dish back into the oven and bake for 10 minutes, or until the cheese is melted and the top is deeply golden. The butter should be bubbling slightly.
- Make the au jus while they bake: In a small saucepan, combine the beef broth, 1 tablespoon Worcestershire, soy sauce, and dried thyme. Bring to a simmer over medium heat. Let it bubble gently for 8–10 minutes until it reduces by about a quarter and intensifies in flavor. Taste it – it should be savory and rich, not thin. If too salty, add a splash of water.
- Rest and serve: Remove the sliders from the oven. Let them rest for 2–3 minutes before cutting into individual sliders with a sharp knife. Pour the warm au jus into small bowls for dipping. Serve immediately.
How I Meal Prep These for the Week
I make a full batch on Sundays and reheat throughout the week. The key is to store the sliders and the au jus separately – never together. Here’s my system:
- Fridge: Wrap the baked (but unsauced) sliders tightly in foil. Store in the fridge for up to 3 days. Keep the au jus in a sealed jar.
- Freezer: You can freeze the unbaked assembled sliders (without the butter brush). Wrap the entire dish in plastic wrap, then foil. Freeze for up to 2 months. To bake, thaw overnight in the fridge, brush with butter, and bake as directed. I’ve done this for last-minute company – it works beautifully.
- Reheat: Reheat individual sliders in a toaster oven at 350°F for 5 minutes. Avoid the microwave – it makes the rolls rubbery and the cheese turns to plastic. The au jus reheats on the stove or in the microwave for 30 seconds.
Things I Wish I’d Known the First Six Times
- Don’t drown the top in butter: You’re brushing, not bathing. Too much butter makes the top rolls soggy instead of crispy. A thin, even coat is all you need. I learned this the hard way when my first batch came out with greasy, sad tops.
- Slice the rolls before baking, not after: Trying to cut baked rolls with a dull knife will squish all your fillings out. Use a sharp serrated bread knife and slice between each roll gently. Or, before you add the beef, score the tops lightly with a knife along the seams so they separate easily after baking. I do the latter – it’s foolproof.
- Use a light hand with the beef: It’s tempting to pile on roast beef, but too much makes the sliders hard to bite and they slide apart. Aim for about 2–3 thin slices per slider. Even if you mess this up a little, it still tastes great – I’ve done it.
- The au jus is negotiable, but not the toasting: You can use store-bought au jus mix in a pinch, and I won’t judge. But never, ever skip toasting the bottom rolls. That single step is the difference between a slider you’re proud to serve and a slider that falls apart. Trust me on this one.
Swaps That Actually Work
- Dairy-Free: Use dairy-free provolone-style cheese (like Violife or Daiya) and vegan butter for the brush. The texture is slightly less melty, but flavor is still spot-on. My friend’s daughter can’t do dairy, and this version passed the kid test.
- Spicy: Swap provolone for pepper jack and add a few thin slices of pickled jalapeño on top of the beef before baking. My husband requests this version every time.
- Kid-Friendly: Omit the Creole seasoning and use only ½ teaspoon of Worcestershire total (shared between butter and jus). My kids prefer it this way – they call them “the sandwich dippers.”
- Chicken Alternative: Use thinly sliced rotisserie chicken instead of roast beef. Reduce baking time to 8 minutes (chicken is already cooked). The au jus works just as well. Simone actually likes chicken version better, but don’t tell Marcus.
- Bulk It Up: Add sautéed mushrooms (cremini or button) between the beef layers. It adds a savory depth and stretches the meat further for bigger crowds.
Questions I Get About These Sliders All the Time
Q: Why did my sliders turn out soggy on the bottom?
A: Ugh, I’ve been there. The most common culprit is skipping the five-minute toast. Seriously – I know it seems like a small step, but without it the bottom buns absorb moisture from the beef and cheese during baking. Second most common: not patting the roast beef dry if it’s stored in liquid. Give the slices a quick blot with a paper towel before layering. You’ve got this next time.
Q: Can I make these gluten-free?
A: Yes, but with a note. Use gluten-free Hawaiian-style rolls (schär or Trader Joe’s has a decent option) and a gluten-free tamari instead of soy sauce. The texture will be a little more crumbly, so slice carefully. I’ve tested it and it works, but they don’t hold up as well for leftovers – eat same day. My sister-in-law is GF and she polished off four.
Q: How long do the leftovers last? Can I freeze the finished sliders?
A: Leftover sliders (baked and stored without au jus) keep in the fridge for up to 3 days. Wrap tightly in foil. I don’t recommend freezing already-baked sliders – the rolls get a weird texture when reheated from frozen. Better to freeze unbaked (see meal prep notes). Reheat in a toaster oven at 350°F for about 5 minutes. The microwave makes them rubbery.
Q: What do you serve with these?
A: Three things my family loves: a simple arugula salad with lemon vinaigrette (cuts the richness), roasted sweet potato wedges (I toss them in the oven alongside the sliders), or a bowl of tomato soup for dipping the sliders themselves – trust me, it’s amazing. My kids always want the soup version on cold days.
More Recipes My Family Makes on Repeat
If you liked these, here are a few others that get the same reaction at our table:
- [INTERNAL LINK PLACEHOLDER: Classic Baked Ziti with Garlic Breadcrumbs] — My go-to for feeding a crowd with zero stress.
- [INTERNAL LINK PLACEHOLDER: Quick Beef and Broccoli Stir-Fry] — Comes together in 20 minutes and uses leftover roast beef.
- [INTERNAL LINK PLACEHOLDER: Sheet Pan Sausage and Peppers] — The best weeknight dinner that almost cleans itself.
If you try these sliders, drop a comment below – I love hearing how they go for you! Did your kids eat three like mine did? Did you try the spicy version? Tell me everything.
📌 These French dip sliders stay crispy and golden even after reheating – save this recipe for your next game day or busy weeknight dinner.

French Dip Sliders
Equipment
- 9×13-inch baking dish
- Small saucepan
- Pastry brush
- Sharp serrated knife
Ingredients
For the Sliders
- 1 package (12-count) Hawaiian sweet rolls
- 1/2 pound thinly sliced roast beef
- 6 slices provolone cheese
- 4 tablespoons salted butter, melted
- 1 teaspoon Worcestershire sauce
- 1/2 teaspoon garlic powder
- 1/2 teaspoon onion powder
- 1/4 teaspoon Creole seasoning
For the Au Jus
- 1 cup low-sodium beef broth
- 1 tablespoon Worcestershire sauce
- 1 teaspoon soy sauce or tamari
- 1/2 teaspoon dried thyme
Instructions
- Preheat oven to 350°F. Slice the slab of Hawaiian rolls horizontally through the middle to create a top and bottom half.
- Place the bottom half in a 9×13 baking dish, cut side up. Toast in the oven for 5 minutes, until lightly golden and dry to the touch. This prevents sogginess.
- Remove from oven. Layer provolone slices evenly over the toasted bottom rolls.
- Drape roast beef slices evenly over the cheese.
- Place the top half of the rolls on, cut side down.
- In a small bowl, mix melted butter, 1 teaspoon Worcestershire, garlic powder, onion powder, and Creole seasoning. Brush generously over the top rolls, including edges.
- Bake for 10 minutes until cheese is melted and tops are deeply golden.
- Meanwhile, in a small saucepan, combine beef broth, 1 tablespoon Worcestershire, soy sauce, and thyme. Simmer over medium heat for 8–10 minutes until reduced by about a quarter. Taste and adjust.
- Let sliders rest for 2–3 minutes, then cut into individual sliders with a sharp serrated knife. Serve with warm au jus for dipping.